Chapter 1: Learning the Interface
In an effort to become familiar with the look and feel of Windows Server 2019, in this chapter, you will learn how to navigate through some daily tasks using the graphical interface.
Windows 8 and Server 2012 brought us a drastic change in the way that we interfaced with the Windows operating system, and most of us didn't think that change was for the better. By now, I assume you have seen, used, and are hopefully deploying Windows 10 on your client computers, which brings some relief with regard to the user interface. With Windows 10, we have kind of a mix between Windows 7 and Windows 8, and it fits the needs of most people in a better way. Just like the last couple of rollouts of the Microsoft Windows operating systems, the Server platform follows on the heels of the Desktop version. Beginning with Windows Server 2016 Microsoft, went back to the basics and returned with the look and feel of Windows 10. Thankfully, Windows Server 2019 keeps this interface.
If you have been using Windows 10, you already have a good head start if you wish to successfully interface with Windows Server 2019. However, if you are still using older equipment and haven't had a chance to really dive into the latest and greatest operating systems, these big changes in the way that we interact with our servers can be a big stumbling block to successfully utilizing the new tools. Many differences exist when comparing Server 2019 to something like Server 2008, and when you are working within three levels of Remote Desktop Protocol (RDP), bouncing from one server to another, all of these little differences are compounded. It suddenly becomes difficult to know which server it is that you are working on or changing. Let's have a show of hands – how many of you have mistakenly rebooted the wrong server? Or, even more likely, how many of you have rebooted your own computer while you were trying to reboot a remote server? I know I have! And not just once.
Hope is not lost! I promise you that once you learn how to manage the interface rather than letting it manage you, some of these changes may start to seem like good ideas. They can increase productivity and help make accomplishing tasks easy – we just need some pointers on making the best use of the new interface.
We're also going to start making use of PowerShell to do a lot of administrative tasks. First introduced in 2006, PowerShell is Microsoft's command-line interface and it's one of the ways Microsoft really wants new administrators like yourself to work. After 13 years of constant development and work, PowerShell is an excellent tool for managing Windows. But if you really love your mouse and GUI, then don't fret – we're going to include both methods where possible!
The recipes in this chapter are dedicated to helping you find your way around the basic Windows Server 2019 interfaces. Let's work together to gain a better understanding of why the interface was built the way it is and learn to take advantage of these new screens and settings.
Let's look at the list of recipes in this chapter:
- Shutting down or restarting the server
- Launching Administrative Tools
- Using WinKey + X for quick admin tasks
- Using the search function to launch applications quickly
- Managing remote servers from a single pane with Server Manager
- Using PowerShell to accomplish any function in Windows Server
- Installing a role or feature
- Administering Server 2019 from a Windows 10 machine
- Managing your servers through the Windows Admin Center
- Identifying useful keyboard shortcuts in Server 2019
- Setting up your PowerShell execution policy
- Building and executing your first PowerShell script
- Searching for PowerShell cmdlets with
Get-Help
Shutting down or restarting the server
I just couldn't resist starting with this one. Yes, this seems trivial. Silly even. However, the number of times that I have watched a simple server restart consume more mouse clicks than creating a domain controller has convinced me that this needed to be in this book. Perhaps the shutdown and restart options were hidden away purposefully, because once your system is up and running, there is not often a need to accomplish either of these tasks. When first configuring the box, though, it is very common to have to reboot a couple of times or shut down a machine to move it to another location. Let's face it, it doesn't seem to matter how many years computers have been around – sometimes, the magical reboot process is still the fix.
Getting ready
To complete this recipe, you will need a Windows Server 2019 system online. There are no other prerequisites.
How to do it…
Let's take a look at three different ways to shut down or restart your system. The first is going to be the most commonly employed. The second is still being used by quite a few folks who had to work hard at getting this strange location in their heads during the Windows 8 rollout, and they have continued to use it from that point forward. The third is less commonly known but is by far my favorite when tasked with restarting a remote server.
Using the Start menu
The first option, thankfully, is in a location that makes sense to anyone using Windows 10. We can simply click on the Start button, and see right there, near the bottom, that we have Power control options available to us:
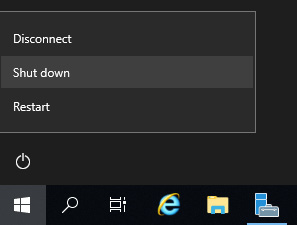
Figure 1.1 – Power control options in the Start menu
Now, when you click on Shut down or Restart, you will be asked to supply a reason why you are restarting. Common sense tells us that if you are manually clicking on the Restart button, there is a pretty good chance you are actually intending to restart the server, right? A planned occurrence? But what is the default option that presents itself? Other (Unplanned). Alas, this default option is certainly going to cause us log files full of unplanned restarts, even though all of those restarts were actually planned. Because let's be real – nobody takes the time to change that drop-down menu before they click Continue:

Figure 1.2 – Shut down/Restart prompt, asking users to choose a reason for shutting down or restarting
The second method to accomplish shutting down or restarting is by right-clicking on the Start button. We will discuss this little menu that is presented when right-clicking on Start in our next recipe, but for the sake of a quick shutdown or restart, you can simply right-click on the Start button and then choose Shut down or sign out:
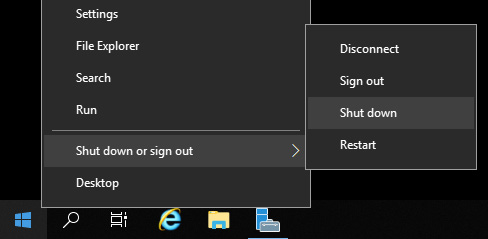
Figure 1.3 – The shutdown or sign out prompt in the Start menu
These two examples run the risk of rebooting the wrong system. Depending on how many layers of remote connections, such as RDP, you are using, it is fairly easy to reboot your own computer or the wrong server instead of the server you intended to reboot. This is because it is fairly easy to click on the Start button of a different system than the one you intended in the first place. One of the most fool-proof ways of restarting your server is at the Command Prompt. Doing this gives you the opportunity to double-check that you are manipulating the correct machine.
Using the Command Prompt
Open a Command Prompt (make sure you are selecting Run as Administrator) and run a quick hostname check to make sure you are restarting the one you really intend to. Then, utilize the shutdown command to take care of the rest. This process can be especially helpful when you're logged into remote servers using RDP. Use the following commands to perform the explained operations:
hostname
shutdown /r /t 0
If you were to simply type shutdown, the server would shut itself down in 60 seconds. Using /r indicates a restart rather than a shutdown, while /t 0 is a timing flag that indicates the number of seconds the server should wait before restarting. Specifying zero here tells it to wait for zero seconds before initiating the restart.
Using Windows PowerShell
The Command Prompt is very 2003. As mentioned in the introduction, we're going to start doing things the PowerShell way. So, instead of opening a Command Prompt, we'll open PowerShell instead (you will need to right-click on PowerShell in the Start menu and choose Run as Administrator). Then, run these commands:
hostname
Restart-Computer
As you can see, the first line, hostname, is the same as it was in our Command Prompt from before. That's because almost any command that works in the Command Prompt also works in PowerShell. However, our second command is different. Restart-Computer is a PowerShell command that does the same thing as shutdown /r /t 0 but is much easier to remember. As a bonus, you can also restart other servers without having to log onto them at all with that command using the -ComputerName parameter:
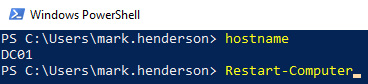
Figure 1.4 – An example of the output of using the hostname command in Windows PowerShell
Windows also has a Stop-Computer command, which you can use if you wish to shut down a server instead of restarting it – but be aware that once the machine is shut down, you will be unable to use PowerShell to start it back up!
Tip
PowerShell has a feature called "tab completion". If you write the first few letters of a command and then press tab on your keyboard, PowerShell will try to finish the command for you. Try just typing the letters "Restart" and press tab. PowerShell should auto-complete this to Restart-Computer for you.
How it works…
Shutting down or restarting a server doesn't require a lot of explanation, but I hope that this small recipe has got you thinking about creative ways to perform regular tasks. As you will see throughout this book, you can accomplish anything in Windows Server 2019 through the use of commands, scripts, and PowerShell. You could easily turn the Restart-Computer command, which we explored in the last example that we tested in this recipe, into a script file, and place it on the desktop of each of your servers as a quick double-click option for accomplishing this task.
However, I work with RDP windows inside RDP windows very often. When bouncing around between a dozen servers that all have the same background image, I found that the only sure-fire way to make sure you are restarting the correct device is to do a quick hostname check before you initiate the restart. If you are interested in discovering all of the available flags that are available in PowerShell for restarting your server, make sure to type in Get-Help Restart-Computer sometime to take a look at all of the available options. We'll look at this in more detil in the Searching for PowerShell cmdlets with Get-Help recipe.
Tip
Using PowerShell is also an easy way to log off a server. Let's say you are layers-deep in RDP and want to log off from a single server (not all of them). Are you sure you clicked on the Start button of the right server? Instead, open PowerShell and simply type logoff.
Launching Administrative Tools
Earlier versions of Windows Server placed all of the Administrative Tools in a self-named folder right inside the Start menu. This was always a quick and easy place to visit in order to see all of the Administrative Tools installed on a particular server. This location for the tools disappeared as of Server 2012 because of the infamous Start Screen. I am glad to say that a more traditional-looking Start menu returned in Windows Server 2016 and has stayed in 2019. Once again, this is a link to Windows Administrative Tools. However, as you also know, there is this thing called Server Manager (and later, we'll learn about the new Admin Center), which loves to present itself every time that you log into a server. Since Server Manager is already on your screen most of the time anyway, it is actually the fastest way to launch the Administrative Tools that you need to utilize so often. Let's take a look at launching your commonly used infrastructure tools right from inside the Server Manager interface.
Getting ready
All you really need is a Windows Server 2019 machine online. The more roles and services that you have running on it, the more options that you will see on your screen as we navigate these menus.
How to do it…
To launch Administrative Tools from your Desktop, perform the following steps:
- Open up Server Manager. In fact, if you just logged into the server, it's probably already open for you.
- You will probably see a message that tells you about the Windows Admin Center. Feel free to check the box that says "Don't remind me again" and close that window. We'll look at the Windows Admin Center in more detail in the Managing your servers through the Windows Admin Center recipe.
- Click on Tools in the upper-right corner.
There you go – a full list of all Administrative Tools installed on that server. Heading into this list is also a quick way of taking a look into what a particular server is doing, which you can take an educated guess at based on what roles and services are installed. Your server may not look exactly like the one shown in the following screenshot – this screenshot was taken before any roles and services had been installed. It is important to note that your server may also be running components that do not show up in this list. For example, if you install a role via PowerShell and do not enter the parameter to also install the management tools for that role, it is possible that you could have a server where the role is up and running, but the management tools simply have not been installed. In that case, those tools would not show up in this list:
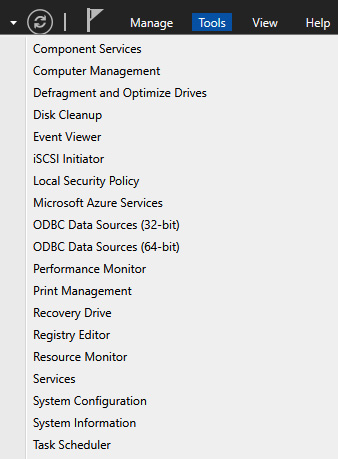
Figure 1.5 – Administrative Tools tab in Server Manager
How it works…
Since Server Manager likes to open automatically when we've logged in, let's make quick use of it to open the tools that we need to do our jobs. Another way to have easy access to your tools from the desktop is to create shortcuts or to pin each of them to your taskbar. Sometimes, this isn't as easy as it sounds. In the past, these tools were all grouped together in the Administrative Tools folder, so you didn't have any reason to memorize the exact names of the tools. While you can access them that way again in Server 2019, that folder may or may not appear inside the Start menu, depending on how the server is configured, because it appears as one of the live tiles. If you click on the Start button, you can try using the search function to find the tool you are looking for, but its name may not immediately come to you. If you're a consultant working on someone else's server, you may not want to pin anything to their desktop anyway. I like to stick with launching Administrative Tools from Server Manager since it always exists, and the tools will always be available inside that menu.
Using WinKey + X for quick admin tasks
There are some functions in Windows that a server administrator needs to use all the time. Instead of making shortcuts or pinning them all to the taskbar, let's get to know this hidden menu, which is extremely useful for launching these commonly used admin tools.
Getting ready
A running Windows Server 2019 machine is all we need to highlight this one. In fact, this menu also exists on any Windows 10 computer, so make use of it often!
How to do it…
There are two ways to open this little menu. While you are in the Server 2019 desktop, you can perform either of these steps:
- Hold down your Windows key (WinKey) on the keyboard and press X.
- Hover your mouse over the Windows flag in the lower-left corner of the Desktop – over the Start button. When you right-click on that button, you will see a menu, as shown in the following screenshot:
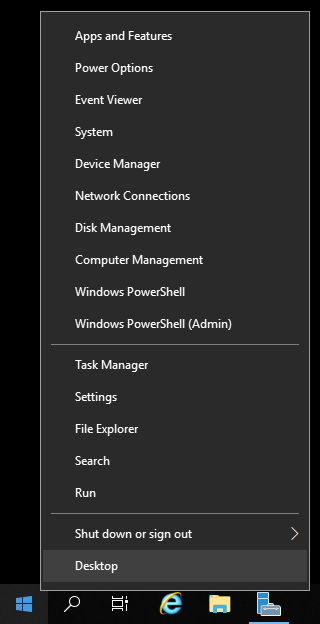
Figure 1.6 – The right-click menu for the Windows Start button
How it works…
This little quick-tasks admin menu is very easy to open and is very convenient for launching programs and settings that are accessed often. I won't talk too much about what particulars are in the menu as it's pretty self-explanatory, but I use this menu multiple times per day to open up the System properties and PowerShell, as it has an option to open an administrative PowerShell prompt right from the menu.
Tip
Look at that, you can also shut down the server from here!
Using the search function to launch applications quickly
Windows 10, and therefore Windows Server 2019, have moved back to a more traditional Start menu. Ever since Windows 7 was released, I have been using the Start menu for one critical function in my daily workflow: searching. Let's explore the search capabilities of Server 2019, which can be accessed with a single press of a button.
Getting ready
For this recipe, you will need a Windows Server 2019 system online.
How to do it…
There are two ways to search inside Server 2019, but they both do exactly the same thing. One is to click on the little magnifying glass next to the Start button, while the other one is to just click the Start button itself. The only difference is that the magnifying glass brings up the search box automatically, while with the Start button, you have to start typing first:
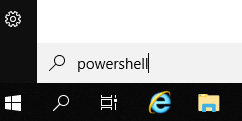
Figure 1.7 – Using search to open PowerShell on the taskbar
You can see here that I've started searching for the PowerShell prompt. It's not immediately obvious, but I have just pressed the Start button and just typed in the word powershell. That's it. I didn't click on anything or move my mouse. I just pressed the Start button on my keyboard and then typed in the word.
Search results are presented at the top of that screen, and you can choose what you are looking for accordingly. This is a quick, easy search. I employ this method of opening applications all day, every day. This way, I don't have to pin anything to the task bar, I don't have to create any shortcuts, and, most importantly, I don't have to use my mouse in order to launch applications:
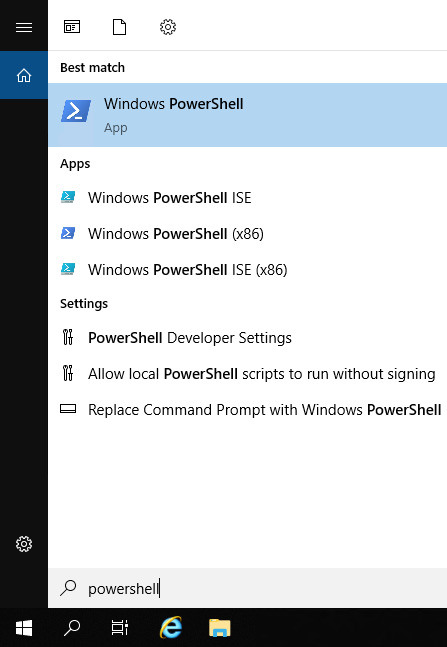
Figure 1.8 – Using the Start menu search feature to open PowerShell
How it works…
From the Start menu, we can search for anything on the server. This gives us the ability to quickly find and launch any program or application that we have installed. This includes Administrative Tools. Rather than moving into Server Manager in order to launch your administrative consoles from the Tools menu, you can also search for them using the Search menu and launch them from there. It also gives us the ability to find files or documents by name. Another powerful way to use the search function in Windows Server 2019 is to open any kind of setting that you might want to change. In previous versions of Windows, you had to either memorize the way to get into the settings that you wanted to change or you had to open up the Control Panel, where you had to poke and prod your way around until you stumbled upon the one that you were looking for. Now, it is a very simple matter of pressing the Windows key, typing the first few characters of the setting or program you want to launch, and pressing Enter.
Another common task to perform from the Search screen is to right-click on the application that you are trying to launch and pin it somewhere. When you right-click on a program from the Search screen, you will see the option to pin the program to either your Start menu or to the taskbar. This will create a quick-launch shortcut on either the main Start menu or on the taskbar of the Desktop mode, giving you easier and faster access to launch those applications in the future.
Managing remote servers from a single pane with Server Manager
If you've used a much older version of Windows Server (say, Server 2003), you may have noticed that Server Manager has changed significantly over the past couple of versions of Windows Server. Part of these changes are a shift in mindset, where the emphasis is now placed on the remote management of servers. Server Manager in Windows Server 2019 can be used to manage and administer multiple systems at the same time, all from your single pane of glass – the monitor that you are sitting in front of.
Server Manager makes use of the Windows Remote Management (WinRM) tools to remotely manipulate servers. Historically, most of us who administer Windows Servers make extensive use of RDP, often having many windows and connections open simultaneously. This can cause confusion and can lead to tasks being accomplished on servers for which they are not intended. By using Server Manager from a single machine to manage multiple servers in your network, you will increase your administrative efficiency, as well as minimize human error by having all the management processes happen from a single pane of glass. In this recipe, you are going to learn how to manage both the local server we are logged into as well as a remote server from the same Server Manager window.
Getting ready
For this recipe, we need two servers. One is the machine we are physically logged into. The other is a server on the same network that we can contact from our primary server so that we can manage it from our local Server Manager.
How to do it…
To manage a local as well as a remote server from the same Server Manager window, perform the following steps:
- Log in to your primary server and launch Server Manager. You will see in the upper-left corner that the only server you have listed is the Local Server that we are logged into:
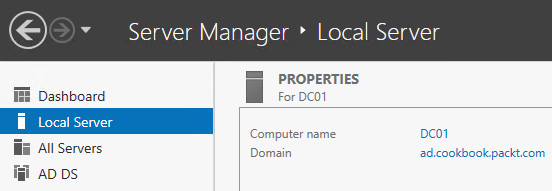
Figure 1.9 – Local Server open on Server Manager
- Now, head over toward the top-right of Server Manager and click on the Manage button. In this menu, click on Add Servers:
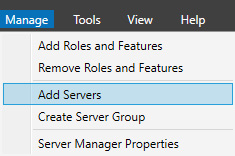
Figure 1.10 – Using Add Servers in Server Manager
- If your servers are part of a domain, finding remote machines to manage is very easy. Simply select them from the default Active Directory tab. If they are not yet joined to your domain, you can simply click over to the tab labeled DNS and search for them from that screen:
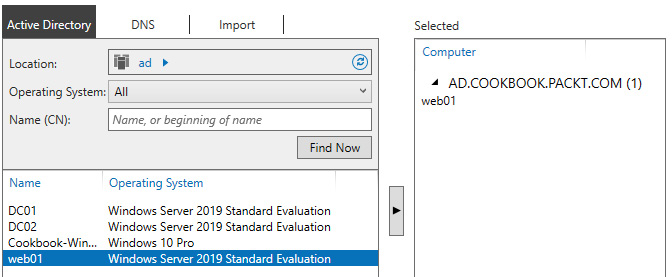
Figure 1.11 – Finding and attaching remote machines using Active Directory
- After adding the servers that you want to manage, if you go ahead and click on All Servers in the left window pane, you will see the additional servers listed that you have selected. If you double-click or right-click on those remote server names, you will see that you have many options available to you to remotely manage those machines without having to log into them:
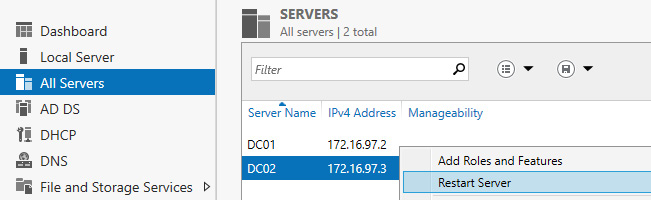
Figure 1.12 – Using All Servers to manage servers
Tip
Not all servers and roles can be managed this way. It is possible to restrict remote management on servers through Group Policy. If that has been done in your environment, you may find that remotely administering them from a centralized console is not possible, and you would have to lift those restrictions on your servers.
How it works…
This recipe was written with the most common network scenario in mind, which is a domain environment where both servers have been joined to the domain. If you are working with standalone servers that are part of a workgroup, rather than being joined to a domain, you will have some additional considerations. In the workgroup scenario, WinRM will need to be enabled specifically, and the Windows Firewall will have to be adjusted in order to allow the right ports and protocols for that WinRM traffic flow to happen successfully. In general, though, you mainly will be working within a Microsoft domain network, in which case these items are not necessary.
See also
- Administering Server 2019 from a Windows 10 machine
Using PowerShell to accomplish any function in Windows Server
As you may have seen earlier in this chapter, an incredibly powerful tool in Windows Server 2019 is PowerShell. Think of PowerShell as a Command Prompt on steroids. It is a command-line interface from which you can manipulate almost anything inside Windows. Better yet, any task that you may wish to accomplish can be scripted out in PowerShell and saved as a .ps1 script file so that you can automate large tasks and schedule them for later or at regular intervals. In this recipe, we'll open up PowerShell and run some sample commands and tasks just to get a quick feel for the interface. In most subsequent chapters of this book, we will do some more specific tasks with PowerShell to go even deeper into the technology.
Getting ready
To start using PowerShell, all you need is a server with Windows Server 2019 installed. PowerShell is installed and enabled by default.
How to do it…
To get a feel for using PowerShell, perform the following steps:
- Our first step to working in PowerShell is finding it. Thankfully, Microsoft has begun the process of phasing out the Command Prompt and PowerShell is now accessible in more places than ever before. The most common methods are pressing WinKey + X and choosing Windows PowerShell (Admin), or typing
PowerShellinto the Start menu, right-clicking it, and choosing Run as administrator: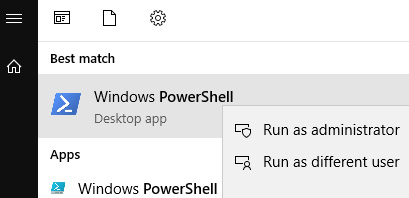
Figure 1.13 – Searching in the Start menu for PowerShell
- Test out some commands that you are familiar with from using the Command Prompt, such as
dirandcls. These still work! Since you are able to make use of these familiar commands, PowerShell can really be your one and only command-line interface. - Now, let's try some of PowerShell's secret sauce; that is, one of its cmdlets. These are special commands that are built into Windows and allow us to do all kinds of information gathering, as well as manipulate server components. We will be using many of these commands later on. Let's start by pulling some data. Maybe take a look at what IP addresses are on the system with
Get-NetIPAddress:
Figure 1.14 – Using Get-NetIPAddress to look at IP addresses on a system
- The previous command probably gave you a lot more information than you needed, since a lot of companies don't make use of IPv6 inside their network yet. Let's whittle this information down to the IPv4-specific information that you are most likely interested in. Enter
Get-NetIPAddress -AddressFamily IPv4to attain it: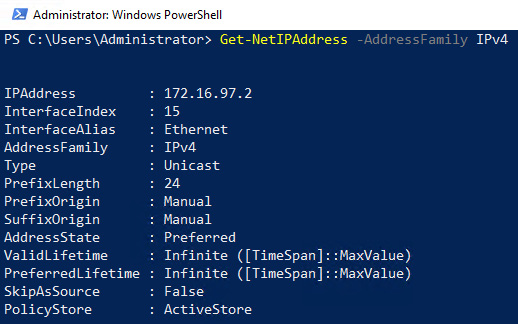
Figure 1.15 – Refining your IP address search using –AddressFamily IPv4
- That's more useful! But if you have a lot of data, this would be very difficult to read. PowerShell supports what's called "pipelining" of requests. This means that the output of one command can be directly sent into a second command. PowerShell comes with commands for making output more human readable, and we can use them with pipelining. One very useful command that I use every day is
Format-Table. TypeGet-NetIPAddress | Format-Tableinto PowerShell:
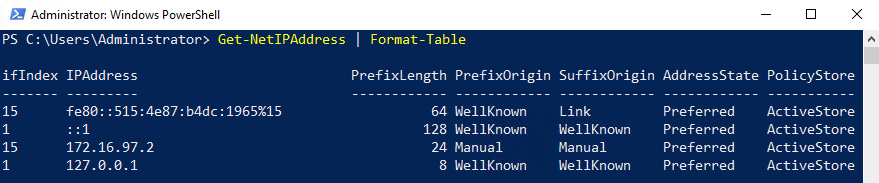
Figure 1.16 – Using Format-Table to organize an output
Tip
PowerShell has a lot of shorthand aliases, which makes typing out commands much easier. For example, you can just use ft instead of typing out all of Format-Table. You can get a list of aliases by running Get-Alias.
How it works…
We just got a feel for some of the many PowerShell commands and cmdlets by launching the program and pulling some data with this particular recipe. There are thousands of Get commands that can be used to query information from the server and, as you have seen, those cmdlets have various parameters that can be appended to the cmdlets to pull more specific data to meet your needs. To make things even better, it also gives us Set cmdlets, which will allow us to make use of the PowerShell prompt to configure many aspects of the configuration on our server, as well as remote servers. Almost every recipe in this book from here on will also show you how to do what we'll be covering in PowerShell.
Installing a role or feature
If you've got this far, you have a working Windows Server 2019 operating system. Great! Now what? Without adding roles and features to your server, it just makes for a great paperweight. We're going to take the next steps here together. Let's install a role and a feature into Windows so that we can start making this server work for us.
Getting ready
As long as you have Windows Server 2019 installed and running, you are ready to install roles and features onto that machine.
How to do it…
To install a role and a feature into Windows, perform the following steps:
- Open Server Manager. In the middle of the screen, you'll see a link that says Add roles and features. Click on that link:
Figure 1.17 – Server Manager showing the Add roles and features link
- Click Next on the first summary screen. You will come to a choice on the second page. For most roles and features, we want to leave it set at the top bullet, which is Role-based or feature-based installation. If we were configuring Remote Desktop Services, which we will discuss in Chapter 7, Remote Desktop Services then we would choose the second option:
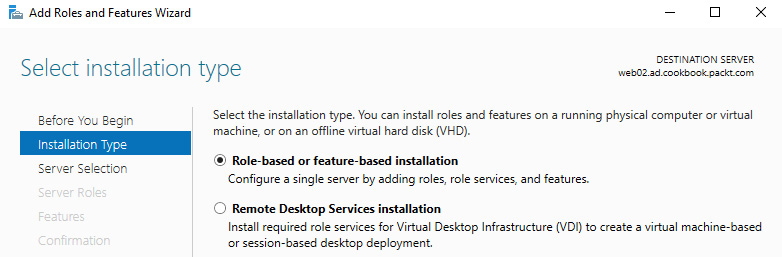
Figure 1.18 – Selecting the installation type
- Now, we choose where we want to install a new role or feature. This is a neat page as we can choose from any server that we have added to our Server Manager, or we can even choose to install a role or feature into a virtual hard disk. I am running the Add Roles Wizard from DC01, but I want to install the IIS role onto WEB01. Rather than having to log into WEB01 to accomplish this task, I will do it right from here. In the following screenshot, you can see WEB01 listed as a server that I can install a role onto, even though I am opening this console on the DC01 server:
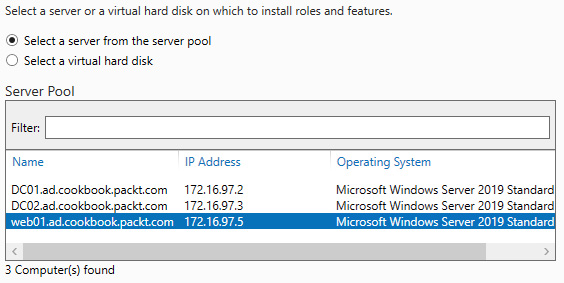
Figure 1.19 – Selecting a server
- Scroll down and choose the role that you want to install. For WEB01, I am choosing the Web Server (IIS) role. Then, click Next.
Tip
You can install more than one role or feature at a time. Some roles require additional components to be installed for them to work properly. For example, when I chose to install the IIS role and clicked Next, I was prompted to install some management tools. Simply click on the Add Features button to automatically add the items that it needs to operate correctly.
- Now, choose any features that you would like to install. For example, in order to do some network connectivity testing later, go ahead and select Telnet Client from the list.
- Read and click Next through the informational messages that are displayed. These messages will vary, depending on which roles and features you have installed.
- The final screen is your installation summary. If everything looks correct, go ahead and click on Install.
After your roles and features have finished installing, the server may or may not have to reboot. This depends on whether or not the role installation requires it. Following installation, or following the reboot, if your new role needs any additional configuration or setting up to be completed, you will be notified at the top of the Server Manager screen:
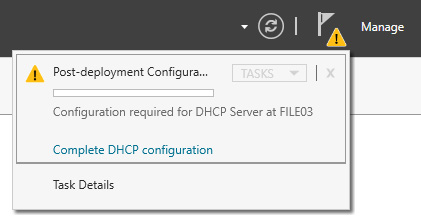
Figure 1.20 – The post-deployment configuration alert
As mentioned in the previous recipes, I'm going to show you how to do the exact same task via PowerShell. In this case, we're going to install IIS and the Telnet Client on the same web01 server, even though I am running this PowerShell from the DC01 server:
Install-WindowsFeature -Name Web-Server, Telnet-Client -ComputerName web01 -IncludeManagementTools
This command installs the IIS role and the Telnet Client onto the web01 server. If you wish to check if these roles are installed on a server, you could also run the following command:
Get-WindowsFeature -Name Web-*, Telnet-Client -ComputerName web01 | Where-Object Installed
As you can see, it's a lot less clicking, and you only need to memorize two very small, simple commands (Get-WindowsFeature and Install-WindowsFeature):
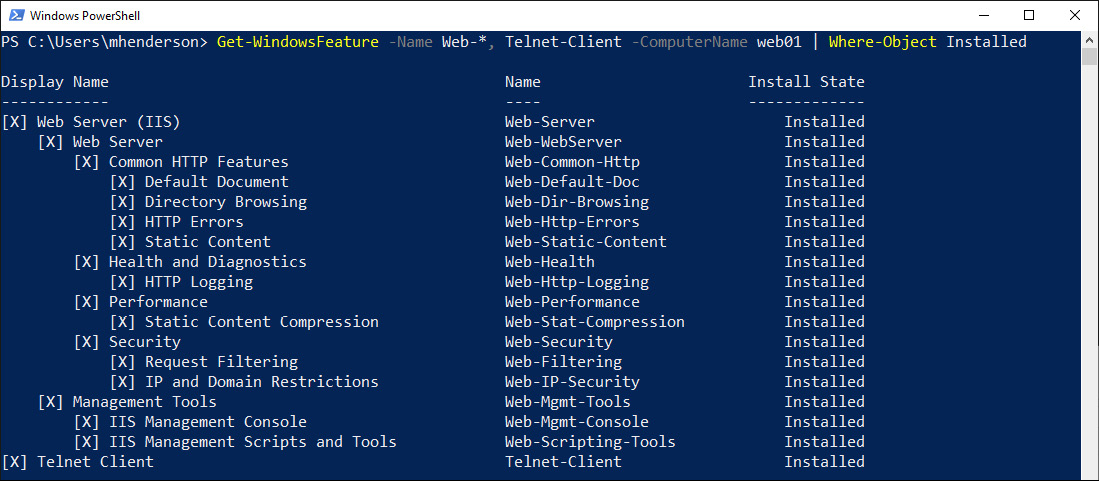
Figure 1.21 – Using Get-WindowsFeature in PowerShell
How it works…
Adding roles and features to a Windows Server is something that every administrator will have to do sooner or later. These items are necessary to turn on the functions in the server that will perform tasks that need to be performed in your environment. Adding roles is quite straightforward, whether you do it via the Server Manager or via PowerShell. However, it is interesting to see the options that are available to add more than one role or feature at a time. Moreover, the ability to remotely install these items for servers in your network that you are not logged into is incredibly useful.
Administering Server 2019 from a Windows 10 machine
In the Managing remote servers from a single pane with Server Manager recipe, we discussed remotely administering another server by using Server Manager. We also did the same task via PowerShell. Did you know we can accomplish the same remote management (including using PowerShell) by using our day-to-day Windows 10 computer? We will install and use the Remote Server Administration Tools (RSAT) to take even more advantage of Server 2019's remote management ideology. It's worth noting, however, that although having the RSAT tools installed locally is very useful and highly recommended, Microsoft is in the process of retiring Server Manager and some of the RSAT tools – many of them have been around since Windows 2000! We will look at this new tooling more in the following Managing your servers through the Windows Admin Center recipe.
Getting ready
To test out these RSAT tools, we will need a Windows 10 client machine that is connected to the internet. We will also need a Windows Server 2019 system online on the same network that we can remotely control and manage.
How to do it…
To remotely manage a server using RSAT, follow these instructions:
- First, we need to download and install the RSAT tools. Prior to October 2018, the RSAT tools had to be downloaded from the Microsoft website. Thankfully, now, there's a simpler way: Click Start and type Manage Optional Settings. Once you are on the Manage Optional Settings screen, click Add A Feature. In the feature list, you will see a list of tools beginning with RSAT. Which precise set of tools you require will depend on what roles you need to manage. For now, we'll install Server Manager. You will want to install the RSAT tools for any relevant Windows features you intend on using:
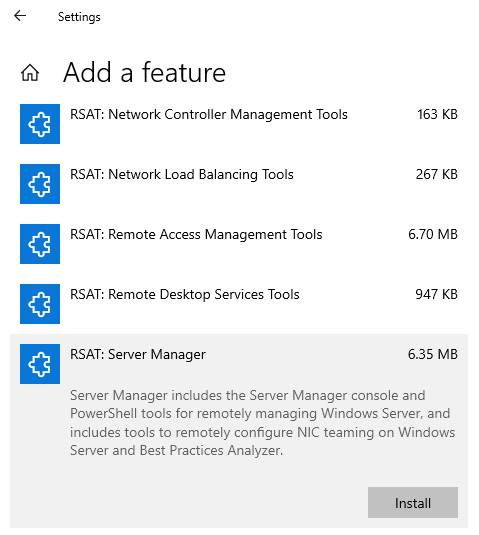
Figure 1.22 – Installing RSAT – Server Manager
- Once the server manager has been installed, launch it from the Start menu. For this recipe, I have the machines we are working with joined to a domain, so we will take a look at adding servers that are part of the domain. Click the Manage menu, then Add Servers. This is the same step we undertook in the Managing remote servers from a single pane with Server Manager recipe.
- Click on the Find Now button. You will see a list of server names that are remotely manageable:
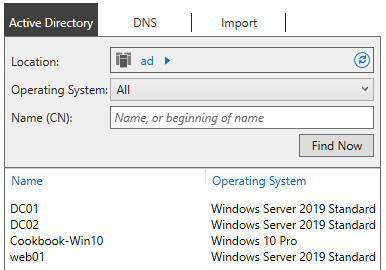
Figure 1.23 – Searching for a server through Active Directory
- Click on the server names that you want to administer and click on the arrow to move them over to the right-hand side of the screen. Upon clicking on OK, you will see these new servers listed and ready for management inside your Server Manager console:
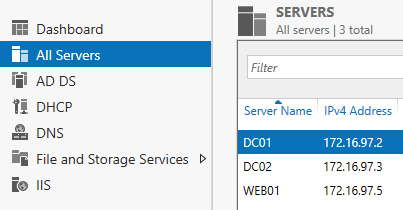
Figure 1.24 – Server DC01 highlighted in the All Servers tab
How it works…
Server Manager in Windows Server 2019 is a powerful tool that can be used for the management of not only the local server but also remote servers that you want to manage. If we take this even a step further and install the RSAT tools on a Windows 10 computer, this gives us the ability to launch and use Server Manager from our everyday Windows 10 computer. In doing so, we enable ourselves to add roles, view events, and restart servers, all from our own desk. Managing servers using these tools will increase productivity and decrease errors because your entire infrastructure of servers can be available within a single window. This is much more efficient than using the RDP client to connect to many different servers, all in different windows. If you've never tried using RSAT to manage servers, give it a try!
See also
- Managing remote servers from a single pane with Server Manager
- Managing your servers through the Windows Admin Center
Managing your servers through the Windows Admin Center
You may have noticed that every time you open Server Manager, you see a little prompt telling you about the new Windows Admin Center. Microsoft are pushing this new Admin Center as their replacement for Server Manager and their traditional RSAT tools that we just installed. The Windows Admin Center does not cover all aspects of Windows Server management, which is why we still need the old tools; however, some new Windows Server features are only accessible via the Windows Admin Center. As a bonus, if you deploy the Windows Admin Center on its own server, you may be able to make it available to everyone and not just yourself. The Windows Admin Center is a web-based replacement for the Server Administrator and a complimentary tool to many of the RSAT components.
Getting ready
To test out the Windows Admin Center, we will need a Windows 10 client machine. We will also need a Windows Server 2019 system online on the same network that we can remotely control and manage.
How to do it…
- The Windows Admin Center does not ship with Windows by default, so we need to download and install it. On your Windows 10 machine, visit https://aka.ms/WACDownload – your download should start automatically. Once the download completes, install it like you would any other software. Pay close attention to the screen asking you to select a port – if you change that port, you will need to remember it. By default, it is set to
6516. Also, pay close attention to the message you receive after the install is finished!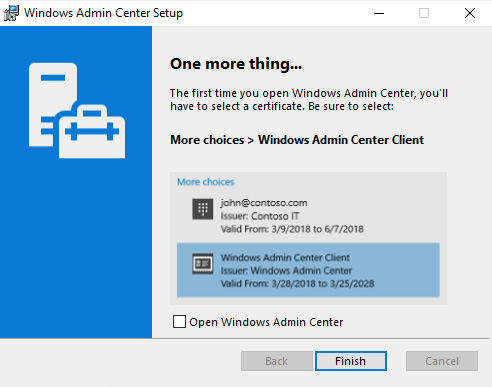
Figure 1.25 – Selecting Windows Admin Center Client in the Windows Admin Center Setup window
- Once the Windows Admin Center has installed, click on the Start menu and find Windows Admin Center. It should launch
https://localhost:6516/in your web browser. Feel free to browse the tour. - Once the Windows Admin Center has loaded, under All connections, click Add and choose Servers:
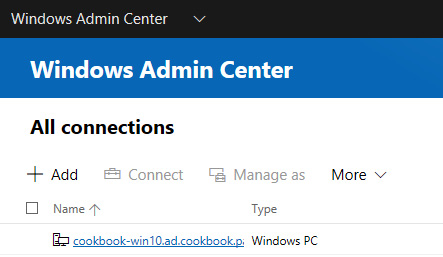
Figure 1.26 – Windows Admin Center
- Click the menu for Search Active Directory and search for *. This will show you every server in your domain. Put a checkmark next to the servers you wish to manage and click Add:
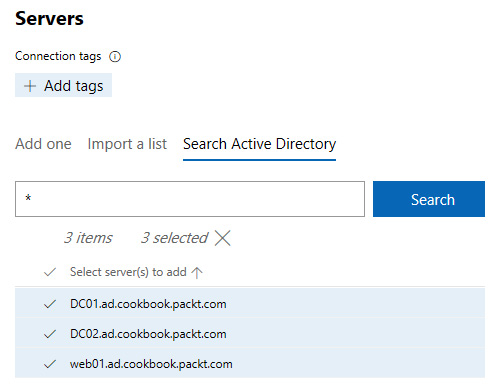
Figure 1.27 – Searching Active Directory
- Once the servers have been added, click on the hyperlink for the server you want to manage. Windows Admin Center will then connect to that server and give you a full list of things you can manage on that server:
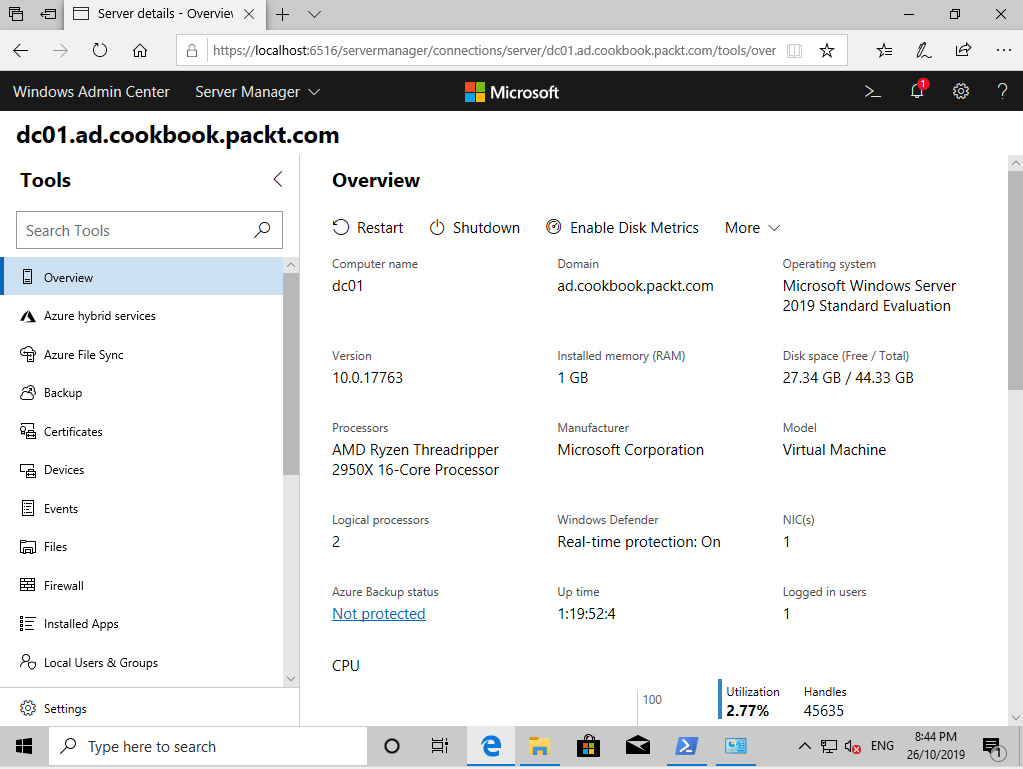
Figure 1.28 – Overview of the selected server
Tip
Instead of installing the Windows Admin Center on your own Windows 10 computer, you can install it on any server on your network, such as an existing web server. Then, you can access it over the network without having to install anything on your computer!
How it works…
The Windows Admin Center is designed to be a replacement for Server Manager and allows you to control many more aspects of the server in a single place. Take a look – you can probably manage the remote servers firewall, view its event log, manage its certificates, and connect it to hybrid Microsoft Azure cloud solutions. You can even get a remote PowerShell console if you are on a computer that doesn't have PowerShell. The Windows Admin Center is the most powerful GUI administration tool Microsoft has ever produced and does away with the need for many of the old RSAT tools. Note that Windows Admin Center is not a complete replacement for RSAT, though – in Microsoft's own words, this tool is complimentary to the existing RSAT.
The Windows Admin Center can be used to manage Windows Server 2016, 2012 R2, 2012, and 2008 R2 hosts as well (although with limited functionality in some cases).
Identifying useful keyboard shortcuts in Server 2019
I prefer using a keyboard over a mouse any day, for almost any task. There are numerous keyboard shortcuts and tips and tricks that I employ on a daily basis and I want to test them out with you in this recipe. Some of these shortcuts have been around for over 30 years and will work with multiple versions of Windows Server; some are much more recent. They will all be useful to you as you start working with servers in your network.
Getting ready
We are going to run these commands and keyboard shortcuts while logged into a Windows Server 2019 machine.
How to do it…
- Windows key: Opens the Start menu, where you can immediately start typing to search for programs.
- Windows key + X: Opens the Quick Links menu.
- Windows key + I: Opens the Windows Settings options.
- Windows key + D: Minimizes all open windows and brings you back to the desktop.
- Windows key + R: Opens the Run box. Launching applications this way is often faster than using the Start menu, if you know the executable name of the application you are trying to launch.
- Windows key + M: Minimizes all windows.
- Windows key + E: Opens File Explorer.
- Windows key + L: Locks the computer.
- Windows key + Tab: Takes you into the new Task View options.
- Window key + Ctrl + D: Creates a new virtual desktop from Task View.
- Windows key + Ctrl + F4: Closes the current virtual desktop.
- Windows key + Ctrl + Left or Right Arrow: Moves you between different virtual desktops.
- Windows key + 1 or 2 or 3 or…: Launches applications that are pinned to your taskbar, in order. So, the first application pinned to the taskbar would open with WinKey + 1, for example.
- Alt + F4: Exits the program you are currently working in. This is especially helpful in full-screen app such as those from the Windows Store where it is not always obvious how to exit the program with your mouse.
- Alt + Tab: Displays a list of open programs so you can hop between them.
- Shift + Delete: Holding down Shift while pressing Delete deletes files without placing them in the Recycle Bin.
- Using Tab inside Command Prompt or PowerShell: When you are working inside PowerShell, if you type the first letter of a command or a file or folder that exists in the directory where you are working in and then press the Tab key, it will auto-populate the rest of the command or filename. For example, you may be trying to launch a Microsoft update file with a filename that is 15 characters long and comprises a mix of numbers and letters. There's no need to type out that filename! Let's say the file starts with KB. Simply navigate to the folder where your installer exists, type in KB, and press Tab. The full filename is populated inside the prompt and you can press the Enter key to launch it. If more than one file is matched and you get the wrong one, keep pressing Tab until you get the right one.
How it works…
Keyboard shortcuts can greatly increase productivity once you are fluent with them. This is not an extensive list by any means – there are many more key combinations that you can use to launch apps, minimize and maximize windows, and do all sorts of other functions. This is a list to get you started with the most common ones that I employ often. Start using these with your daily tasks and I bet your mouse will start to feel lonely.
If you are interested in exploring more of the Windows Server 2019 key combinations available, this website is a great place to start, at http://technet.microsoft.com/en-us/library/hh831491.aspx.
Setting your PowerShell Execution Policy
As you've hopefully already seen, Windows PowerShell can be an extremely powerful tool for server management. Windows and PowerShell are fully intertwined, and PowerShell can be useful for so many tasks on your servers. However, the ability to run PowerShell scripts is disabled by default on many machines. The first stumbling block that many new PowerShell administrators bump into is the execution policy. It's quite simple: in order to allow PowerShell scripts to run on your server, the execution policy must be adjusted to allow that to happen. Let's introduce our first task in PowerShell by using some commands in this recipe that will set this policy for us.
This is also a good introduction to the idea of the verb-noun syntax that PowerShell utilizes. For example, we are going to make use of cmdlets called Get-ExecutionPolicy and Set-ExecutionPolicy. The Get and Set verbs are very common across all facets of cmdlets available in PowerShell. Wrap your mind around this verb-noun syntax and you will be well on your way to figuring out PowerShell on your machines.
Getting ready
We will be working within a PowerShell prompt on our Windows Server 2019 server.
How to do it…
Follow these steps to set the PowerShell execution policy:
- Right-click on the PowerShell icon and choose Run as administrator:

Figure 1.29 – Running PowerShell as administrator
- Type
Get-ExecutionPolicyand press Enter in order to see the current settings for the PowerShell execution policy: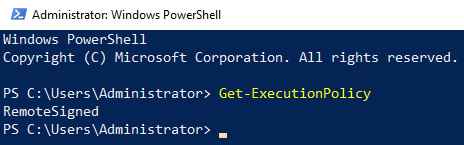
Figure 1.30 – Running Get-ExecutionPolicy
- You can see that the current execution policy is set to RemoteSigned. Here is a short description of the different options for the policy:
Remote Signed: This is the default setting in Server 2019 and allows PowerShell scripts that are locally created to run. If you try running remote scripts (for example, downloaded from the internet), they must be signed by a trusted publisher in order to execute successfully.
All Signed: With this setting, all scripts will only be allowed to run if they are signed by a trusted publisher.
Restricted: With this setting, PowerShell is locked down so that scripts will not run.
Unrestricted: This setting will allow PowerShell to run scripts with or without signing.
- For the purposes of our recipe and to make sure the scripts will run for us as we progress through these recipes, let's set our execution policy to unrestricted. Go ahead and use this command:
Set-ExecutionPolicy Unrestricted
The following is the output:
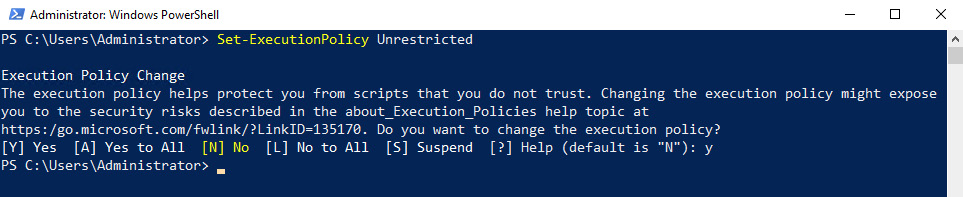
Figure 1.31 – Output of Set-ExecutionPolicy
How it works…
The PowerShell execution policy is a simple setting and easy to change, but can make a world of difference when it comes to running your first scripts. If configured to be more restrictive than you intend, you will have trouble getting your scripts to run and you may think that you have mistyped something, when in fact the issue is only the policy. On the other hand, in an effort to make your servers as secure as possible, on machines where you don't need to execute PowerShell scripts, it makes sense to restrict this access. You may also want to read some additional information on the signing of scripts to see whether creating and executing signed scripts would make more sense in your own environment. There are some in-built server functions that rely on a certain level of security with your execution policy. Setting your policy to unrestricted on all your servers could result in some functions not working properly, and you may have to increase that level of security back to remote signed.
Building and executing your first PowerShell script
PowerShell is a great interface for acquiring and configure information about our servers. Most of us are familiar with creating some simple old-fashioned batch files that are driven by the Command Prompt, essentially programming out small tasks within these batch files to automate a series of commands. This saves time later as we do not have to type out the commands line by line, especially for common tasks or for items that we need to run during login.
PowerShell has a hugely increased level of functionality in this regard, but the ability to write out multiple lines of PowerShell into a script file is the most basic of them. We can then launch this script file as we would a batch file, automating tasks while taking advantage of the additional features that PowerShell brings to the table over the Command Prompt. These PowerShell scripts are put together inside .ps1 files; let's build a simple one together to get a feel for running these scripts.
Getting ready
Our work with PowerShell today will be accomplished from a Windows Server 2019 machine. PowerShell is installed by default with Windows, and there is nothing further that we need to install.
How to do it…
Follow these steps to build and execute your first PowerShell script:
- Open the Start menu, type
Windows PowerShell ISE, and click the desktop app to open it. Do not choose the one ending in (x86) – for some reason, Windows thinks this is a good choice. It isn't. You may need to look further down your Start menu to find the correct one. Windows PowerShell ISE is an editor for PowerShell scripts that is much more useful than opening a simple text editor such as Notepad in order to build our script: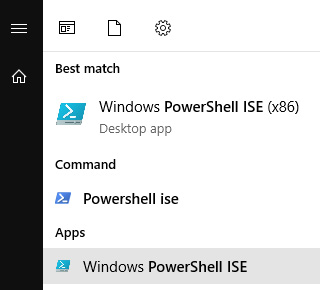
Figure 1.32 – Locating Powershell ISE in the Start menu
- Navigate to File | New from the menus in order to open a blank
.ps1script file. - In your first line, type the following:
Write-Host "Hello! Here is the current date and time:"
- From the toolbar menu, click the green arrow that says Run Script. Alternatively, you can simply press the F5 button. When you run the script, the command and output are displayed in the lower portion of the ISE window:
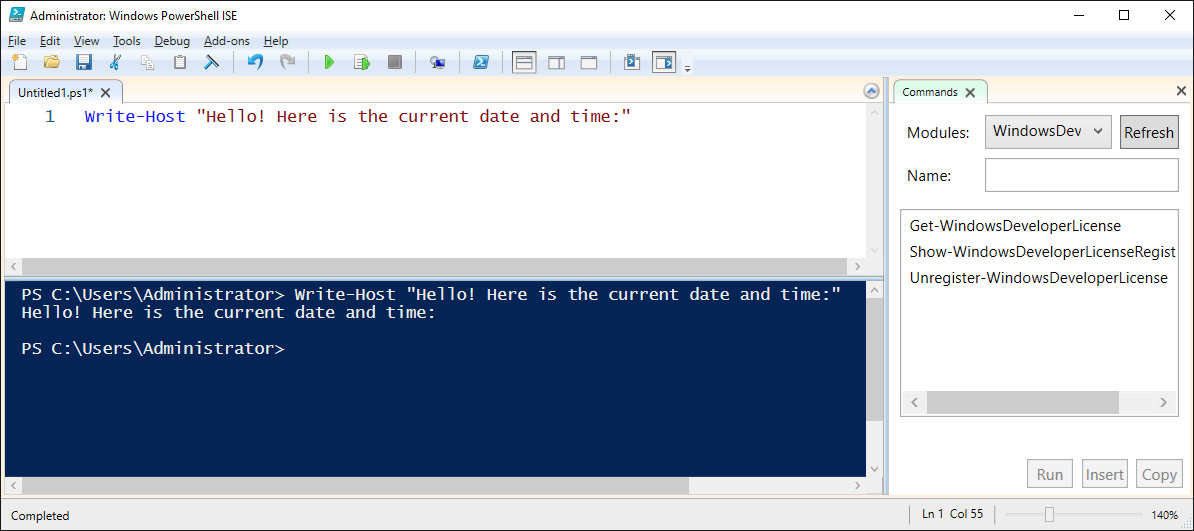
Figure 1.33 – Using Windows PowerShell ISE
Cool? Not really. So far, it's pretty lame – it's just reflecting the text that we told it to echo, but it worked. It didn't even actually tell us what the time is. But that is the nice thing about using the ISE editing tool rather than a generic text editor – you have the ability to quickly test run scripts as you make modifications.
- Now, let's add some additional lines to our script so that we get the information we are looking for. You can see a list of available commands on the right-hand side of the screen (you may have to switch your Modules to All) if you would like to browse through what is available, but for our example, simply change your script so that it includes the following:
Write-Host "Hello! Here is the current date and time: $(Get-Date)"
Write-Host "The name of your computer is: $(hostname)"
- Press the Run Script button again to see the new output:
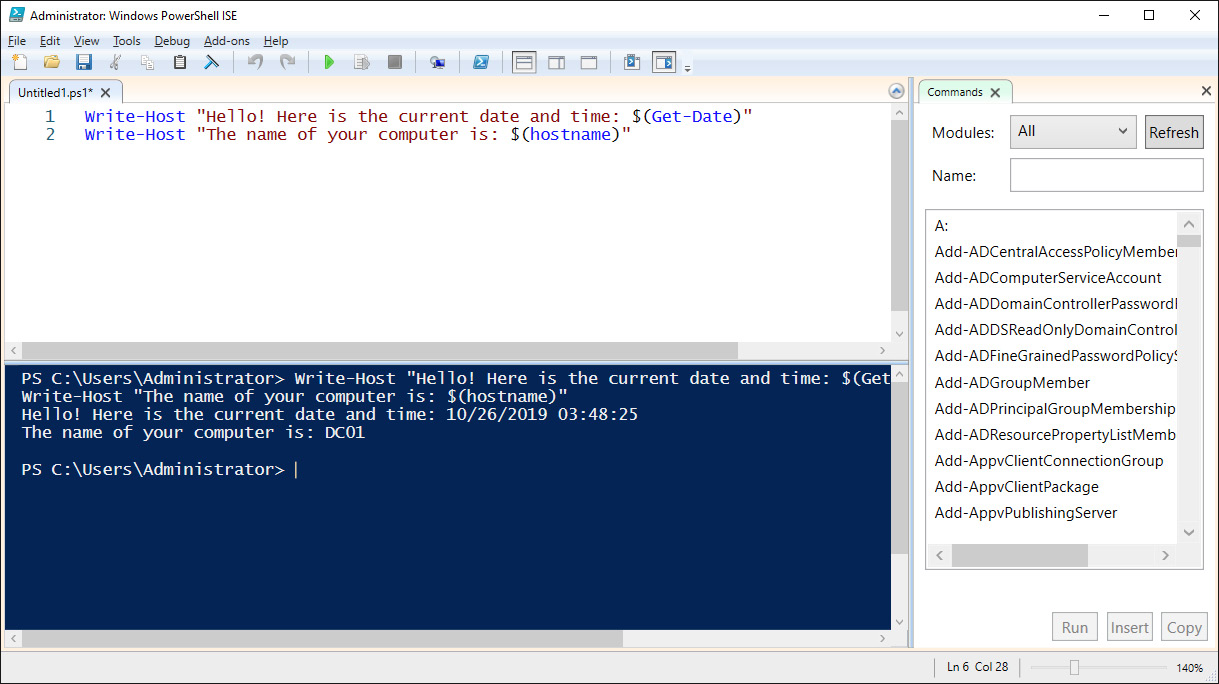
Figure 1.34 – Using Windows PowerShell ISE
- Now, navigate to File | Save and save your new
.ps1PowerShell script. - Let's test this script by launching it from within a real PowerShell command window. Go to your Start menu and run PowerShell.
- Browse to the location where you just saved your script file – you can use the old DOS cd commands for this. Then, launch the script by inputting
.\filename. In my case, I used.\GetTime.ps1.
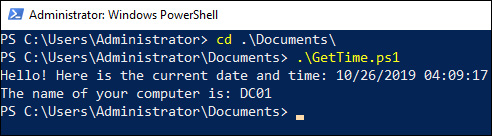
Figure 1.35 – Running the script file
Tip
The PowerShell ISE comes with Windows by default, but you can write PowerShell scripts in any code editor. Visual Studio Code is a free editor provided by Microsoft that is cross-platform and has excellent support for PowerShell scripting. I have written tens of thousands of lines of PowerShell in Visual Studio Code. Check it out on your Windows 10 machine at https://aka.ms/vscode.
How it works…
In this recipe, we created a very simple PowerShell script and saved it on our server for execution. While, in practice, getting time and date information from your server may come faster by using the standalone Get-Date cmdlet, we provided this recipe to give you a small taste of the ISE and to get your scripting juices flowing. Expanding upon the ideas presented here will start to save you valuable time and keystrokes as you identify more and more ways to automate the tasks and information gathering processes that are part of your daily routines. The possibilities of PowerShell are practically limitless, so make sure that you open it up and start becoming familiar with the interfaces and tools associated with it right away!
Tip
Windows Server 2019 comes with PowerShell 5, which only works on Windows. However, if you upgrade to PowerShell 6 or 7, these run on Linux and OSX as well – so if you wanted to, you can have PowerShell on all your servers, not just your Windows ones! Be careful, though: if you have existing scripts, some things have changed in PowerShell 6 and above, so you will want to check that they still work. With Visual Studio Code and PowerShell 6 or above, you can write and run PowerShell from Windows, Mac, or Linux.
Searching for PowerShell cmdlets with Get-Help
With this recipe, we'll spend a minute using Get-Help inside PowerShell in order to, well, get some help! I see both new and experienced PowerShell administrators going to the web a lot in order to find commands and the parameters of those commands. The internet is great, and there is a ton of data out there about how to use PowerShell, but in many cases, the information that you are looking for resides right inside PowerShell itself. By using the Get-Help cmdlet combined with the functions you are running or searching for, you might not have to open that web browser after all.
Getting ready
We will be running some commands from inside PowerShell on a Windows Server 2019 machine.
How to do it…
To use the Get-Help function inside PowerShell, run the following steps:
- Launch a PowerShell prompt.
- Type
Get-Help. - You may be asked to run
Update-Helpto download the latest help from the internet – you can do this if you wish (although it can sometimes take a while). - You're finished! No, I'm just kidding. Using
Get-Helpby itself will present you with some helpful data about theGet-Helpcommand, but that's not really what we are looking for, is it? How about usingGet-Helpwith a search parameter, like this:Get-Help Computer
The following is the output:
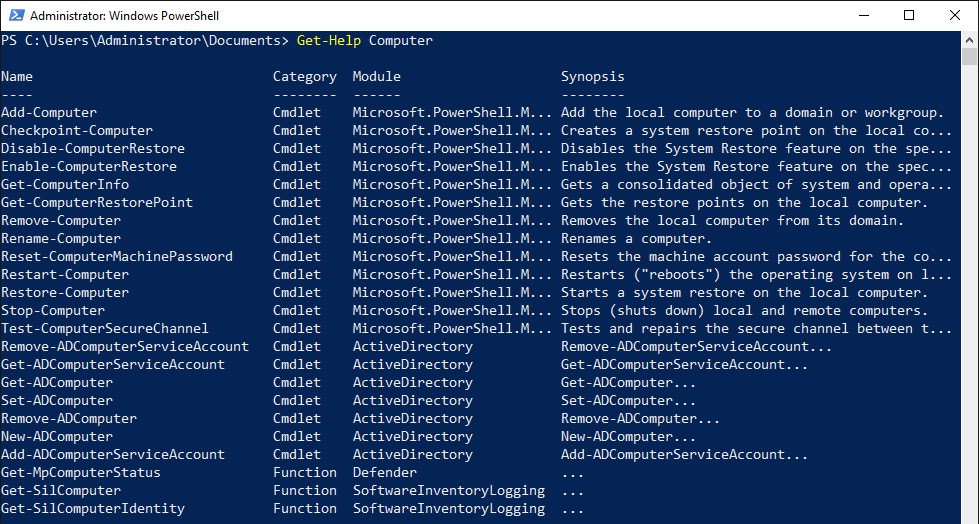
Figure 1.36 – Running Get-Help Computer
Cool! That searched the available cmdlets and presented us with a list of the ones that contain the word
Computer. - Now, what if we wanted to find out some more particular information about one of these cmdlets – maybe about
Restart-Computer, which we used earlier? Use the following command:Get-Help Restart-Computer
The following is the output:
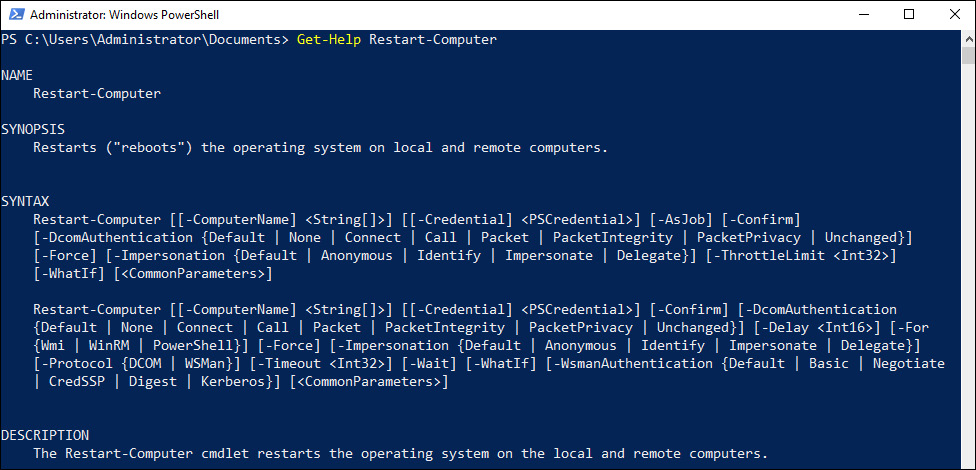
Figure 1.37 – Running Get-Help Restart-Computer
Now we're really cooking! This is wonderful information.
There are many sections of help in the Get-Help output, and you may not see them all by default. Try running Get-Help Restart-Computer -Full to see all of them! This is basically what you would find if you were looking for information about the Restart-Computer cmdlet and went searching on TechNet for it.
How it works…
The Get-Help cmdlet in PowerShell can be used with virtually any command in order to find out more information about that particular function. I often use it when the specific name of a cmdlet that I want to use escapes my memory. By using Get-Help as a search function, it will present a list of available cmdlets that include the keyword you specified. This is a brilliant function in PowerShell and is just another example of why PowerShell should replace your usage of the Command Prompt.
Also included with the Get-Help files are all the special syntax and parameter options for each cmdlet that you might be working with. This saves you having to go to the web in order to search for these functions, and it is just way more fun doing it at the command line than in a web browser.