

 Download code from GitHub
This chapter introduces the reader to the world of Hadoop and the core components of Hadoop, namely the Hadoop Distributed File System (HDFS) and MapReduce. We will start by introducing the changes and new features in the Hadoop 3 release. Particularly, we will talk about the new features of HDFS and Yet Another Resource Negotiator (YARN), and changes to client applications. Furthermore, we will also install a Hadoop cluster locally and demonstrate the new features such as erasure coding (EC) and the timeline service. As as quick note, Chapter 10, Visualizing Big Data shows you how to create a Hadoop cluster in AWS.
In a nutshell, the following topics will be covered throughout this chapter:
- HDFS
- High availability
- Intra-DataNode balancer
- EC
- Port mapping
- MapReduce
- Task-level optimization
- YARN
- Opportunistic containers
- Timeline service v.2
- Docker containerization
- Other changes
- Installation of Hadoop 3.1
- HDFS
- YARN
- EC
- Timeline service v.2
HDFS is a software-based filesystem implemented in Java and it sits on top of the native filesystem. The main concept behind HDFS is that it divides a file into blocks (typically 128 MB) instead of dealing with a file as a whole. This allows many features such as distribution, replication, failure recovery, and more importantly distributed processing of the blocks using multiple machines. Block sizes can be 64 MB, 128 MB, 256 MB, or 512 MB, whatever suits the purpose. For a 1 GB file with 128 MB blocks, there will be 1024 MB/128 MB equal to eight blocks. If you consider a replication factor of three, this makes it 24 blocks. HDFS provides a distributed storage system with fault tolerance and failure recovery. HDFS has two main components: the NameNode and the DataNode. The NameNode contains all the metadata of all content of the filesystem: filenames, file permissions, and the location of each block of each file, and hence it is the most important machine in HDFS. DataNodes connect to the NameNode and store the blocks within HDFS. They rely on the NameNode for all metadata information regarding the content in the filesystem. If the NameNode does not have any information, the DataNode will not be able to serve information to any client who wants to read/write to the HDFS.
It is possible for NameNode and DataNode processes to be run on a single machine; however, generally HDFS clusters are made up of a dedicated server running the NameNode process and thousands of machines running the DataNode process. In order to be able to access the content information stored in the NameNode, it stores the entire metadata structure in memory. It ensures that there is no data loss as a result of machine failures by keeping a track of the replication factor of blocks. Since it is a single point of failure, to reduce the risk of data loss on account of the failure of a NameNode, a secondary NameNode can be used to generate snapshots of the primary NameNode's memory structures.
DataNodes have large storage capacities and, unlike the NameNode, HDFS will continue to operate normally if a DataNode fails. When a DataNode fails, the NameNode automatically takes care of the now diminished replication of all the data blocks in the failed DataNode and makes sure the replication is built back up. Since the NameNode knows all locations of the replicated blocks, any clients connected to the cluster are able to proceed with little to no hiccups.
Note
In order to make sure that each block meets the minimum required replication factor, the NameNode replicates the lost blocks.
The following diagram depicts the mapping of files to blocks in the NameNode, and the storage of blocks and their replicas within the DataNodes:
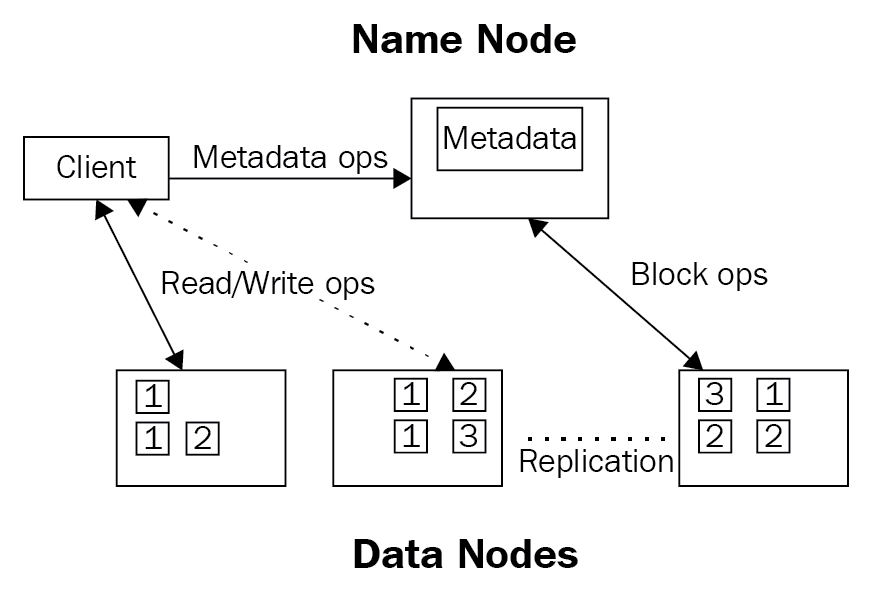
The NameNode, as shown in the preceding diagram, has been the single point of failure since the beginning of Hadoop.
The loss of NameNodes can crash the cluster in both Hadoop 1.x as well as Hadoop 2.x. In Hadoop 1.x, there was no easy way to recover, whereas Hadoop 2.x introduced high availability (active-passive setup) to help recover from NameNode failures.
The following diagram shows how high availability works:
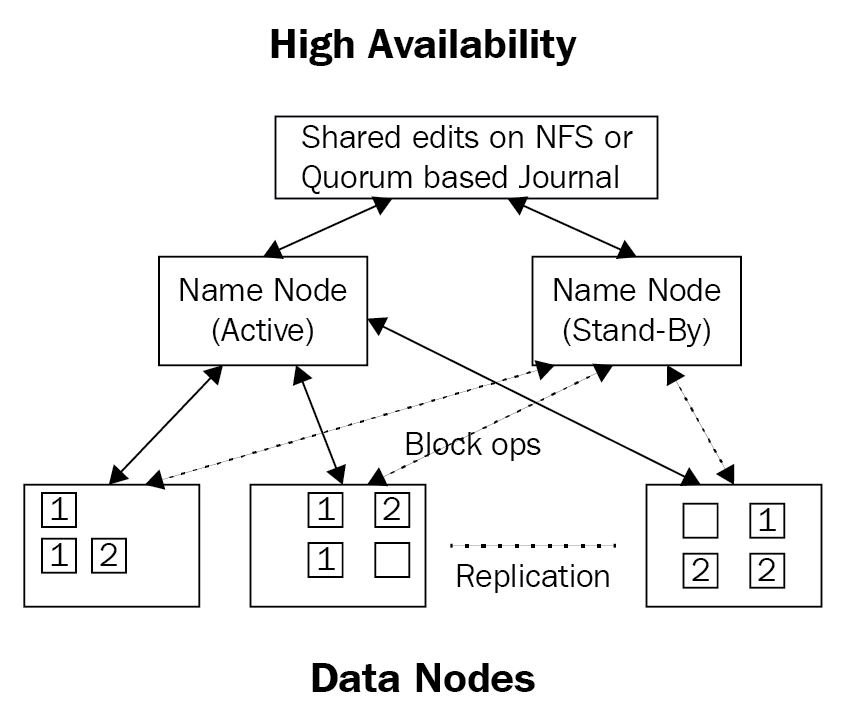
In Hadoop 3.x you can have two passive NameNodes along with the active node, as well as five JournalNodesto assist with recovery from catastrophic failures:
NameNode machines: The machines on which you run the active and standby NameNodes. They should have equivalent hardware to each other and to what would be used in a non-HA cluster.
JournalNode machines: The machines on which you run the JournalNodes. The JournalNode daemon is relatively lightweight, so these daemons may reasonably be collocated on machines with other Hadoop daemons, for example NameNodes, the JobTracker, or the YARN ResourceManager.
HDFS has a way to balance the data blocks across the data nodes, but there is no such balancing inside the same data node with multiple hard disks. Hence, a 12-spindle DataNode can have out of balance physical disks. But why does this matter to performance? Well, by having out of balance disks, the blocks at DataNode level might be the same as other DataNodes but the reads/writes will be skewed because of imbalanced disks. Hence, Hadoop 3.x introduces the intra-node balancer to balance the physical disks inside each data node to reduce the skew of the data.
This increases the reads and writes performed by any process running on the cluster, such as a mapper or reducer.
HDFS has been the fundamental component since the inception of Hadoop. In Hadoop 1.x as well as Hadoop 2.x, a typical HDFS installation uses a replication factor of three.
Compared to the default replication factor of three, EC is probably the biggest change in HDFS in years and fundamentally doubles the capacity for many datasets by bringing down the replication factor from 3 to about 1.4. Let's now understand what EC is all about.
EC is a method of data protection in which data is broken into fragments, expanded, encoded with redundant data pieces, and stored across a set of different locations or storage. If at some point during this process data is lost due to corruption, then it can be reconstructed using the information stored elsewhere. Although EC is more CPU intensive, this greatly reduces the storage needed for the reliable storing of large amounts of data (HDFS). HDFS uses replication to provide reliable storage and this is expensive, typically requiring three copies of data to be stored, thus causing a 200% overhead in storage space.
In Hadoop 3.x, many of the ports for various services have been changed.
Previously, the default ports of multiple Hadoop services were in the Linux ephemeral port range (32768–61000). This indicated that at startup, services would sometimes fail to bind to the port with another application due to a conflict.
These conflicting ports have been moved out of the ephemeral range, affecting the NameNode, Secondary NameNode, DataNode, and KMS.
The changes are listed as follows:
- NameNode ports: 50470 → 9871, 50070 → 9870, and 8020 → 9820
- Secondary NameNode ports: 50091 → 9869 and 50090 → 9868
- DataNode ports: 50020 → 9867, 50010 → 9866, 50475 → 9865, and 50075 → 9864
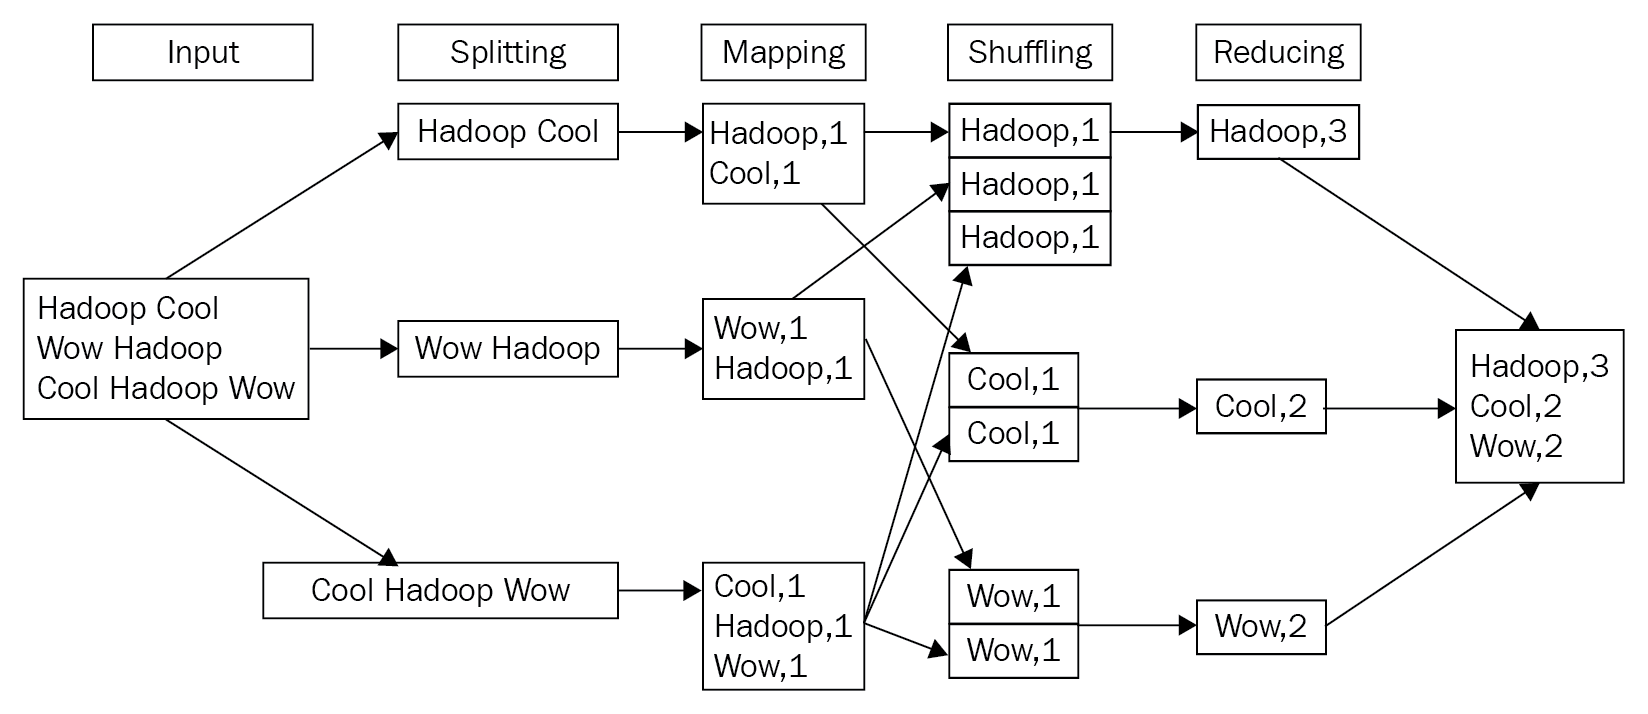
An easy way to understand this concept is to imagine that you and your friends want to sort out piles of fruit into boxes. For that, you want to assign each person the task of going through one raw basket of fruit (all mixed up) and separating out the fruit into various boxes. Each person then does the same task of separating the fruit into the various types with this basket of fruit. In the end, you end up with a lot of boxes of fruit from all your friends. Then, you can assign a group to put the same kind of fruit together in a box, weigh the box, and seal the box for shipping. A classic example of showing the MapReduce framework at work is the word count example. The following are the various stages of processing the input data, first splitting the input across multiple worker nodes and then finally generating the output, the word counts:
The MapReduce framework consists of a single ResourceManager and multiple NodeManagers (usually, NodeManagers coexist with the DataNodes of HDFS).
MapReduce has added support for a native implementation of the map output collector. This new support can result in a performance improvement of about 30% or more, particularly for shuffle-intensive jobs.
The native library will build automatically with Pnative. Users may choose the new collector on a job-by-job basis by setting mapreduce.job.map.output.collector.class=org.apache.hadoop.mapred.nativetask.NativeMapOutputCollectorDelegator in their job configuration.
The basic idea is to be able to add a NativeMapOutputCollector in order to handle key/value pairs emitted by mapper. As a result of this sort, spill, and IFile serialization can all be done in native code. A preliminary test (on Xeon E5410, jdk6u24) showed promising results as follows:
sortis about 3-10 times faster than Java (only binary string compare is supported)IFileserialization speed is about three times faster than Java: about 500 MB per second. If CRC32C hardware is used, things can get much faster in the range of 1 GB or higher per second- Merge code is not completed yet, so the test uses enough
io.sort.mbto prevent mid-spill
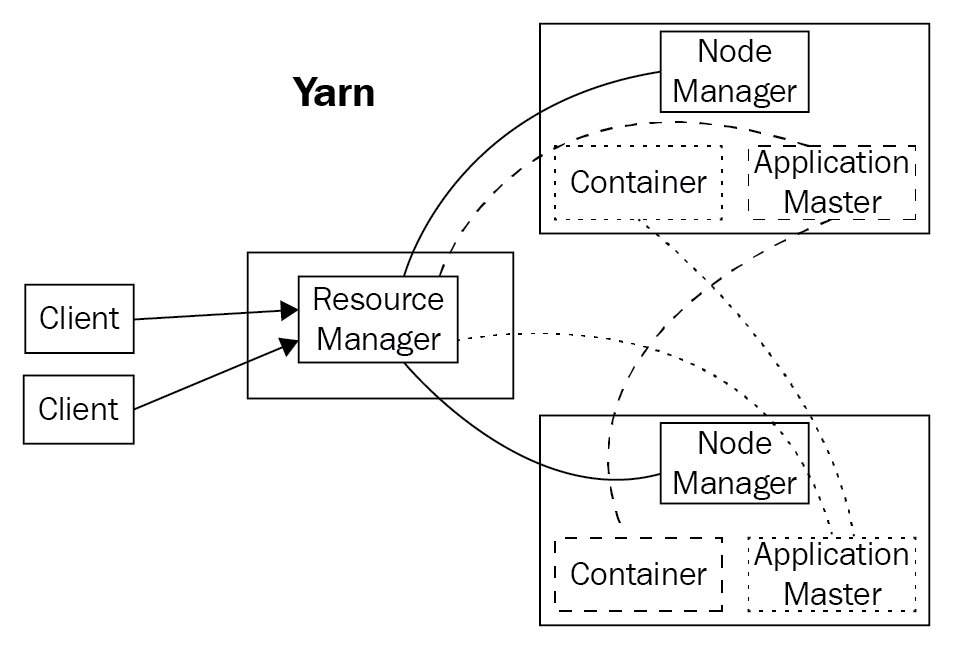
When an application wants to run, the client launches the ApplicationMaster, which then negotiates with the ResourceManager to get resources in the cluster in the form of containers. A container represents CPUs (cores) and memory allocated on a single node to be used to run tasks and processes. Containers are supervised by the NodeManager and scheduled by the ResourceManager.
Examples of containers:
- One core and 4 GB RAM
- Two cores and 6 GB RAM
- Four cores and 20 GB RAM
Some containers are assigned to be mappers and others to be reducers; all this is coordinated by the ApplicationMaster in conjunction with the ResourceManager. This framework is called YARN:
Using YARN, several different applications can request for and execute tasks on containers, sharing the cluster resources pretty well. However, as the size of the clusters grows and the variety of applications and requirements change, the efficiency of the resource utilization is not as good over time.
Opportunistic containers can be transmitted to a NodeManager even if their execution at that particular time cannot begin immediately, unlike YARN containers, which are scheduled in a node if and only if there are unallocated resources.
In these types of scenarios, opportunistic containers will be queued at the NodeManager till the required resources are available for use. The ultimate goal of these containers is to enhance the cluster resource utilization and in turn improve task throughput.
There are two types of container, as follows:
- Guaranteed containers: These containers correspond to the existing YARN containers. They are assigned by the capacity scheduler. They are transmitted to a node if and only if there are resources available to begin their execution immediately.
- Opportunistic containers: Unlike guaranteed containers, in this case we cannot guarantee that there will be resources available to begin their execution once they are dispatched to a node. On the contrary, they will be queued at the NodeManager itself until resources become available.
The YARN timeline service v.2 addresses the following two major challenges:
- Enhancing the scalability and reliability of the timeline service
- Improving usability by introducing flows and aggregation
Version 2 adopts a more scalable distributed writer architecture and backend storage, as opposed to v.1 which does not scale well beyond small clusters as it used a single instance of writer/reader architecture and backend storage.
Since Apache HBase scales well even to larger clusters and continues to maintain a good read and write response time, v.2 prefers to select it as the primary backend storage.
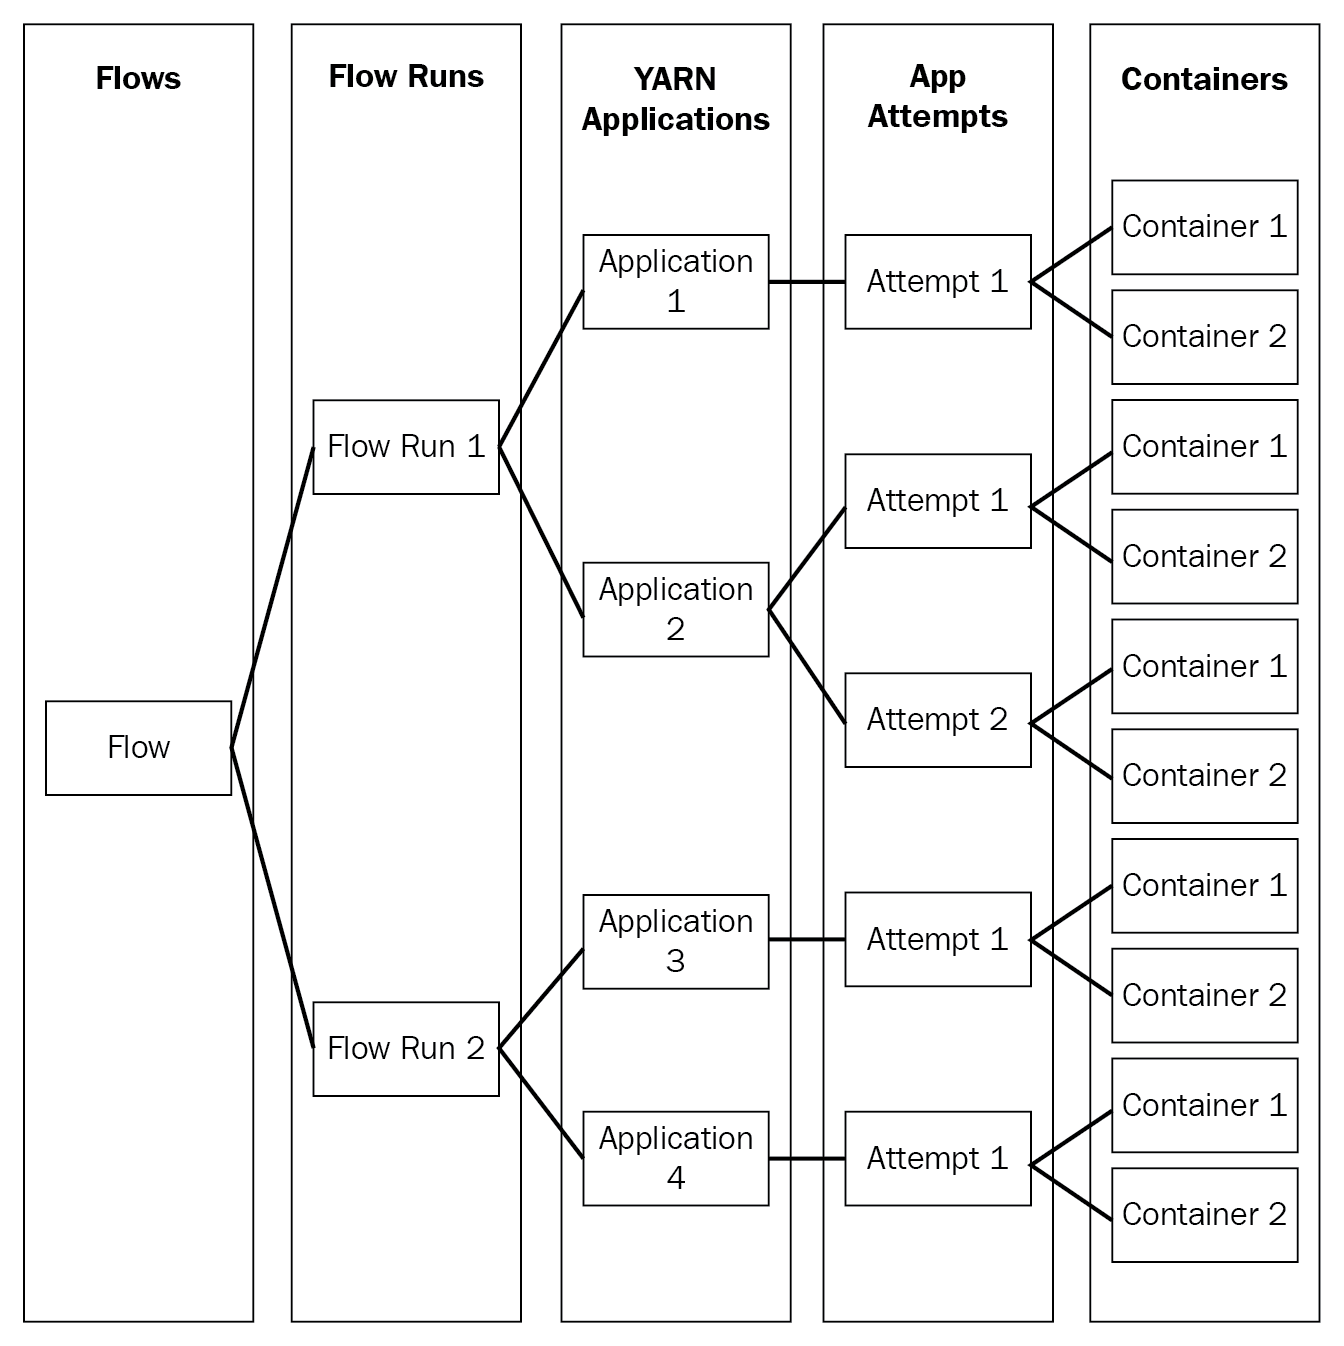
Many a time, users are more interested in the information obtained at the level of flows or in logical groups of YARN applications. For this reason, it is more convenient to launch a series of YARN applications to complete a logical workflow.
In order to achieve this, v.2 supports the notion of flows and aggregates metrics at the flow level.
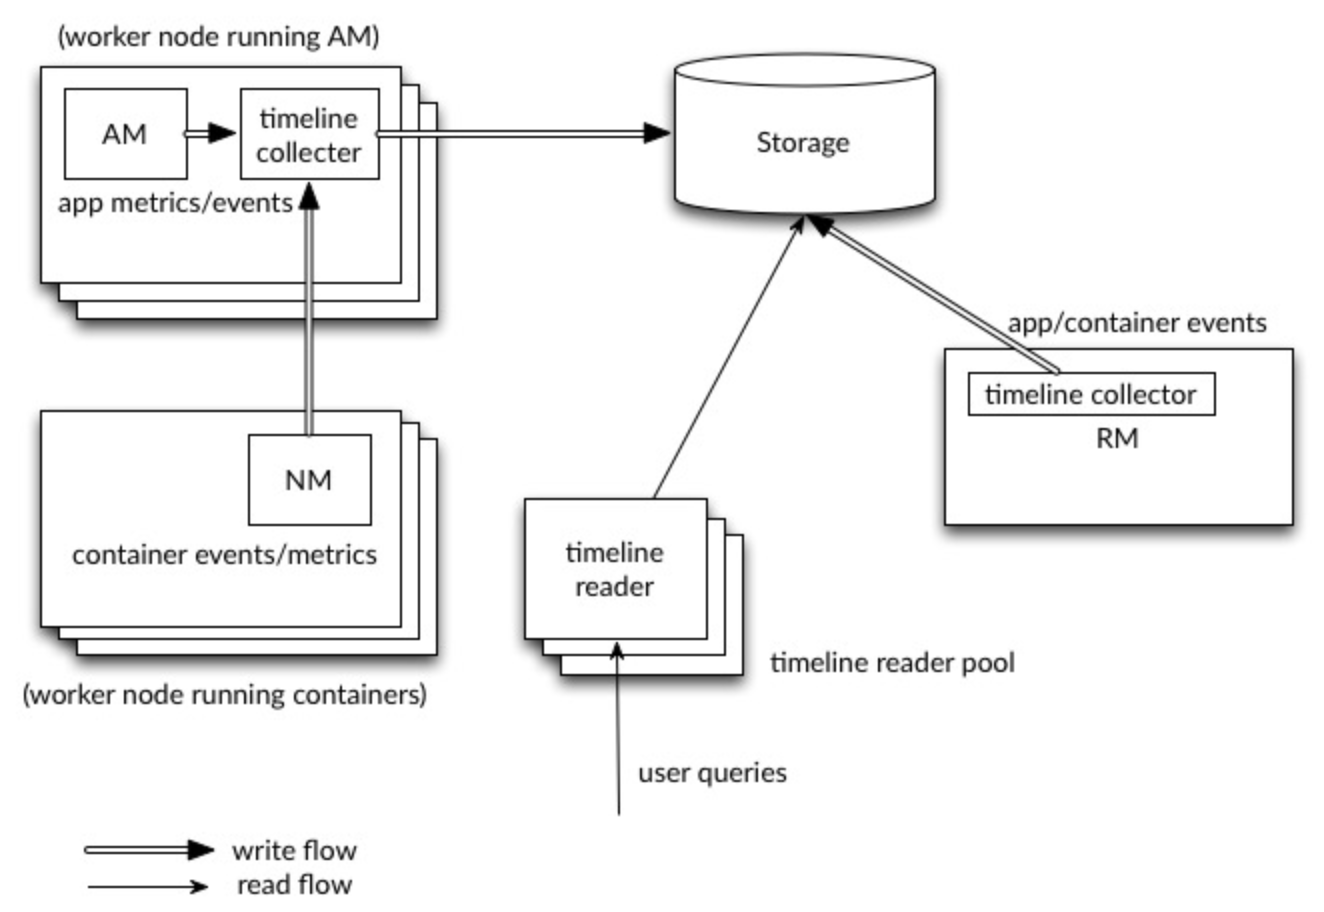
YARN Timeline Service v.2 uses a set of collectors (writers) to write data to the back-end storage. The collectors are distributed and co-located with the application masters to which they are dedicated. All data that belong to that application are sent to the application level timeline collectors with the exception of the resource manager timeline collector.
For a given application, the application master can write data for the application to the co-located timeline collectors (which is an NM auxiliary service in this release). In addition, node managers of other nodes that are running the containers for the application also write data to the timeline collector on the node that is running the application master.
The resource manager also maintains its own timeline collector. It emits only YARN-generic life-cycle events to keep its volume of writes reasonable.
The timeline readers are separate daemons separate from the timeline collectors, and they are dedicated to serving queries via REST API:
The following diagram illustrates the design at a high level:
There are other changes coming up in Hadoop 3, which are mainly to make it easier to maintain and operate. Particularly, the command-line tools have been revamped to better suit the needs of operational teams.
All Hadoop JARs are now compiled to target a runtime version of Java 8. Hence, users that are still using Java 7 or lower must upgrade to Java 8.
The Hadoop shell scripts have been rewritten to fix many long-standing bugs and include some new features.
Incompatible changes are documented in the release notes. You can find them at https://issues.apache.org/jira/browse/HADOOP-9902.
There are more details available in the documentation at https://hadoop.apache.org/docs/r3.0.0/hadoop-project-dist/hadoop-common/UnixShellGuide.html. The documentation present at https://hadoop.apache.org/docs/r3.0.0/hadoop-project-dist/hadoop-common/UnixShellAPI.html will appeal to power users, as it describes most of the new functionalities, particularly those related to extensibility.
The new hadoop-client-api and hadoop-client-runtime artifacts have been added, as referred to by https://issues.apache.org/jira/browse/HADOOP-11804. These artifacts shade Hadoop's dependencies into a single JAR. As a result, it avoids leaking Hadoop's dependencies onto the application's classpath.
Hadoop now also supports integration with Microsoft Azure Data Lake and Aliyun Object Storage System as an alternative for Hadoop-compatible filesystems.
In this section, we shall see how to install a single-node Hadoop 3 cluster on your local machine. In order to do this, we will be following the documentation given at https://hadoop.apache.org/docs/current/hadoop-project-dist/hadoop-common/SingleCluster.html.
This document gives us a detailed description of how to install and configure a single-node Hadoop setup in order to carry out simple operations using Hadoop MapReduce and the HDFS quickly.
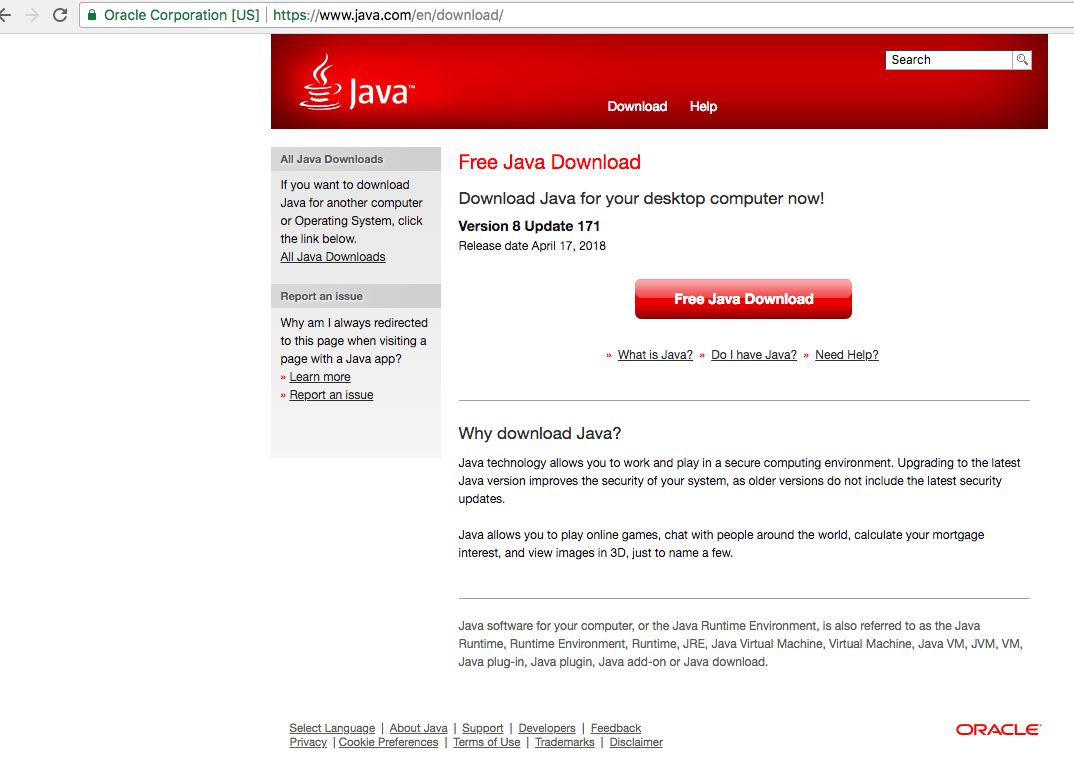
Java 8 must be installed for Hadoop to be run. If Java 8 does not exist on your machine, then you can download and install Java 8: https://www.java.com/en/download/.
The following will appear on your screen when you open the download link in the browser:
Download the Hadoop 3.1 version using the following link: http://apache.spinellicreations.com/hadoop/common/hadoop-3.1.0/.
The following screenshot is the page shown when the download link is opened in the browser:
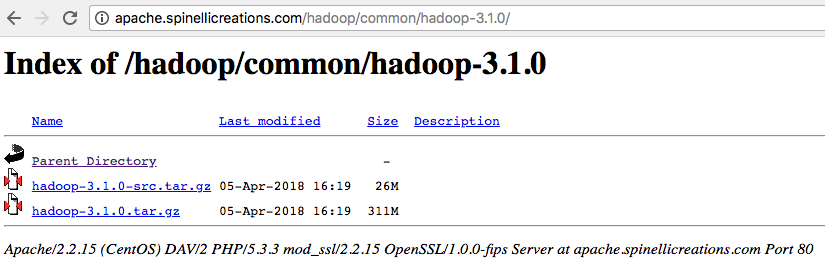
When you get this page in your browser, simply download the hadoop-3.1.0.tar.gz file to your local machine.
Perform the following steps to install a single-node Hadoop cluster on your machine:
- Extract the downloaded file using the following command:
tar -xvzf hadoop-3.1.0.tar.gz- Once you have extracted the Hadoop binaries, just run the following commands to test the Hadoop binaries and make sure the binaries works on our local machine:
cd hadoop-3.1.0

mkdir input

cp etc/hadoop/*.xml input

bin/hadoop jar share/hadoop/mapreduce/hadoop-mapreduce-examples-3.1.0.jar grep input output 'dfs[a-z.]+'

cat output/*
If everything runs as expected, you will see an output directory showing some output, which shows that the sample command worked.
Now check if you can ssh to the localhost without a passphrase by running a simple command, shown as follows:
$ ssh localhostIf you cannot ssh to localhost without a passphrase, execute the following commands:
$ ssh-keygen -t rsa -P '' -f ~/.ssh/id_rsa
$ cat ~/.ssh/id_rsa.pub >> ~/.ssh/authorized_keys
$ chmod 0600 ~/.ssh/authorized_keysMake the following changes to the configuration file etc/hadoop/core-site.xml:
<configuration>
    <property>
        <name>fs.defaultFS</name>
        <value>hdfs://localhost:9000</value>
    </property>
</configuration>
Make the following changes to the configuration file etc/hadoop/hdfs-site.xml:
<configuration>
    <property>
        <name>dfs.replication</name>
        <value>1</value>
    </property>
        <name>dfs.name.dir</name>
        <value><YOURDIRECTORY>/hadoop-3.1.0/dfs/name</value>
    </property>
</configuration>Follow these steps as shown to start HDFS (NameNode and DataNode):
- Format the filesystem:
$ ./bin/hdfs namenode -format- Start the NameNode daemon and the DataNode daemon:
$ ./sbin/start-dfs.shThe Hadoop daemon log output is written to the $HADOOP_LOG_DIR directory (defaults to $HADOOP_HOME/logs).
- Browse the web interface for the NameNode; by default it is available at
http://localhost:9870/. - Make the HDFS directories required to execute MapReduce jobs:
$ ./bin/hdfs dfs -mkdir /user
$ ./bin/hdfs dfs -mkdir /user/<username>- When you're done, stop the daemons with the following:
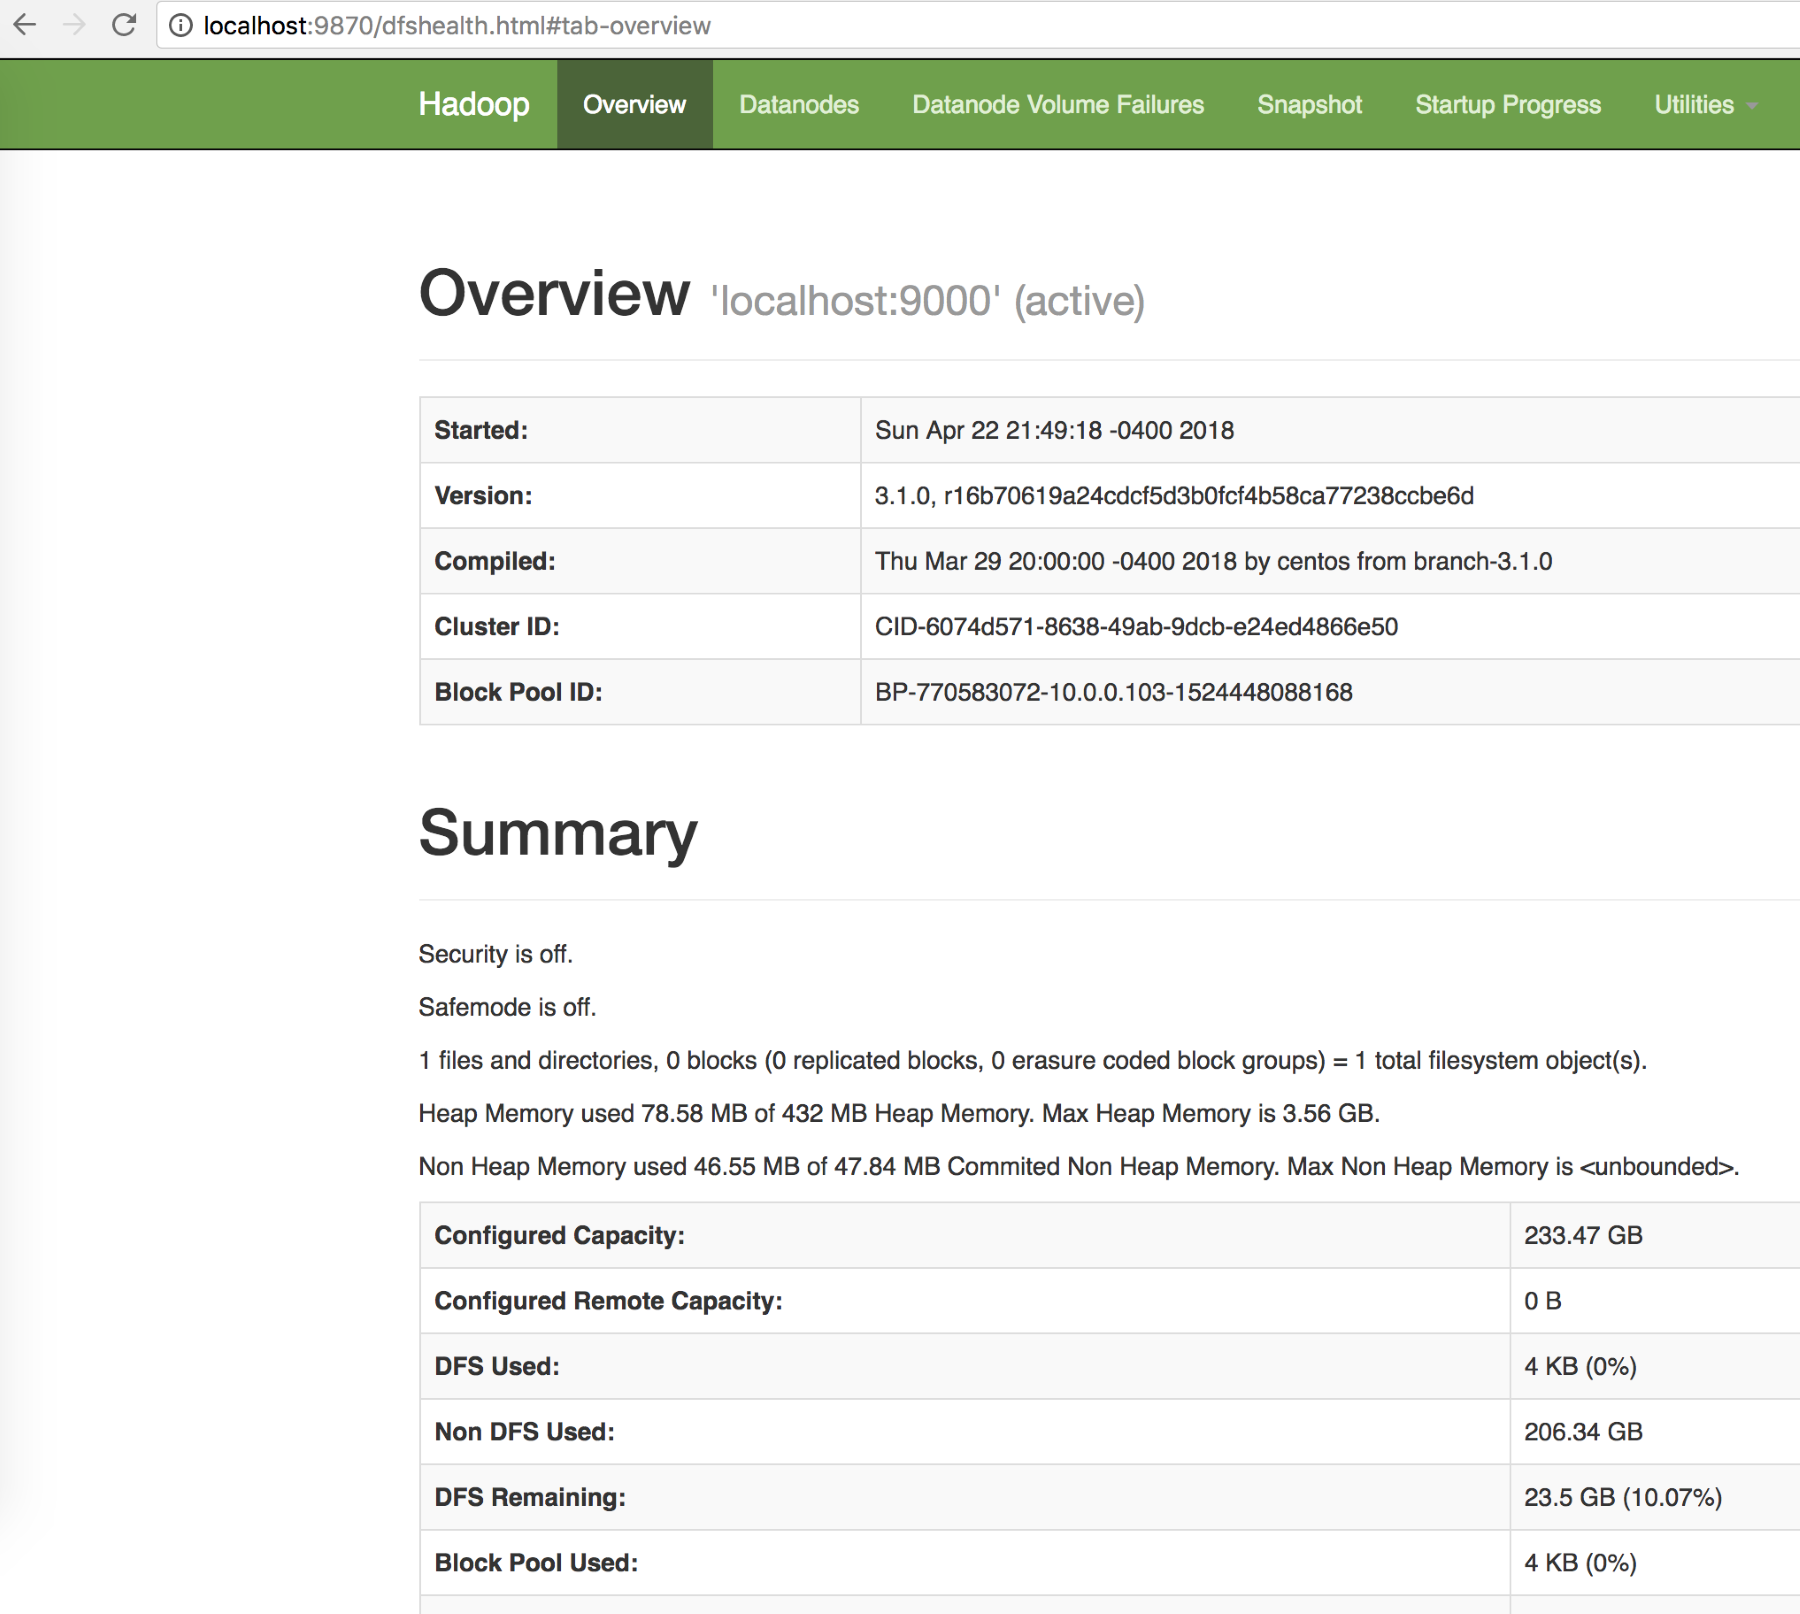
$ ./sbin/stop-dfs.sh- Open a browser to check your local Hadoop, which can be launched in the browser as
http://localhost:9870/. The following is what the HDFS installation looks like:
- Clicking on the
Datanodestab shows the nodes as shown in the following screenshot:
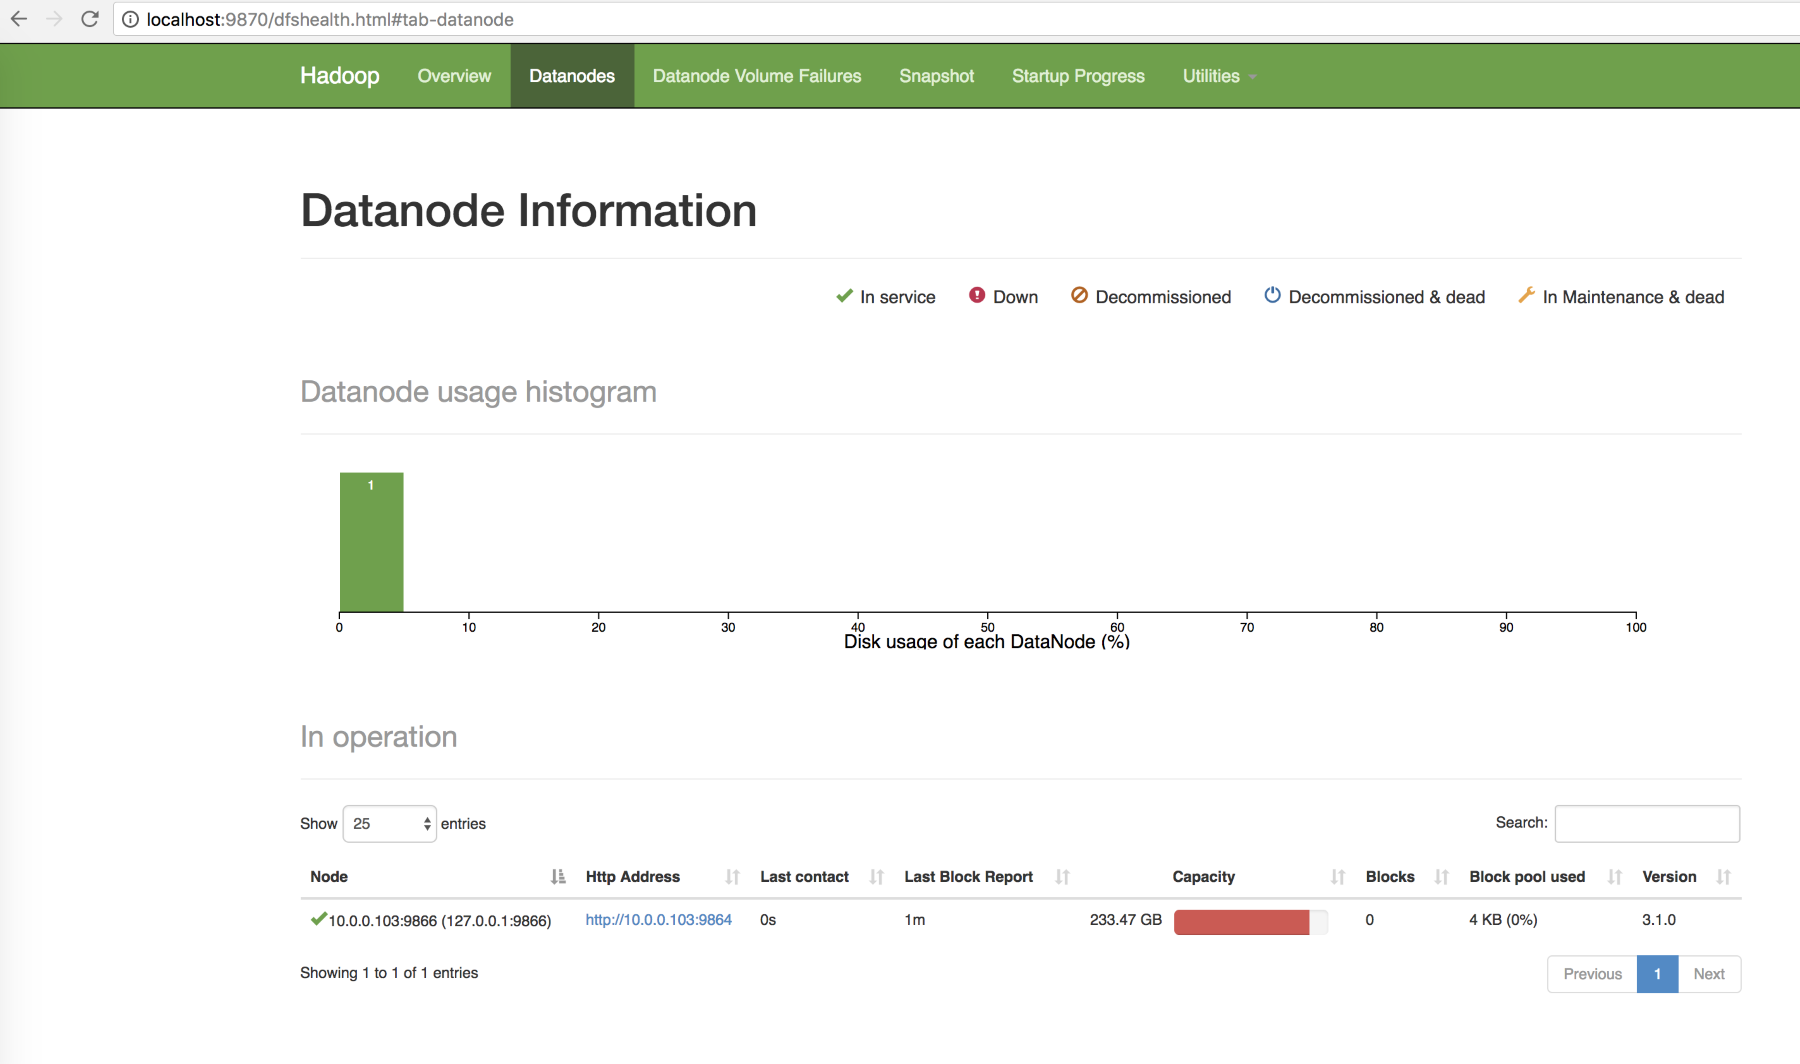
Figure: Screenshot showing the nodes in the Datanodes tab
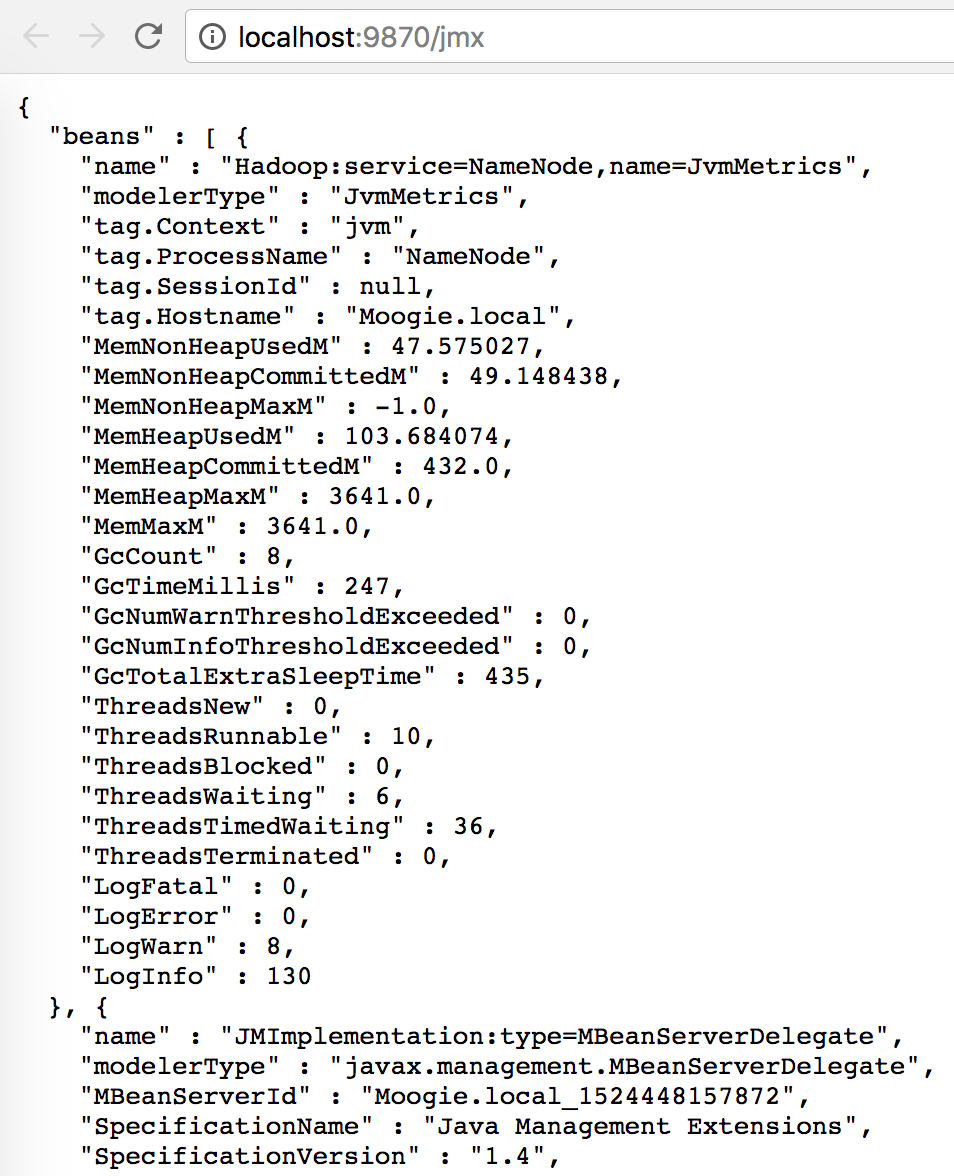
- As shown in the following screenshot, you can also look at the various JVM metrics of your cluster components:
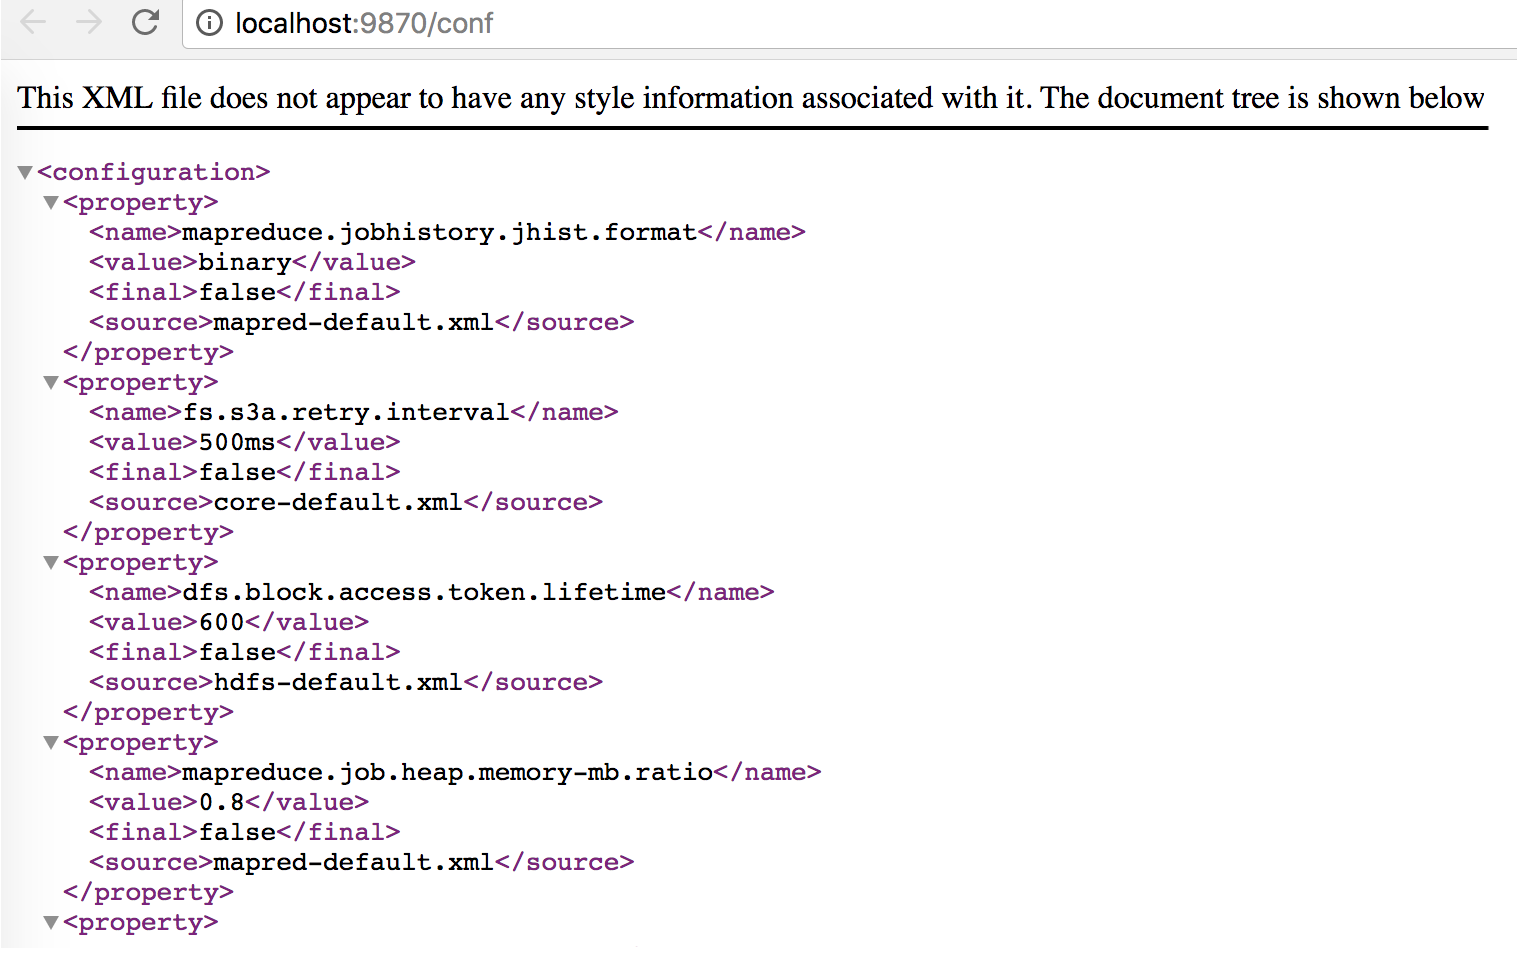
- As shown in the following screenshot, you can also check the configuration. This is a good place to look at the entire configuration and all the default settings:
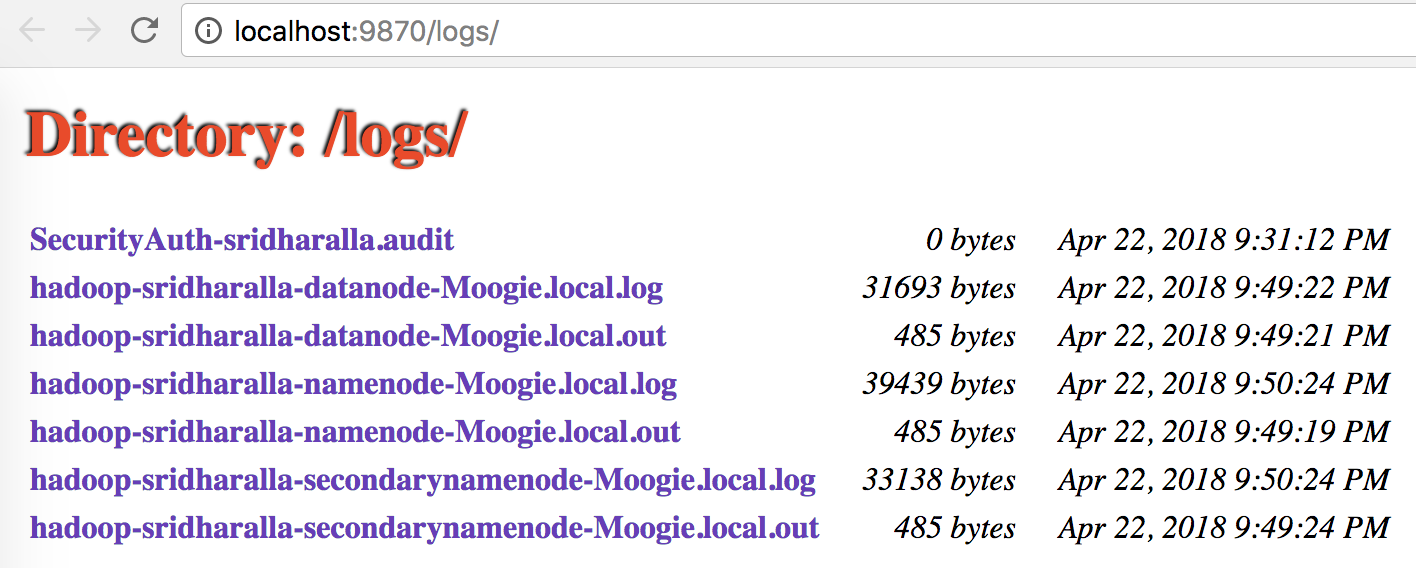
- You can also browse the filesystem of your newly installed cluster, as shown in the following screenshot:
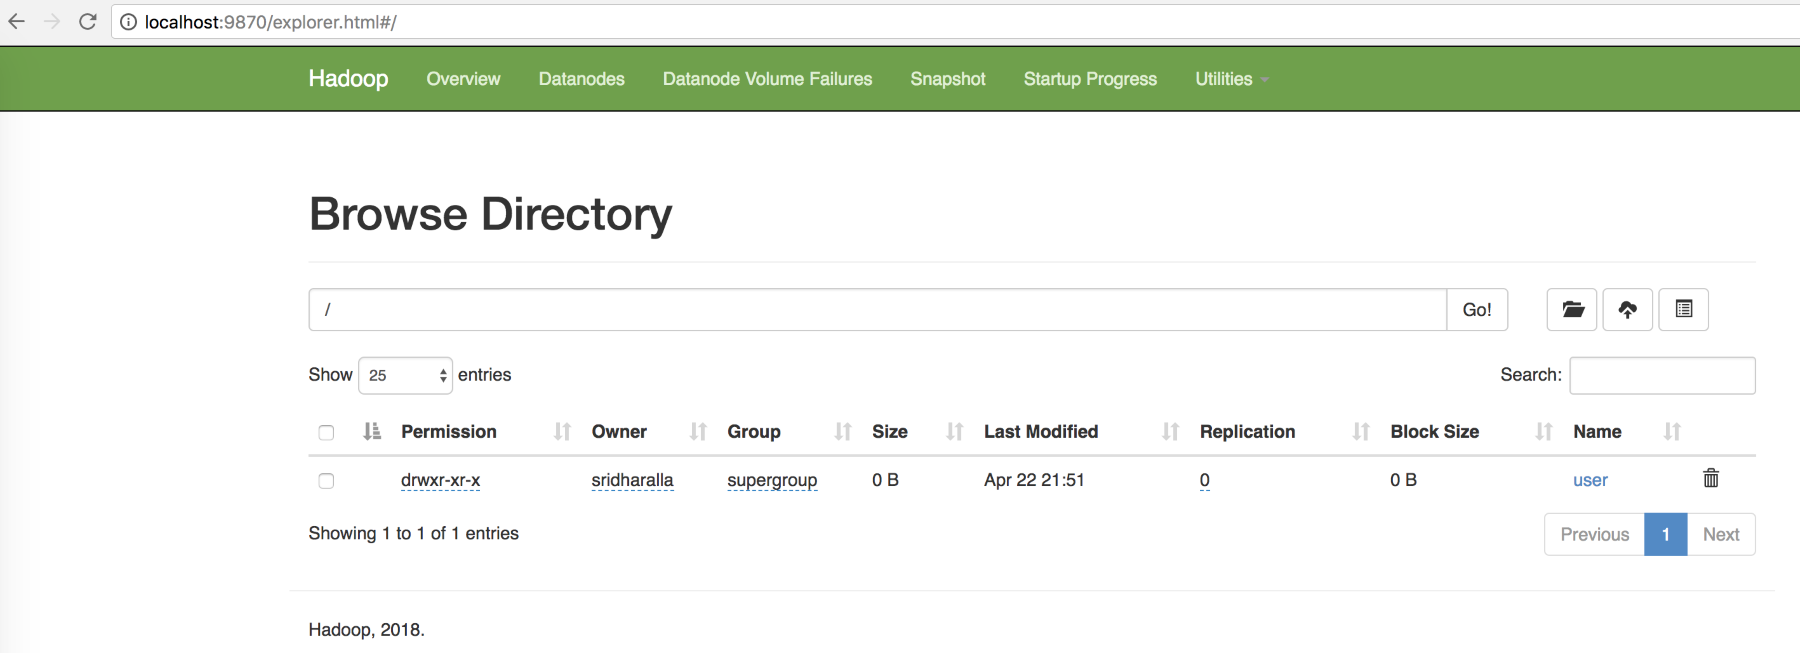
Figure: Screenshot showing the Browse Directory and how you can browse the filesystem in you newly installed cluster
At this point, we should all be able to see and use a basic HDFS cluster. But this is just a HDFS filesystem with some directories and files. We also need a job/task scheduling service to actually use the cluster for computational needs rather than just storage.
In this section, we will set up a YARN service and start the components needed to run and operate a YARN cluster:
Start the ResourceManager daemon and the NodeManager daemon:
$ sbin/start-yarn.shBrowse the web interface for the ResourceManager; by default it is available at:
http://localhost:8088/Run a MapReduce job
When you're done, stop the daemons with the following:
$ sbin/stop-yarn.shThe following is the YARN ResourceManager, which you can view by putting the URL http://localhost:8088/ into the browser:
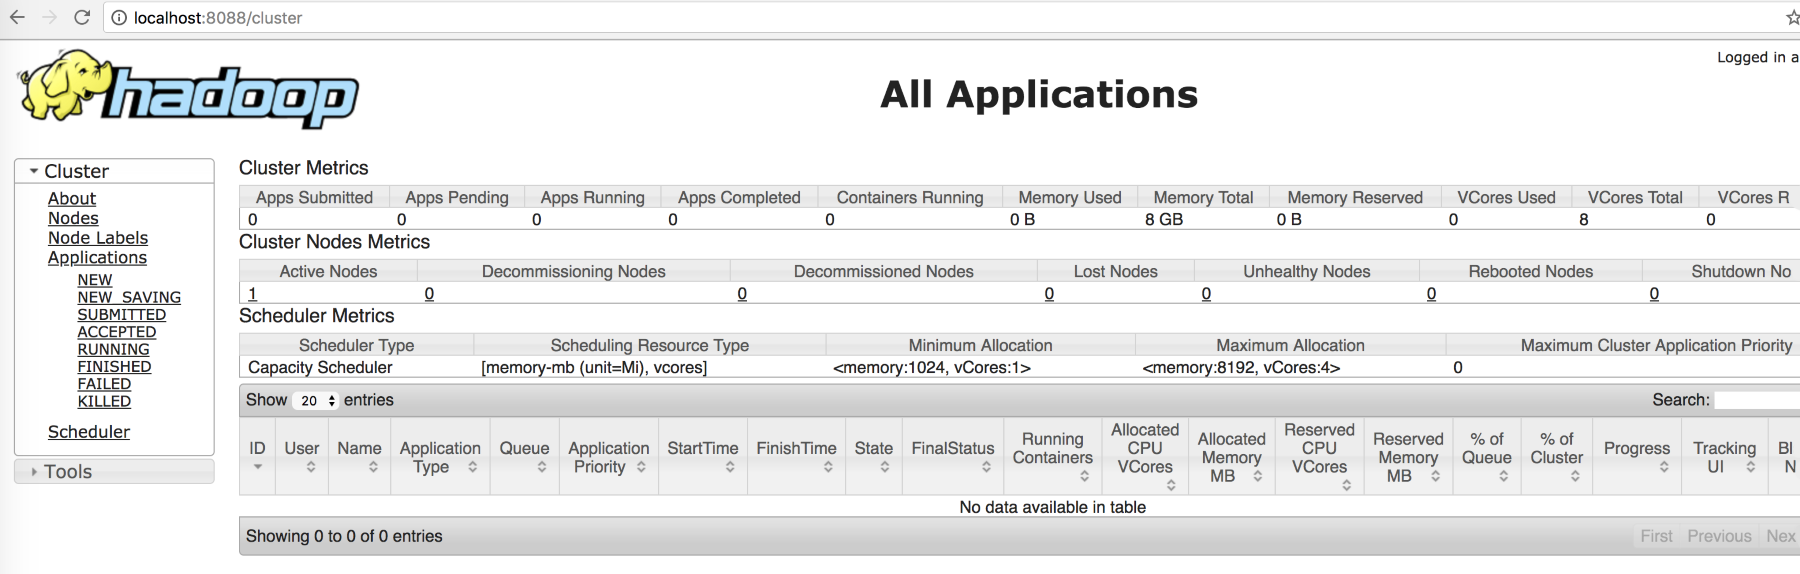
Figure: Screenshot of YARN ResouceManager
The following is a view showing the queues of resources in the cluster, along with any applications running. This is also the place where you can see and monitor the running jobs:
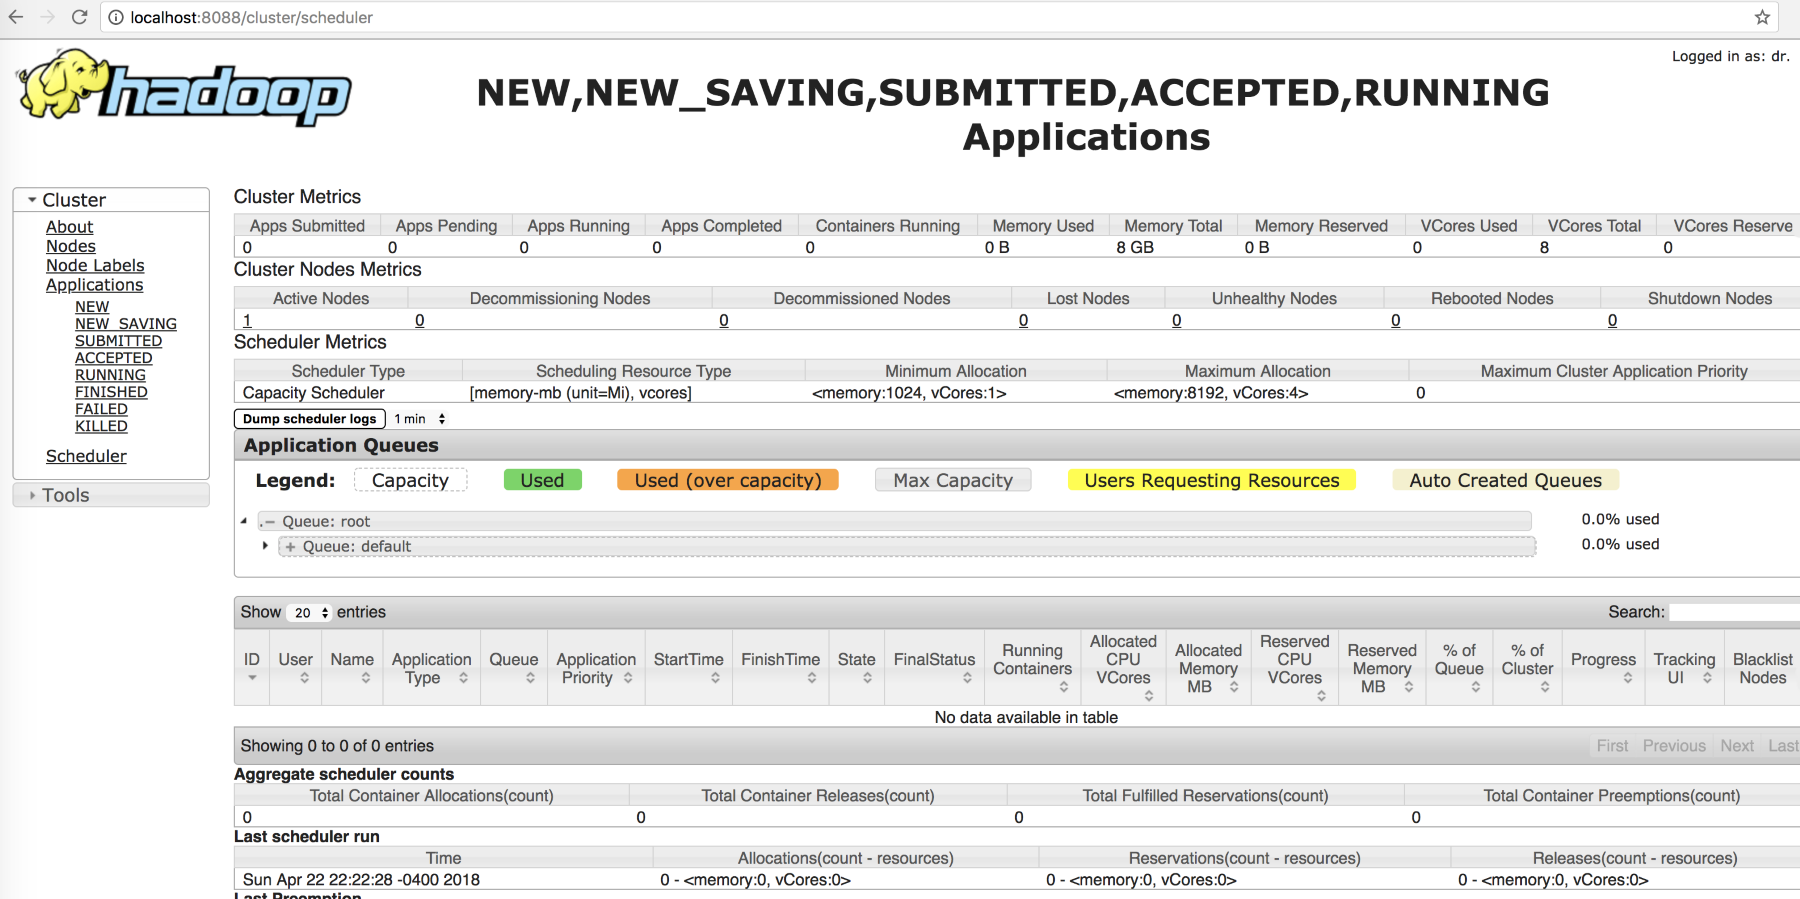
Figure: Screenshot of queues of resources in the cluster
At this time, we should be able to see the running YARN service in our local cluster running Hadoop 3.1.0. Next, we will look at some new features in Hadoop 3.x.
EC is a key change in Hadoop 3.x promising a significant improvement in HDFS utilization efficiencies as compared to earlier versions where replication factor of 3 for instance caused immense wastage of precious cluster file system for all kinds of data no matter what the relative importance was to the tasks at hand.
EC can be setup using policies and assigning the policies to directories in HDFS. For this, HDFS provides an ec subcommand to perform administrative commands related to EC:
hdfs ec [generic options]
    [-setPolicy -path <path> [-policy <policyName>] [-replicate]]
    [-getPolicy -path <path>]
    [-unsetPolicy -path <path>]
    [-listPolicies]
    [-addPolicies -policyFile <file>]
    [-listCodecs]
    [-enablePolicy -policy <policyName>]
    [-disablePolicy -policy <policyName>]
    [-help [cmd ...]]
The following are the details of each command:
[-setPolicy -path <path> [-policy <policyName>] [-replicate]]: Sets an EC policy on a directory at the specified path.path: An directory in HDFS. This is a mandatory parameter. Setting a policy only affects newly created files, and does not affect existing files.policyName: The EC policy to be used for files under this directory. This parameter can be omitted if adfs.namenode.ec.system.default.policyconfiguration is set. The EC policy of the path will be set with the default value in configuration.-replicate: Apply the special REPLICATION policy on the directory, force the directory to adopt 3x replication scheme.-replicate and -policy <policyName>: These are optional arguments. They cannot be specified at the same time.
[-getPolicy -path <path>]: Get details of the EC policy of a file or directory at the specified path.[-unsetPolicy -path <path>]: Unset an EC policy set by a previous call tosetPolicyon a directory. If the directory inherits the EC policy from an ancestor directory,unsetPolicyis a no-op. Unsetting the policy on a directory which doesn't have an explicit policy set will not return an error.[-listPolicies]: Lists all (enabled, disabled and removed) EC policies registered in HDFS. Only the enabled policies are suitable for use with thesetPolicycommand.[-addPolicies -policyFile <file>]: Add a list of EC policies. Please referetc/hadoop/user_ec_policies.xml.templatefor the example policy file. The maximum cell size is defined in propertydfs.namenode.ec.policies.max.cellsizewith the default value 4 MB. Currently HDFS allows the user to add 64 policies in total, and the added policy ID is in range of 64 to 127. Adding policy will fail if there are already 64 policies added.[-listCodecs]: Get the list of supported EC codecs and coders in system. A coder is an implementation of a codec. A codec can have different implementations, thus different coders. The coders for a codec are listed in a fall back order.[-removePolicy -policy <policyName>]: It removes an EC policy[-enablePolicy -policy <policyName>]: It enables an EC policy[-disablePolicy -policy <policyName>]: It disables an EC policy
By using -listPolicies, you can list all the EC policies currently setup in your cluster
along with the state of such policies whether they are ENABLED or DISABLED:
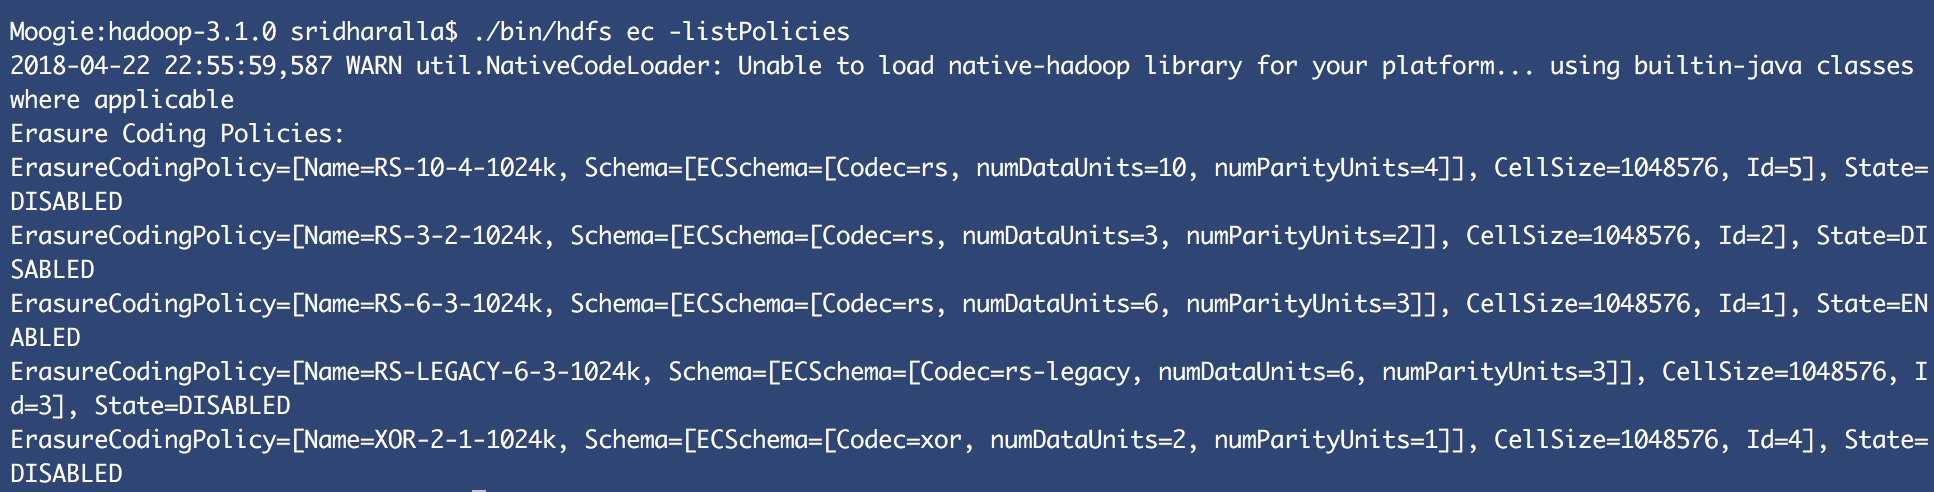
Lets test out EC in our cluster. First we will create directories in the HDFS shown as follows:
./bin/hdfs dfs -mkdir /user/normal
./bin/hdfs dfs -mkdir /user/ec
Once the two directories are created then you can set the policy on any path:
./bin/hdfs ec -setPolicy -path /user/ec -policy RS-6-3-1024k
Set RS-6-3-1024k erasure coding policy on /user/ec
Now copying any content into the /user/ec folder falls into the newly set policy.
Type the command shown as follows to test this:
./bin/hdfs dfs -copyFromLocal ~/Documents/OnlineRetail.csv /user/ec
The following screenshot shows the result of the copying, as expected the system complains as we don't really have a cluster on our local system enough to implement EC. But this should give us an idea of what is needed and how it would look:

While HDFS always had a great feature of balancing the data between the data nodes in the cluster, often this resulted in skewed disks within data nodes. For instance, if you have four disks, two disks might take the bulk of the data and the other two might be under-utilized. Given that physical disks (say 7,200 or 10,000 rpm) are slow to read/write, this kind of skewing of data results in poor performance. Using an intra-node balancer, we can rebalance the data amongst the disks.
Run the command shown in the following example to invoke disk balancing on a DataNode:
./bin/hdfs diskbalancer -plan 10.0.0.103The following is the output of the disk balancer command:

As stated in the YARN timeline service v.2 section, v.2 always selects Apache HBase as the primary backing storage, since Apache HBase scales well even to larger clusters and continues to maintain a good read and write response time.
There are a few steps that need to be performed to prepare the storage for timeline service v.2:
- Set up the HBase cluster
- Enable the co-processor
- Create the schema for timeline service v.2
Each step is explained in more detail in the following sections.
The first step involves picking an Apache HBase cluster to use as the storage cluster. The version of Apache HBase that is supported with the timeline service v.2 is 1.2.6. The 1.0.x versions no longer work with timeline service v.2. Later versions of HBase have not been tested yet with the timeline service.
If you are intent on a simple deploy profile for the Apache HBase cluster where the data loading is light but the data needs to persist across node comings and goings, you could consider the Standalone HBase over HDFS deploy mode.
http://mirror.cogentco.com/pub/apache/hbase/1.2.6/
The following screenshot is the download link to HBase 1.2.6:
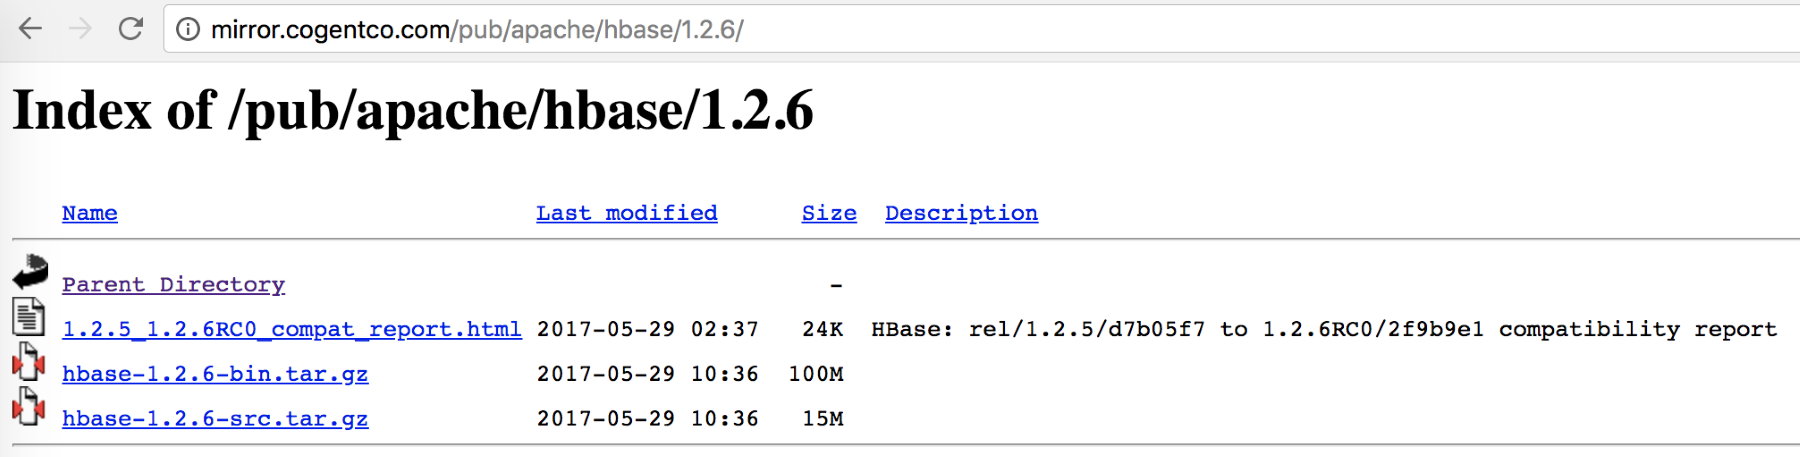
Download hbase-1.2.6-bin.tar.gz to your local machine. Then extract the HBase
binaries:
tar -xvzf hbase-1.2.6-bin.tar.gz
The following is the content of the extracted HBase:

This is a useful variation on the standalone HBase setup and has all HBase daemons running inside one JVM but rather than persisting to the local filesystem, it persists to an HDFS instance. Writing to HDFS where data is replicated ensures that data is persisted across node comings and goings. To configure this standalone variant, edit your hbasesite.xml setting the hbase.rootdir to point at a directory in your HDFS instance but then set hbase.cluster.distributed to false.
The following is the hbase-site.xml with the hdfs port 9000 for the local cluster we have installed mentioned as a property. If you leave this out there wont be a HBase cluster installed.
<configuration>
    <property>
        <name>hbase.rootdir</name>
        <value>hdfs://localhost:9000/hbase</value>
    </property>
    <property>
        <name>hbase.cluster.distributed</name>
        <value>false</value>
    </property>
</configuration>
Next step is to start HBase. We will do this by using start-hbase.sh script:
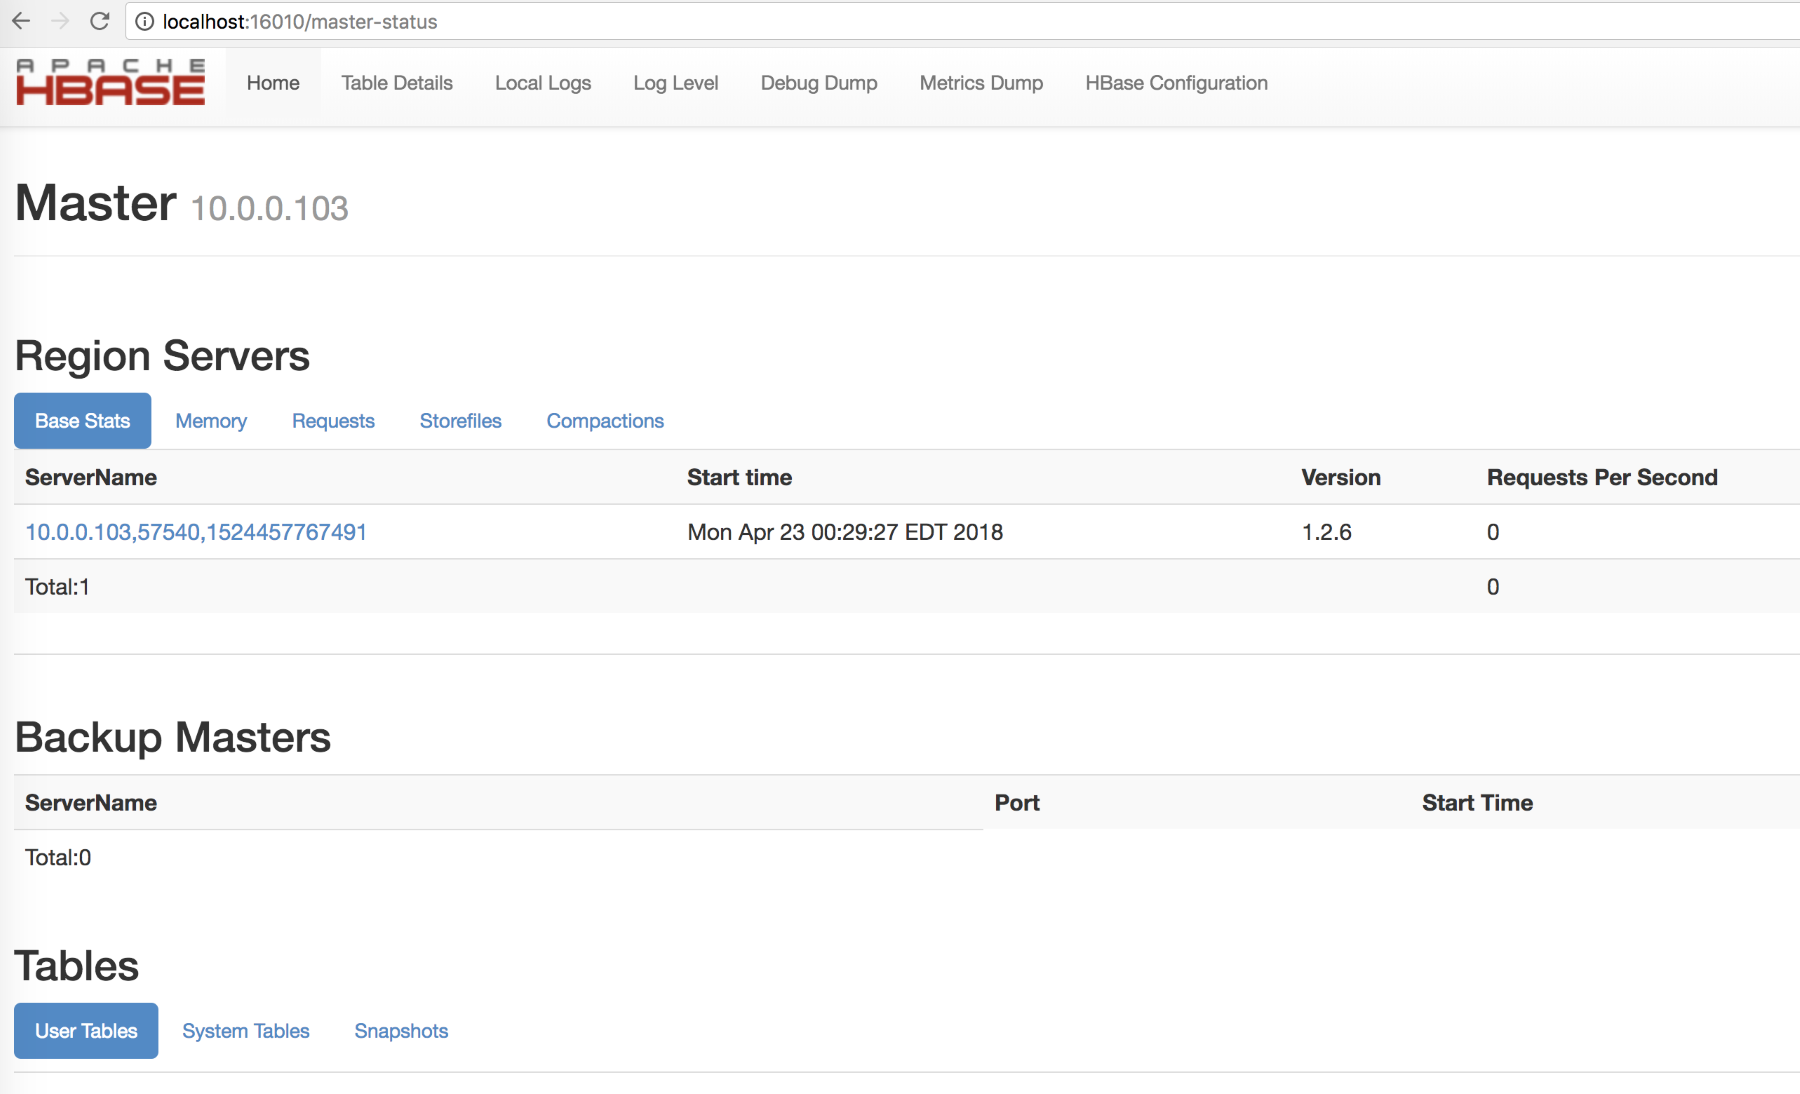
./bin/start-hbase.sh
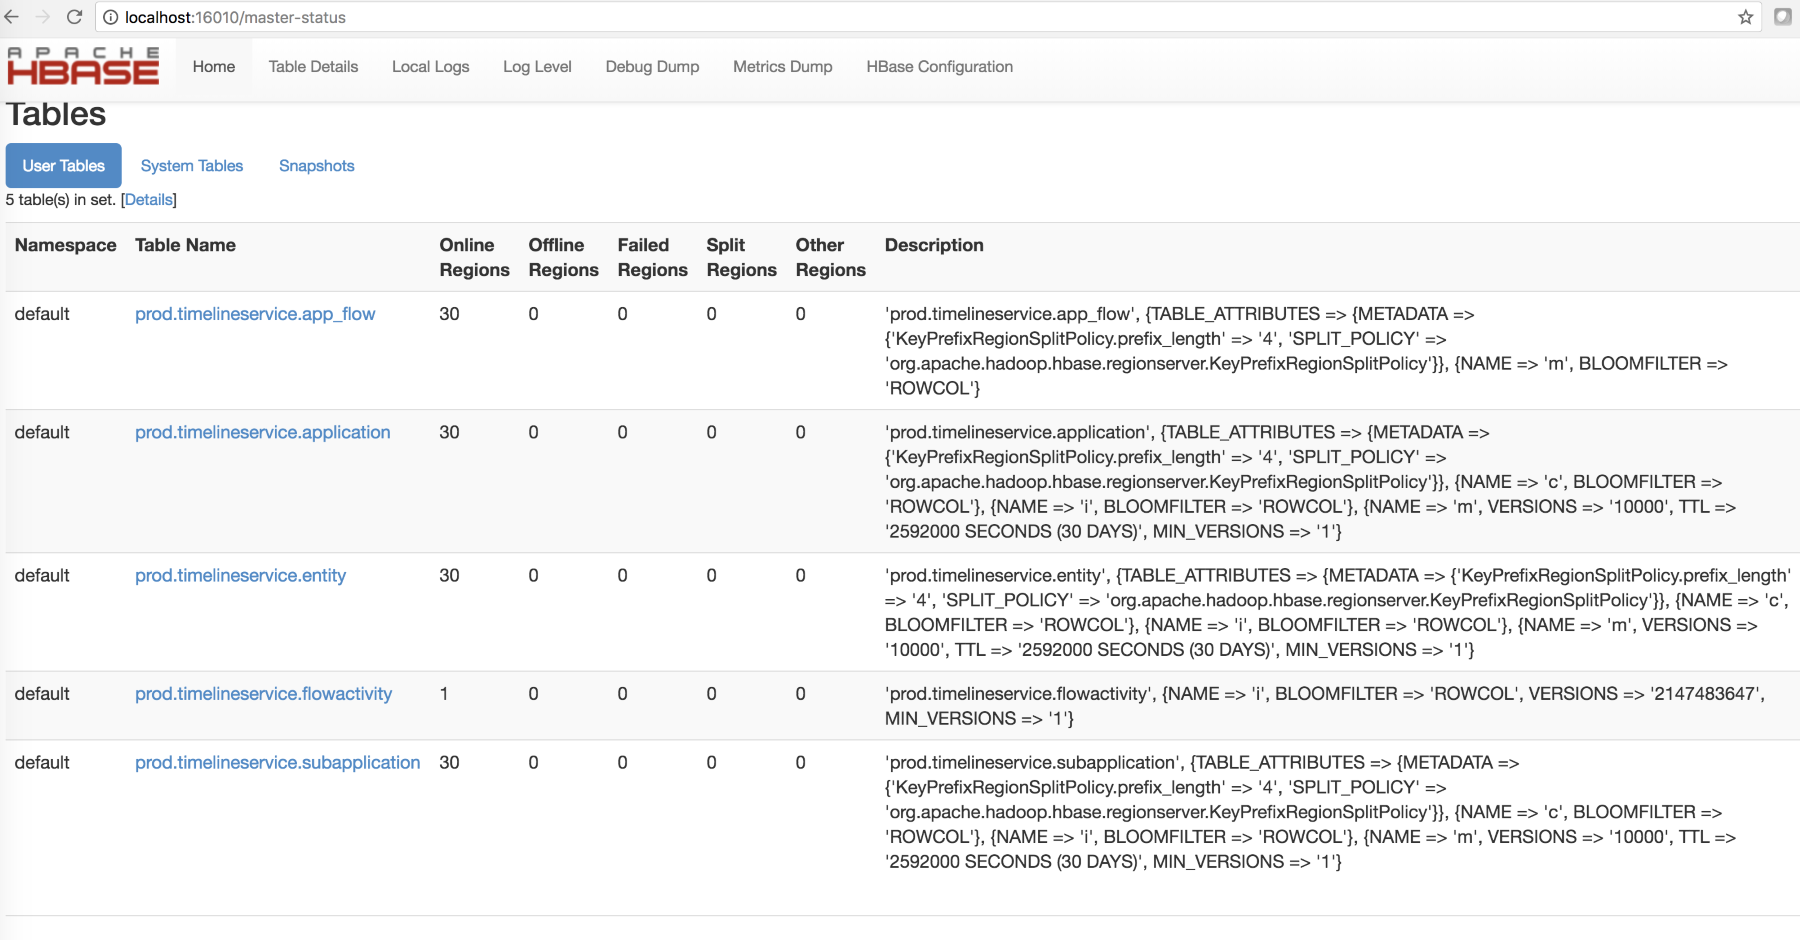
The following screenshot shows the HBase cluster we just installed:
The following screenshot shows are more attributes of the HBase cluster setup showing versions, of various components:
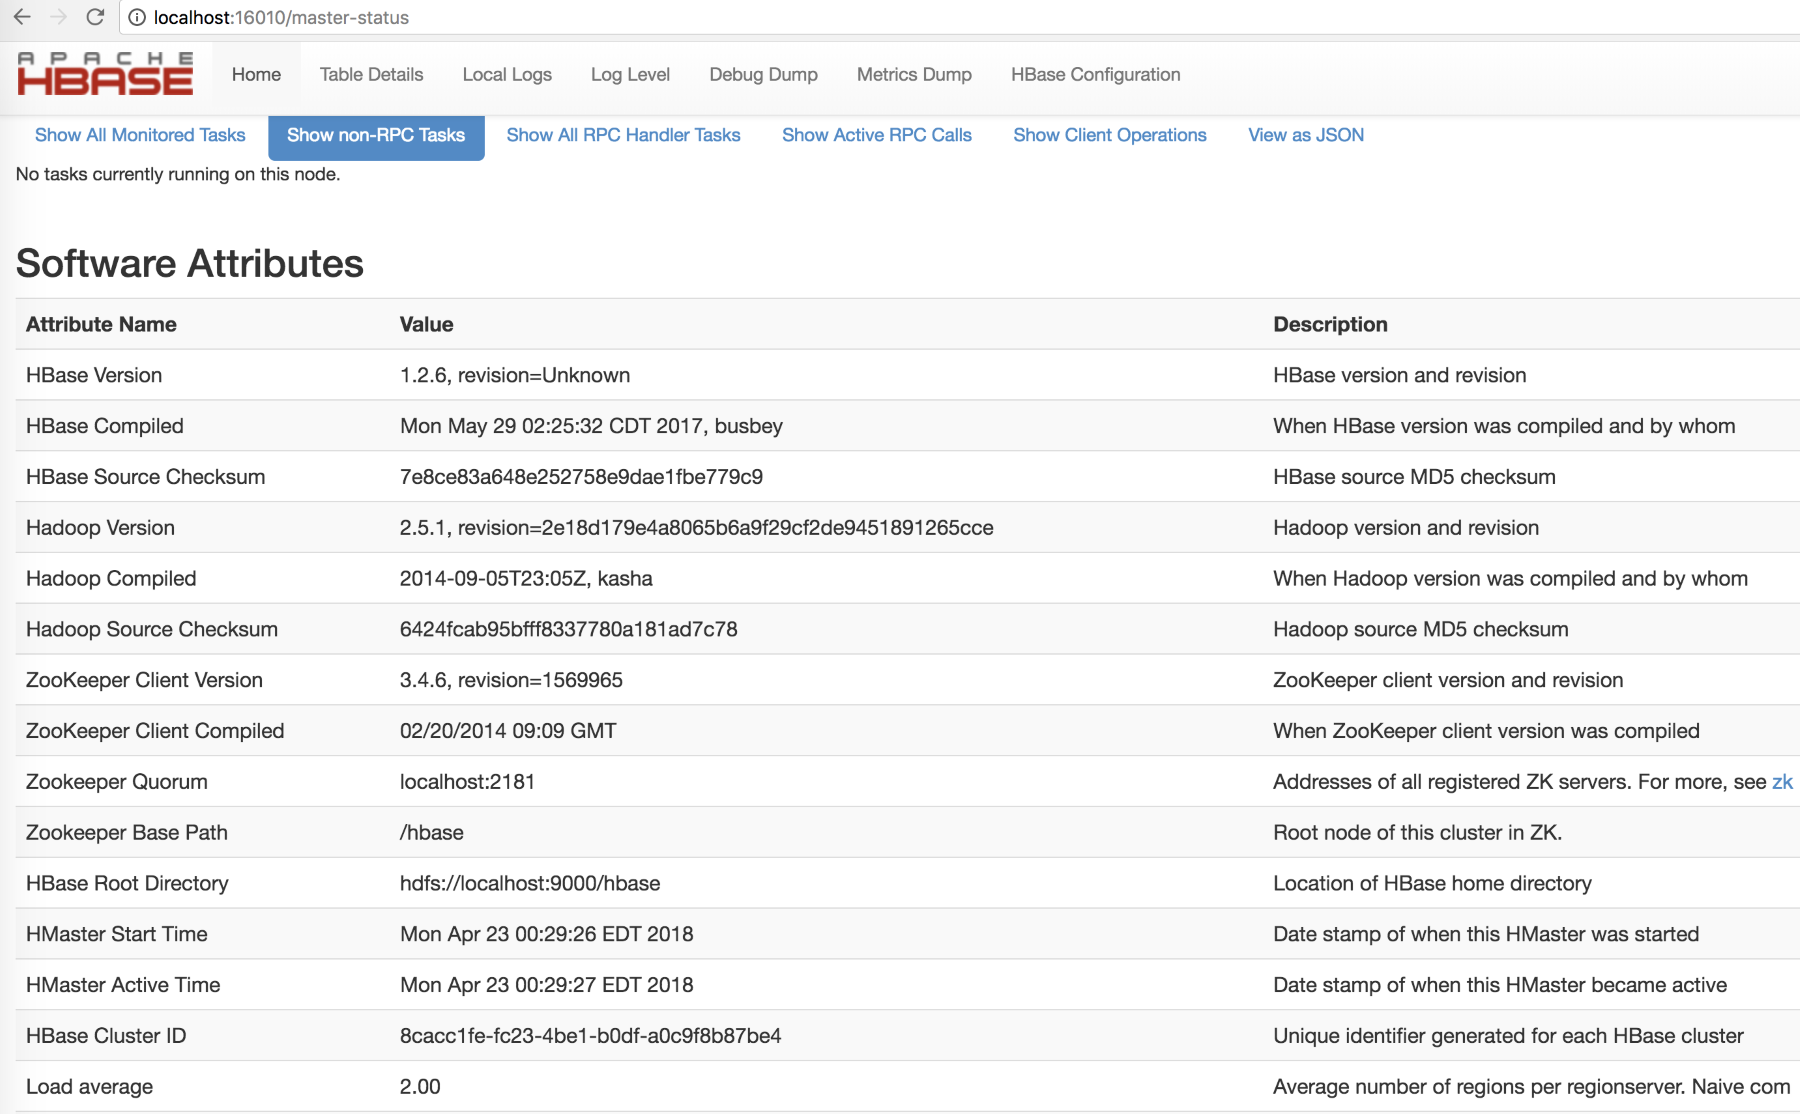
Figure: Screenshot of attributes of the HBase cluster setup and the versions of different components
Once you have an Apache HBase cluster ready to use, perform the steps in the following section.
In this version, the co-processor is loaded dynamically.
Copy the timeline service .jar to HDFS from where HBase can load it. It is needed for the flowrun table creation in the schema creator. The default HDFS location is /hbase/coprocessor.
For example:
hadoop fs -mkdir /hbase/coprocessor hadoop fs -put hadoop-yarn-server-timelineservice-hbase-3.0.0-alpha1-SNAPSHOT.jar /hbase/coprocessor/hadoop-yarn-server-timelineservice.jar
To place the JAR at a different location on HDFS, there also exists a YARN configuration setting called yarn.timeline-service.hbase.coprocessor.jar.hdfs.location, shown as follows:
<property>
  <name>yarn.timeline-service.hbase.coprocessor.jar.hdfs.location</name>
  <value>/custom/hdfs/path/jarName</value>
</property>
Create the timeline service schema using the schema creator tool. For this to happen, we also need to make sure the JARs are all found correctly:
export HADOOP_CLASSPATH=$HADOOP_CLASSPATH:/Users/sridharalla/hbase-1.2.6/lib/:/Users/sridharalla/hadoop-3.1.0/share/hadoop/yarn/timelineservice/
Once we have the classpath corrected, we can create the HBase schema/tables using a simple command, shown as follows:
./bin/hadoop org.apache.hadoop.yarn.server.timelineservice.storage.TimelineSchemaCreator -create -skipExistingTable
The following is the HBase schema created as a result of the preceding command:
The following are the basic configurations to start timeline service v.2:
<property>
  <name>yarn.timeline-service.version</name>
  <value>2.0f</value>
</property>

<property>
  <name>yarn.timeline-service.enabled</name>
  <value>true</value>
</property>

<property>
  <name>yarn.nodemanager.aux-services</name>
  <value>mapreduce_shuffle,timeline_collector</value>
</property>

<property>
  <name>yarn.nodemanager.aux-services.timeline_collector.class</name>
  <value>org.apache.hadoop.yarn.server.timelineservice.collector.PerNodeTimelineCollectorsAuxService</value>
</property>

<property>
  <description> This setting indicates if the yarn system metrics is published by RM and NM by on the timeline service. </description>
  <name>yarn.system-metrics-publisher.enabled</name>
  <value>true</value>
</property>

<property>
  <description>This setting is to indicate if the yarn container events are published by RM to the timeline service or not. This configuration is for ATS V2. </description>
  <name>yarn.rm.system-metrics-publisher.emit-container-events</name>
  <value>true</value>
</property>
Also, add the hbase-site.xml configuration file to the client Hadoop cluster configuration so that it can write data to the Apache HBase cluster you are using, or set yarn.timeline-service.hbase.configuration.file to the file URL pointing to hbase-site.xml for the same purpose of writing the data to HBase, for example:
<property>
  <description>This is an Optional URL to an hbase-site.xml configuration file. It is to be used to connect to the timeline-service hbase cluster. If it is empty or not specified, the HBase configuration will be loaded from the classpath. Else, they will override those from the ones present on the classpath. </description>
  <name>yarn.timeline-service.hbase.configuration.file</name>
  <value>file:/etc/hbase/hbase-site.xml</value>
</property>
Restart the ResourceManager as well as the node managers to pick up the new configuration. The collectors start within the resource manager and the node managers in an embedded manner.
The timeline service reader is a separate YARN daemon, and it can be started using the following syntax:
$ yarn-daemon.sh start timelinereaderTo write MapReduce framework data to timeline service v.2, enable the following configuration in mapred-site.xml:
<property>
  <name>mapreduce.job.emit-timeline-data</name>
  <value>true</value>
</property>
The timeline service is still evolving so you should try it out only to test out the features and not in production, and wait for the more widely adopted version, which should be available sometime soon.
In this chapter, we have discussed the new features in Hadoop 3.x and how it improves the reliability and performance of Hadoop 2.x. We also walked through the installation of a standalone Hadoop cluster on the local machine.
In the next chapter, we will take a peek into the world of big data analytics.
