Download code from GitHub
Building a Blog Application
Django is a powerful Python web framework with a relatively shallow learning curve. You can easily build simple web applications in a short time. Django is also a robust and scalable framework that can be used to create large-scale web applications with complex requirements and integrations. This makes Django attractive for both beginners and expert programmers.
In this book, you will learn how to build complete Django projects that are ready for production use. If you haven't installed Django yet, you will discover how to do so in the first part of this chapter.
This chapter covers how to create a simple blog application using Django. The chapter's purpose is to help you to get a general idea of how the framework works, an understanding of how the different components interact with each other, and the skills to easily create Django projects with basic functionality. You will be guided through the creation of a complete project, but I will go into more detail on this later. The different framework components will be explored in detail throughout this book.
This chapter will cover the following topics:
- Installing Django
- Creating and configuring a Django project
- Creating a Django application
- Designing models and generating model migrations
- Creating an administration site for your models
- Working with QuerySets and managers
- Building views, templates, and URLs
- Adding pagination to list views
- Using Django's class-based views
Installing Django
If you have already installed Django, you can skip this section and jump directly to the Creating your first project section. Django comes as a Python package and thus can be installed in any Python environment. If you haven't installed Django yet, the following is a quick guide to installing it for local development.
Django 3 continues the path of providing new features while maintaining the core functionalities of the framework. The 3.0 release includes for the first time Asynchronous Server Gateway Interface (ASGI) support, which makes Django fully async-capable. Django 3.0 also includes official support for MariaDB, new exclusion constraints on PostgreSQL, filter expressions enhancements, and enumerations for model field choices, as well as other new features.
Django 3.0 supports Python 3.6, 3.7, and 3.8. In the examples in this book, we will use Python 3.8.2. If you're using Linux or macOS, you probably have Python installed. If you're using Windows, you can download a Python installer at https://www.python.org/downloads/windows/.
If you're not sure whether Python is installed on your computer, you can verify this by typing python into the shell. If you see something like the following, then Python is installed on your computer:
Python 3.8.2 (v3.8.2:7b3ab5921f, Feb 24 2020, 17:52:18)
[Clang 6.0 (clang-600.0.57)] on darwin
Type "help", "copyright", "credits" or "license" for more information.
If your installed Python version is lower than 3.6, or if Python is not installed on your computer, download Python 3.8.2 from https://www.python.org/downloads/ and install it.
Since you will be using Python 3, you don't have to install a database. This Python version comes with a built-in SQLite database. SQLite is a lightweight database that you can use with Django for development. If you plan to deploy your application in a production environment, you should use a full-featured database, such as PostgreSQL, MySQL, or Oracle. You can find more information about how to get your database running with Django at https://docs.djangoproject.com/en/3.0/topics/install/#database-installation.
Creating an isolated Python environment
Since version 3.3, Python has come with the venv library, which provides support for creating lightweight virtual environments. Each virtual environment has its own Python binary and can have its own independent set of installed Python packages in its site directories. Using the Python venv module to create isolated Python environments allows you to use different package versions for different projects, which is far more practical than installing Python packages system-wide. Another advantage of using venv is that you won't need any administration privileges to install Python packages.
Create an isolated environment with the following command:
python -m venv my_env
This will create a my_env/ directory, including your Python environment. Any Python libraries you install while your virtual environment is active will go into the my_env/lib/python3.8/site-packages directory.
Run the following command to activate your virtual environment:
source my_env/bin/activate
The shell prompt will include the name of the active virtual environment enclosed in parentheses, as follows:
(my_env)laptop:~ zenx$
You can deactivate your environment at any time with the deactivate command. You can find more information about venv at https://docs.python.org/3/library/venv.html.
Installing Django with pip
The pip package management system is the preferred method for installing Django. Python 3.8 comes with pip preinstalled, but you can find pip installation instructions at https://pip.pypa.io/en/stable/installing/.
Run the following command at the shell prompt to install Django with pip:
pip install "Django==3.0.*"
Django will be installed in the Python site-packages/ directory of your virtual environment.
Now check whether Django has been successfully installed. Run python on a terminal, import Django, and check its version, as follows:
>>> import django
>>> django.get_version()
'3.0.4'
If you get an output like 3.0.X, Django has been successfully installed on your machine.
Django can be installed in several other ways. You can find a complete installation guide at https://docs.djangoproject.com/en/3.0/topics/install/.
Creating your first project
Our first Django project will be building a complete blog. Django provides a command that allows you to create an initial project file structure. Run the following command from your shell:
django-admin startproject mysite
This will create a Django project with the name mysite.
Avoid naming projects after built-in Python or Django modules in order to avoid conflicts.
Let's take a look at the project structure generated:
mysite/
    manage.py
    mysite/
      __init__.py
      asgi.py
      wsgi.py
      settings.py
      urls.py
These files are as follows:
manage.py: This is a command-line utility used to interact with your project. It is a thin wrapper around thedjango-admin.pytool. You don't need to edit this file.mysite/: This is your project directory, which consists of the following files:__init__.py: An empty file that tells Python to treat themysitedirectory as a Python module.asgi.py: This is the configuration to run your project as ASGI, the emerging Python standard for asynchronous web servers and applications.settings.py: This indicates settings and configuration for your project and contains initial default settings.urls.py: This is the place where your URL patterns live. Each URL defined here is mapped to a view.wsgi.py: This is the configuration to run your project as a Web Server Gateway Interface (WSGI) application.
The generated settings.py file contains the project settings, including a basic configuration to use an SQLite3 database and a list named INSTALLED_APPS that contains common Django applications that are added to your project by default. We will go through these applications later in the Project settings section.
Django applications contain a models.py file where data models are defined. Each data model is mapped to a database table. To complete the project setup, you need to create the tables associated with the models of the applications listed in INSTALLED_APPS. Django includes a migration system that manages this.
Open the shell and run the following commands:
cd mysite
python manage.py migrate
You will note an output that ends with the following lines:
Applying contenttypes.0001_initial... OK
Applying auth.0001_initial... OK
Applying admin.0001_initial... OK
Applying admin.0002_logentry_remove_auto_add... OK
Applying admin.0003_logentry_add_action_flag_choices... OK
Applying contenttypes.0002_remove_content_type_name... OK
Applying auth.0002_alter_permission_name_max_length... OK
Applying auth.0003_alter_user_email_max_length... OK
Applying auth.0004_alter_user_username_opts... OK
Applying auth.0005_alter_user_last_login_null... OK
Applying auth.0006_require_contenttypes_0002... OK
Applying auth.0007_alter_validators_add_error_messages... OK
Applying auth.0008_alter_user_username_max_length... OK
Applying auth.0009_alter_user_last_name_max_length... OK
Applying auth.0010_alter_group_name_max_length... OK
Applying auth.0011_update_proxy_permissions... OK
Applying sessions.0001_initial... OK
The preceding lines are the database migrations that are applied by Django. By applying migrations, the tables for the initial applications are created in the database. You will learn about the migrate management command in the Creating and applying migrations section of this chapter.
Running the development server
Django comes with a lightweight web server to run your code quickly, without needing to spend time configuring a production server. When you run the Django development server, it keeps checking for changes in your code. It reloads automatically, freeing you from manually reloading it after code changes. However, it might not notice some actions, such as adding new files to your project, so you will have to restart the server manually in these cases.
Start the development server by typing the following command from your project's root folder:
python manage.py runserver
You should see something like this:
Watching for file changes with StatReloader
Performing system checks...
System check identified no issues (0 silenced).
January 01, 2020 - 10:00:00
Django version 3.0, using settings 'mysite.settings'
Starting development server at http://127.0.0.1:8000/
Quit the server with CONTROL-C.
Now open http://127.0.0.1:8000/ in your browser. You should see a page stating that the project is successfully running, as shown in the following screenshot:
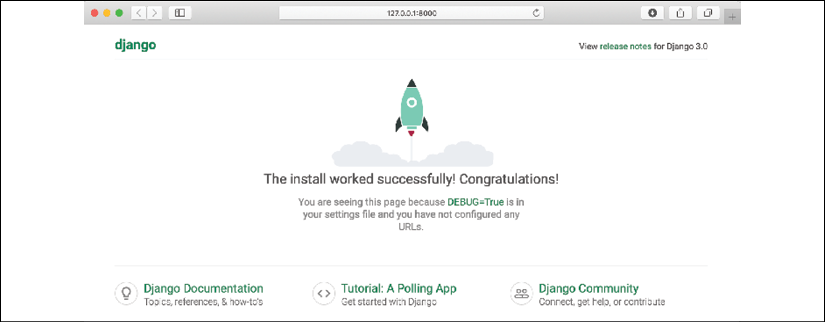
Figure 1.1: The default page of the Django development server
The preceding screenshot indicates that Django is running. If you take a look at your console, you will see the GET request performed by your browser:
[01/Jan/2020 17:20:30] "GET / HTTP/1.1" 200 16351
Each HTTP request is logged in the console by the development server. Any error that occurs while running the development server will also appear in the console.
You can run the Django development server on a custom host and port or tell Django to load a specific settings file, as follows:
python manage.py runserver 127.0.0.1:8001 \--settings=mysite.settings
When you have to deal with multiple environments that require different configurations, you can create a different settings file for each environment.
Remember that this server is only intended for development and is not suitable for production use. In order to deploy Django in a production environment, you should run it as a WSGI application using a web server, such as Apache, Gunicorn, or uWSGI, or as an ASGI application using a server like Uvicorn or Daphne. You can find more information on how to deploy Django with different web servers at https://docs.djangoproject.com/en/3.0/howto/deployment/wsgi/.
Chapter 14, Going Live, explains how to set up a production environment for your Django projects.
Project settings
Let's open the settings.py file and take a look at the configuration of the project. There are several settings that Django includes in this file, but these are only part of all the Django settings available. You can see all the settings and their default values at https://docs.djangoproject.com/en/3.0/ref/settings/.
The following settings are worth looking at:
DEBUGis a Boolean that turns the debug mode of the project on and off. If it is set toTrue, Django will display detailed error pages when an uncaught exception is thrown by your application. When you move to a production environment, remember that you have to set it toFalse. Never deploy a site into production withDEBUGturned on because you will expose sensitive project-related data.ALLOWED_HOSTSis not applied while debug mode is on or when the tests are run. Once you move your site to production and setDEBUGtoFalse, you will have to add your domain/host to this setting in order to allow it to serve your Django site.INSTALLED_APPSis a setting you will have to edit for all projects. This setting tells Django which applications are active for this site. By default, Django includes the following applications:django.contrib.admin: An administration sitedjango.contrib.auth: An authentication frameworkdjango.contrib.contenttypes: A framework for handling content typesdjango.contrib.sessions: A session frameworkdjango.contrib.messages: A messaging frameworkdjango.contrib.staticfiles: A framework for managing static files
MIDDLEWAREis a list that contains middleware to be executed.ROOT_URLCONFindicates the Python module where the root URL patterns of your application are defined.DATABASESis a dictionary that contains the settings for all the databases to be used in the project. There must always be a default database. The default configuration uses an SQLite3 database.LANGUAGE_CODEdefines the default language code for this Django site.USE_TZtells Django to activate/deactivate timezone support. Django comes with support for timezone-aware datetime. This setting is set toTruewhen you create a new project using thestartprojectmanagement command.
Don't worry if you don't understand much about what you're seeing here. You will learn the different Django settings in the following chapters.
Projects and applications
Throughout this book, you will encounter the terms project and application over and over. In Django, a project is considered a Django installation with some settings. An application is a group of models, views, templates, and URLs. Applications interact with the framework to provide some specific functionalities and may be reused in various projects. You can think of a project as your website, which contains several applications, such as a blog, wiki, or forum, that can also be used by other projects.
The following diagram shows the structure of a Django project:
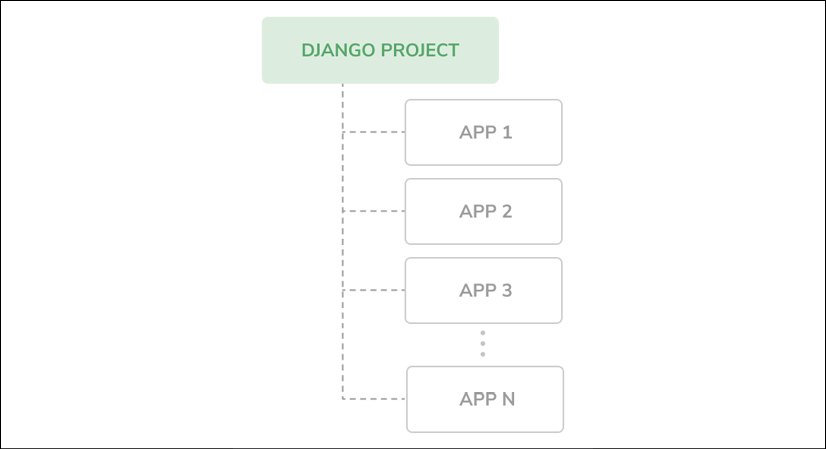
Figure 1.2: The Django project/application structure
Creating an application
Now let's create your first Django application. You will create a blog application from scratch. From the project's root directory, run the following command:
python manage.py startapp blog
This will create the basic structure of the application, which looks like this:
blog/
    __init__.py
    admin.py
    apps.py
    migrations/
        __init__.py
    models.py
    tests.py
    views.py
These files are as follows:
admin.py: This is where you register models to include them in the Django administration site—using this site is optional.apps.py: This includes the main configuration of theblogapplication.migrations: This directory will contain database migrations of your application. Migrations allow Django to track your model changes and synchronize the database accordingly.models.py: This includes the data models of your application; all Django applications need to have amodels.pyfile, but this file can be left empty.tests.py: This is where you can add tests for your application.views.py: The logic of your application goes here; each view receives an HTTP request, processes it, and returns a response.
Designing the blog data schema
You will start designing your blog data schema by defining the data models for your blog. A model is a Python class that subclasses django.db.models.Model in which each attribute represents a database field. Django will create a table for each model defined in the models.py file. When you create a model, Django will provide you with a practical API to query objects in the database easily.
First, you need to define a Post model. Add the following lines to the models.py file of the blog application:
from django.db import models
from django.utils import timezone
from django.contrib.auth.models import User
class Post(models.Model):
    STATUS_CHOICES = (
        ('draft', 'Draft'),
        ('published', 'Published'),
    )
    title = models.CharField(max_length=250)
    slug = models.SlugField(max_length=250,
                            unique_for_date='publish')
    author = models.ForeignKey(User,
                              on_delete=models.CASCADE,
                              related_name='blog_posts')
    body = models.TextField()
    publish = models.DateTimeField(default=timezone.now)
    created = models.DateTimeField(auto_now_add=True)
    updated = models.DateTimeField(auto_now=True)
    status = models.CharField(max_length=10,
                              choices=STATUS_CHOICES,
                              default='draft')
    class Meta:
        ordering = ('-publish',)
    def __str__(self):
        return self.title
This is your data model for blog posts. Let's take a look at the fields you just defined for this model:
title: This is the field for the post title. This field isCharField, which translates into aVARCHARcolumn in the SQL database.slug: This is a field intended to be used in URLs. A slug is a short label that contains only letters, numbers, underscores, or hyphens. You will use theslugfield to build beautiful, SEO-friendly URLs for your blog posts. You have added theunique_for_dateparameter to this field so that you can build URLs for posts using theirpublishdate andslug. Django will prevent multiple posts from having the same slug for a given date.author: This field defines a many-to-one relationship, meaning that each post is written by a user, and a user can write any number of posts. For this field, Django will create a foreign key in the database using the primary key of the related model. In this case, you are relying on theUsermodel of the Django authentication system. Theon_deleteparameter specifies the behavior to adopt when the referenced object is deleted. This is not specific to Django; it is an SQL standard. UsingCASCADE, you specify that when the referenced user is deleted, the database will also delete all related blog posts. You can take a look at all the possible options at https://docs.djangoproject.com/en/3.0/ref/models/fields/#django.db.models.ForeignKey.on_delete. You specify the name of the reverse relationship, fromUsertoPost, with therelated_nameattribute. This will allow you to access related objects easily. You will learn more about this later.body: This is the body of the post. This field is a text field that translates into aTEXTcolumn in the SQL database.publish: This datetime indicates when the post was published. You use Django's timezonenowmethod as the default value. This returns the current datetime in a timezone-aware format. You can think of it as a timezone-aware version of the standard Pythondatetime.nowmethod.created: This datetime indicates when the post was created. Since you are usingauto_now_addhere, the date will be saved automatically when creating an object.updated: This datetime indicates the last time the post was updated. Since you are usingauto_nowhere, the date will be updated automatically when saving an object.status: This field shows the status of a post. You use achoicesparameter, so the value of this field can only be set to one of the given choices.
Django comes with different types of fields that you can use to define your models. You can find all field types at https://docs.djangoproject.com/en/3.0/ref/models/fields/.
The Meta class inside the model contains metadata. You tell Django to sort results by the publish field in descending order by default when you query the database. You specify the descending order using the negative prefix. By doing this, posts published recently will appear first.
The __str__() method is the default human-readable representation of the object. Django will use it in many places, such as the administration site.
If you are coming from using Python 2.x, note that in Python 3, all strings are natively considered Unicode; therefore, we only use the __str__() method and the __unicode__() method is obsolete.
Activating the application
In order for Django to keep track of your application and be able to create database tables for its models, you have to activate it. To do this, edit the settings.py file and add blog.apps.BlogConfig to the INSTALLED_APPS setting. It should look like this:
INSTALLED_APPS = [
    'django.contrib.admin',
    'django.contrib.auth',
    'django.contrib.contenttypes',
    'django.contrib.sessions',
    'django.contrib.messages',
    'django.contrib.staticfiles',
    'blog.apps.BlogConfig',
]
The BlogConfig class is your application configuration. Now Django knows that your application is active for this project and will be able to load its models.
Creating and applying migrations
Now that you have a data model for your blog posts, you will need a database table for it. Django comes with a migration system that tracks the changes made to models and enables them to propagate into the database. As mentioned, the migrate command applies migrations for all applications listed in INSTALLED_APPS; it synchronizes the database with the current models and existing migrations.
First, you will need to create an initial migration for your Post model. In the root directory of your project, run the following command:
python manage.py makemigrations blog
You should get the following output:
Migrations for 'blog':
    blog/migrations/0001_initial.py
        - Create model Post
Django just created the 0001_initial.py file inside the migrations directory of the blog application. You can open that file to see how a migration appears. A migration specifies dependencies on other migrations and operations to perform in the database to synchronize it with model changes.
Let's take a look at the SQL code that Django will execute in the database to create the table for your model. The sqlmigrate command takes the migration names and returns their SQL without executing it. Run the following command to inspect the SQL output of your first migration:
python manage.py sqlmigrate blog 0001
The output should look as follows:
BEGIN;
--
-- Create model Post
--
CREATE TABLE "blog_post" ("id" integer NOT NULL PRIMARY KEY AUTOINCREMENT, "title" varchar(250) NOT NULL, "slug" varchar(250) NOT NULL, "body" text NOT NULL, "publish" datetime NOT NULL, "created" datetime NOT NULL, "updated" datetime NOT NULL, "status" varchar(10) NOT NULL, "author_id" integer NOT NULL REFERENCES "auth_user" ("id") DEFERRABLE INITIALLY DEFERRED);
CREATE INDEX "blog_post_slug_b95473f2" ON "blog_post" ("slug");
CREATE INDEX "blog_post_author_id_dd7a8485" ON "blog_post" ("author_id");
COMMIT;
The exact output depends on the database you are using. The preceding output is generated for SQLite. As you can see in the output, Django generates the table names by combining the application name and the lowercase name of the model (blog_post), but you can also specify a custom database name for your model in the Meta class of the model using the db_table attribute.
Django creates a primary key automatically for each model, but you can also override this by specifying primary_key=True in one of your model fields. The default primary key is an id column, which consists of an integer that is incremented automatically. This column corresponds to the id field that is automatically added to your models.
Let's sync your database with the new model. Run the following command to apply existing migrations:
python manage.py migrate
You will get an output that ends with the following line:
Applying blog.0001_initial... OK
You just applied migrations for the applications listed in INSTALLED_APPS, including your blog application. After applying the migrations, the database reflects the current status of your models.
If you edit the models.py file in order to add, remove, or change the fields of existing models, or if you add new models, you will have to create a new migration using the makemigrations command. The migration will allow Django to keep track of model changes. Then, you will have to apply it with the migrate command to keep the database in sync with your models.
Creating an administration site for models
Now that you have defined the Post model, you will create a simple administration site to manage your blog posts. Django comes with a built-in administration interface that is very useful for editing content. The Django site is built dynamically by reading your model metadata and providing a production-ready interface for editing content. You can use it out of the box, configuring how you want your models to be displayed in it.
The django.contrib.admin application is already included in the INSTALLED_APPS setting, so you don't need to add it.
Creating a superuser
First, you will need to create a user to manage the administration site. Run the following command:
python manage.py createsuperuser
You will see the following output; enter your desired username, email, and password, as follows:
Username (leave blank to use 'admin'): admin
Email address: admin@admin.com
Password: ********
Password (again): ********
Superuser created successfully.
The Django administration site
Now start the development server with the python manage.py runserver command and open http://127.0.0.1:8000/admin/ in your browser. You should see the administration login page, as shown in the following screenshot:
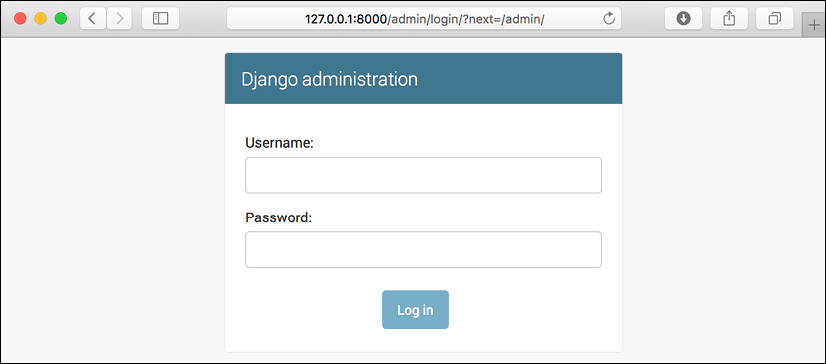
Figure 1.3: The Django administration site login screen
Log in using the credentials of the user you created in the preceding step. You will see the administration site index page, as shown in the following screenshot:
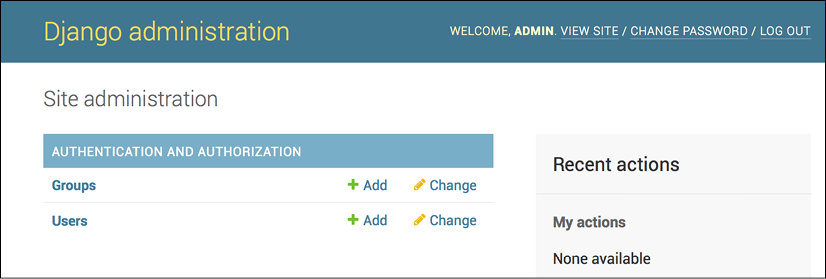
Figure 1.4: The Django administration site index page
The Group and User models that you can see in the preceding screenshot are part of the Django authentication framework located in django.contrib.auth. If you click on Users, you will see the user you created previously.
Adding models to the administration site
Let's add your blog models to the administration site. Edit the admin.py file of the blog application and make it look like this:
from django.contrib import admin
from .models import Post
admin.site.register(Post)
Now reload the administration site in your browser. You should see your Post model on the site, as follows:
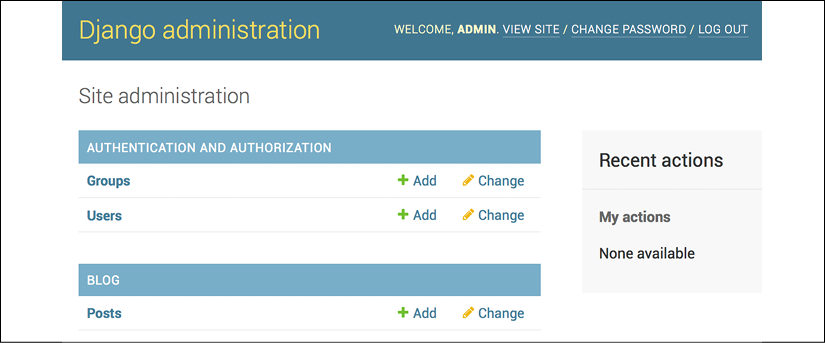
Figure 1.5: The Post model of the blog application included in the Django administration site index page
That was easy, right? When you register a model in the Django administration site, you get a user-friendly interface generated by introspecting your models that allows you to list, edit, create, and delete objects in a simple way.
Click on the Add link beside Posts to add a new post. You will note the form that Django has generated dynamically for your model, as shown in the following screenshot:
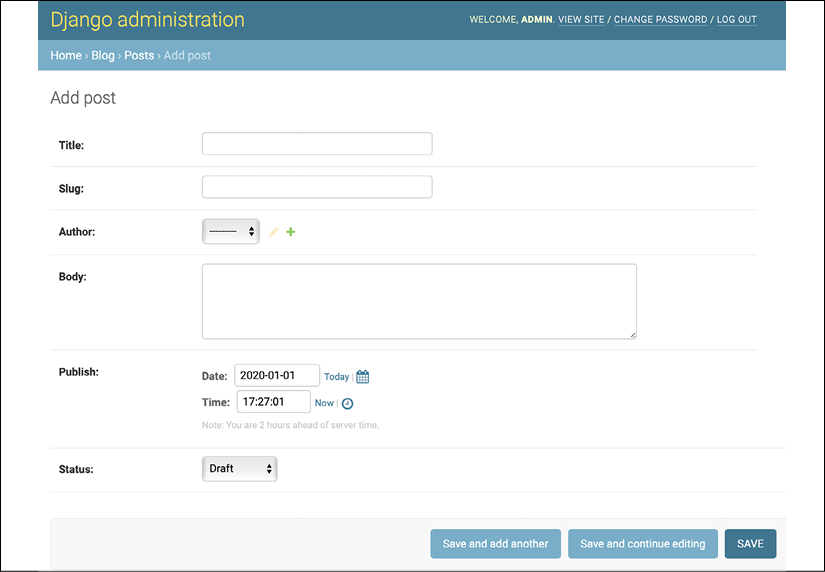
Figure 1.6: The Django administration site edit form for the Post model
Django uses different form widgets for each type of field. Even complex fields, such as the DateTimeField, are displayed with an easy interface, such as a JavaScript date picker.
Fill in the form and click on the SAVE button. You should be redirected to the post list page with a success message and the post you just created, as shown in the following screenshot:
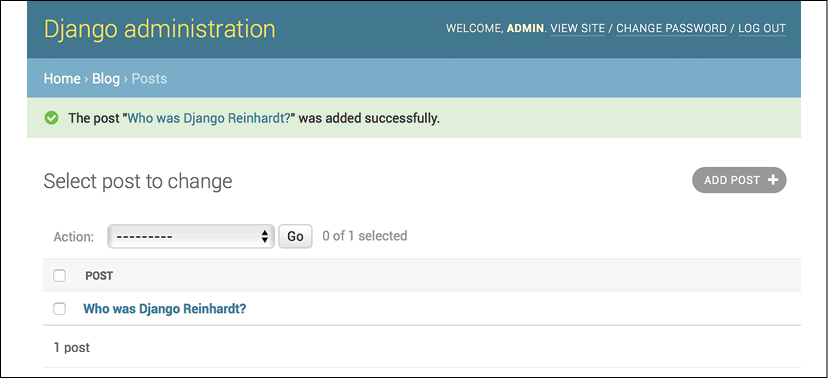
Figure 1.7: The Django administration site list view for the Post model with an added successfully message
Customizing the way that models are displayed
Now, we will take a look at how to customize the administration site. Edit the admin.py file of your blog application and change it, as follows:
from django.contrib import admin
from .models import Post
@admin.register(Post)
class PostAdmin(admin.ModelAdmin):
    list_display = ('title', 'slug', 'author', 'publish', 'status')
You are telling the Django administration site that your model is registered in the site using a custom class that inherits from ModelAdmin. In this class, you can include information about how to display the model in the site and how to interact with it.
The list_display attribute allows you to set the fields of your model that you want to display on the administration object list page. The @admin.register() decorator performs the same function as the admin.site.register() function that you replaced, registering the ModelAdmin class that it decorates.
Let's customize the admin model with some more options, using the following code:
@admin.register(Post)
class PostAdmin(admin.ModelAdmin):
    list_display = ('title', 'slug', 'author', 'publish', 'status')
    list_filter = ('status', 'created', 'publish', 'author')
    search_fields = ('title', 'body')
    prepopulated_fields = {'slug': ('title',)}
    raw_id_fields = ('author',)
    date_hierarchy = 'publish'
    ordering = ('status', 'publish')
Return to your browser and reload the post list page. Now, it will look like this:
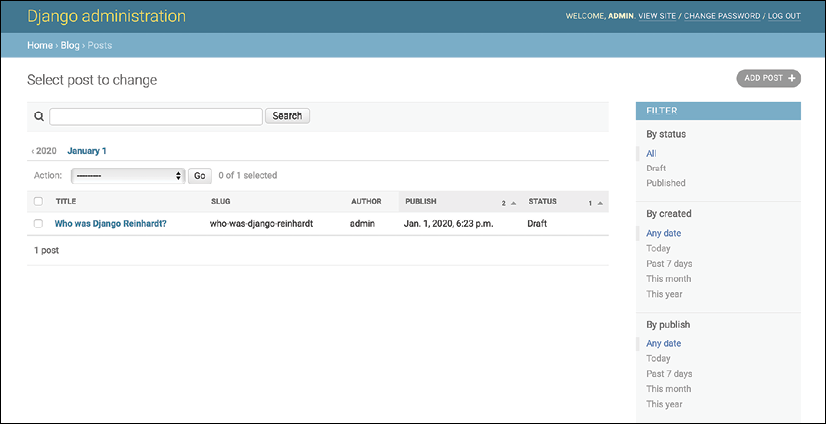
Figure 1.8: The Django administration site custom list view for the Post model
You can see that the fields displayed on the post list page are the ones you specified in the list_display attribute. The list page now includes a right sidebar that allows you to filter the results by the fields included in the list_filter attribute.
A search bar has appeared on the page. This is because you have defined a list of searchable fields using the search_fields attribute. Just below the search bar, there are navigation links to navigate through a date hierarchy; this has been defined by the date_hierarchy attribute. You can also see that the posts are ordered by STATUS and PUBLISH columns by default. You have specified the default sorting criteria using the ordering attribute.
Next, click on the ADD POST link. You will also note some changes here. As you type the title of a new post, the slug field is filled in automatically. You have told Django to prepopulate the slug field with the input of the title field using the prepopulated_fields attribute.
Also, the author field is now displayed with a lookup widget that can scale much better than a drop-down select input when you have thousands of users. This is achieved with the raw_id_fields attribute and it looks like this:

Figure 1.9: The widget to select related objects for the author field of the Post model
With a few lines of code, you have customized the way your model is displayed on the administration site. There are plenty of ways to customize and extend the Django administration site; you will learn more about this later in this book.
Working with QuerySets and managers
Now that you have a fully functional administration site to manage your blog's content, it's time to learn how to retrieve information from the database and interact with it. Django comes with a powerful database abstraction API that lets you create, retrieve, update, and delete objects easily. The Django object-relational mapper (ORM) is compatible with MySQL, PostgreSQL, SQLite, Oracle, and MariaDB. Remember that you can define the database of your project in the DATABASES setting of your project's settings.py file. Django can work with multiple databases at a time, and you can program database routers to create custom routing schemes.
Once you have created your data models, Django gives you a free API to interact with them. You can find the data model reference of the official documentation at https://docs.djangoproject.com/en/3.0/ref/models/.
The Django ORM is based on QuerySets. A QuerySet is a collection of database queries to retrieve objects from your database. You can apply filters to QuerySets to narrow down the query results based on given parameters.
Creating objects
Open the terminal and run the following command to open the Python shell:
python manage.py shell
Then, type the following lines:
>>> from django.contrib.auth.models import User
>>> from blog.models import Post
>>> user = User.objects.get(username='admin')
>>> post = Post(title='Another post',
...             slug='another-post',
...             body='Post body.',
...             author=user)
>>> post.save()
Let's analyze what this code does. First, you retrieve the user object with the username admin:
user = User.objects.get(username='admin')
The get() method allows you to retrieve a single object from the database. Note that this method expects a result that matches the query. If no results are returned by the database, this method will raise a DoesNotExist exception, and if the database returns more than one result, it will raise a MultipleObjectsReturned exception. Both exceptions are attributes of the model class that the query is being performed on.
Then, you create a Post instance with a custom title, slug, and body, and set the user that you previously retrieved as the author of the post:
post = Post(title='Another post', slug='another-post', body='Post body.', author=user)
This object is in memory and is not persisted to the database.
Finally, you save the Post object to the database using the save() method:
post.save()
The preceding action performs an INSERT SQL statement behind the scenes. You have seen how to create an object in memory first and then persist it to the database, but you can also create the object and persist it into the database in a single operation using the create() method, as follows:
Post.objects.create(title='One more post',
                    slug='one-more-post',
                    body='Post body.',
                    author=user)
Updating objects
Now, change the title of the post to something different and save the object again:
>>> post.title = 'New title'
>>> post.save()
This time, the save() method performs an UPDATE SQL statement.
The changes you make to the object are not persisted to the database until you call the save() method.
Retrieving objects
You already know how to retrieve a single object from the database using the get() method. You accessed this method using Post.objects.get(). Each Django model has at least one manager, and the default manager is called objects. You get a QuerySet object using your model manager. To retrieve all objects from a table, you just use the all() method on the default objects manager, like this:
>>> all_posts = Post.objects.all()
This is how you create a QuerySet that returns all objects in the database. Note that this QuerySet has not been executed yet. Django QuerySets are lazy, which means they are only evaluated when they are forced to be. This behavior makes QuerySets very efficient. If you don't set the QuerySet to a variable, but instead write it directly on the Python shell, the SQL statement of the QuerySet is executed because you force it to output results:
>>> all_posts
Using the filter() method
To filter a QuerySet, you can use the filter() method of the manager. For example, you can retrieve all posts published in the year 2020 using the following QuerySet:
>>> Post.objects.filter(publish__year=2020)
You can also filter by multiple fields. For example, you can retrieve all posts published in 2020 by the author with the username admin:
>>> Post.objects.filter(publish__year=2020, author__username='admin')
This equates to building the same QuerySet chaining multiple filters:
>>> Post.objects.filter(publish__year=2020) \
>>>             .filter(author__username='admin')
Queries with field lookup methods are built using two underscores, for example, publish__year, but the same notation is also used for accessing fields of related models, such as author__username.
Using exclude()
You can exclude certain results from your QuerySet using the exclude() method of the manager. For example, you can retrieve all posts published in 2020 whose titles don't start with Why:
>>> Post.objects.filter(publish__year=2020) \
>>>             .exclude(title__startswith='Why')
Using order_by()
You can order results by different fields using the order_by() method of the manager. For example, you can retrieve all objects ordered by their title, as follows:
>>> Post.objects.order_by('title')
Ascending order is implied. You can indicate descending order with a negative sign prefix, like this:
>>> Post.objects.order_by('-title')
Deleting objects
If you want to delete an object, you can do it from the object instance using the delete() method:
>>> post = Post.objects.get(id=1)
>>> post.delete()
Note that deleting objects will also delete any dependent relationships for ForeignKey objects defined with on_delete set to CASCADE.
When QuerySets are evaluated
Creating a QuerySet doesn't involve any database activity until it is evaluated. QuerySets usually return another unevaluated QuerySet. You can concatenate as many filters as you like to a QuerySet, and you will not hit the database until the QuerySet is evaluated. When a QuerySet is evaluated, it translates into an SQL query to the database.
QuerySets are only evaluated in the following cases:
- The first time you iterate over them
- When you slice them, for instance,
Post.objects.all()[:3] - When you pickle or cache them
- When you call
repr()orlen()on them - When you explicitly call
list()on them - When you test them in a statement, such as
bool(),or,and, orif
Creating model managers
As I previously mentioned, objects is the default manager of every model that retrieves all objects in the database. However, you can also define custom managers for your models. You will create a custom manager to retrieve all posts with the published status.
There are two ways to add or customize managers for your models: you can add extra manager methods to an existing manager, or create a new manager by modifying the initial QuerySet that the manager returns. The first method provides you with a QuerySet API such as Post.objects.my_manager(), and the latter provides you with Post.my_manager.all(). The manager will allow you to retrieve posts using Post.published.all().
Edit the models.py file of your blog application to add the custom manager:
class PublishedManager(models.Manager):
    def get_queryset(self):
        return super(PublishedManager,
                     self).get_queryset()\
                          .filter(status='published')
class Post(models.Model):
    # ...
    objects = models.Manager() # The default manager.
    published = PublishedManager() # Our custom manager.
The first manager declared in a model becomes the default manager. You can use the Meta attribute default_manager_name to specify a different default manager. If no manager is defined in the model, Django automatically creates the objects default manager for it. If you declare any managers for your model but you want to keep the objects manager as well, you have to add it explicitly to your model. In the preceding code, you add the default objects manager and the published custom manager to the Post model.
The get_queryset() method of a manager returns the QuerySet that will be executed. You override this method to include your custom filter in the final QuerySet.
You have now defined your custom manager and added it to the Post model; you can use it to perform queries. Let's test it.
Start the development server again with the following command:
python manage.py shell
Now, you can import the Post model and retrieve all published posts whose title starts with Who, executing the following QuerySet:
>>> from blog.models import Post
>>> Post.published.filter(title__startswith='Who')
To obtain results for this QuerySet, make sure that you set the published field to True in the Post object whose title starts with Who.
Building list and detail views
Now that you have knowledge of how to use the ORM, you are ready to build the views of the blog application. A Django view is just a Python function that receives a web request and returns a web response. All the logic to return the desired response goes inside the view.
First, you will create your application views, then you will define a URL pattern for each view, and finally, you will create HTML templates to render the data generated by the views. Each view will render a template, passing variables to it, and will return an HTTP response with the rendered output.
Creating list and detail views
Let's start by creating a view to display the list of posts. Edit the views.py file of your blog application and make it look like this:
from django.shortcuts import render, get_object_or_404
from .models import Post
def post_list(request):
    posts = Post.published.all()
    return render(request,
                 'blog/post/list.html',
                 {'posts': posts})
You just created your first Django view. The post_list view takes the request object as the only parameter. This parameter is required by all views. In this view, you retrieve all the posts with the published status using the published manager that you created previously.
Finally, you use the render() shortcut provided by Django to render the list of posts with the given template. This function takes the request object, the template path, and the context variables to render the given template. It returns an HttpResponse object with the rendered text (normally HTML code). The render() shortcut takes the request context into account, so any variable set by the template context processors is accessible by the given template. Template context processors are just callables that set variables into the context. You will learn how to use them in Chapter 3, Extending Your Blog Application.
Let's create a second view to display a single post. Add the following function to the views.py file:
def post_detail(request, year, month, day, post):
    post = get_object_or_404(Post, slug=post,
                                   status='published',
                                   publish__year=year,
                                   publish__month=month,
                                   publish__day=day)
    return render(request,
                  'blog/post/detail.html',
                  {'post': post})
This is the post detail view. This view takes the year, month, day, and post arguments to retrieve a published post with the given slug and date. Note that when you created the Post model, you added the unique_for_date parameter to the slug field. This ensures that there will be only one post with a slug for a given date, and thus, you can retrieve single posts using the date and slug. In the detail view, you use the get_object_or_404() shortcut to retrieve the desired post. This function retrieves the object that matches the given parameters or an HTTP 404 (not found) exception if no object is found. Finally, you use the render() shortcut to render the retrieved post using a template.
Adding URL patterns for your views
URL patterns allow you to map URLs to views. A URL pattern is composed of a string pattern, a view, and, optionally, a name that allows you to name the URL project-wide. Django runs through each URL pattern and stops at the first one that matches the requested URL. Then, Django imports the view of the matching URL pattern and executes it, passing an instance of the HttpRequest class and the keyword or positional arguments.
Create a urls.py file in the directory of the blog application and add the following lines to it:
from django.urls import path
from . import views
app_name = 'blog'
urlpatterns = [
    # post views
    path('', views.post_list, name='post_list'),
    path('<int:year>/<int:month>/<int:day>/<slug:post>/',
         views.post_detail,
         name='post_detail'),
]
In the preceding code, you define an application namespace with the app_name variable. This allows you to organize URLs by application and use the name when referring to them. You define two different patterns using the path() function. The first URL pattern doesn't take any arguments and is mapped to the post_list view. The second pattern takes the following four arguments and is mapped to the post_detail view:
year: Requires an integermonth: Requires an integerday: Requires an integerpost: Can be composed of words and hyphens
You use angle brackets to capture the values from the URL. Any value specified in the URL pattern as <parameter> is captured as a string. You use path converters, such as <int:year>, to specifically match and return an integer and <slug:post> to specifically match a slug. You can see all path converters provided by Django at https://docs.djangoproject.com/en/3.0/topics/http/urls/#path-converters.
If using path() and converters isn't sufficient for you, you can use re_path() instead to define complex URL patterns with Python regular expressions. You can learn more about defining URL patterns with regular expressions at https://docs.djangoproject.com/en/3.0/ref/urls/#django.urls.re_path. If you haven't worked with regular expressions before, you might want to take a look at the Regular Expression HOWTO located at https://docs.python.org/3/howto/regex.html first.
Creating a urls.py file for each application is the best way to make your applications reusable by other projects.
Next, you have to include the URL patterns of the blog application in the main URL patterns of the project.
Edit the urls.py file located in the mysite directory of your project and make it look like the following:
from django.urls import path, include
from django.contrib import admin
urlpatterns = [
    path('admin/', admin.site.urls),
    path('blog/', include('blog.urls', namespace='blog')),
]
The new URL pattern defined with include refers to the URL patterns defined in the blog application so that they are included under the blog/ path. You include these patterns under the namespace blog. Namespaces have to be unique across your entire project. Later, you will refer to your blog URLs easily by using the namespace followed by a colon and the URL name, for example, blog:post_list and blog:post_detail. You can learn more about URL namespaces at https://docs.djangoproject.com/en/3.0/topics/http/urls/#url-namespaces.
Canonical URLs for models
A canonical URL is the preferred URL for a resource. You may have different pages in your site where you display posts, but there is a single URL that you use as the main URL for a blog post. The convention in Django is to add a get_absolute_url() method to the model that returns the canonical URL for the object.
You can use the post_detail URL that you have defined in the preceding section to build the canonical URL for Post objects. For this method, you will use the reverse() method, which allows you to build URLs by their name and pass optional parameters. You can learn more about the URLs utility functions at https://docs.djangoproject.com/en/3.0/ref/urlresolvers/.
Edit the models.py file of the blog application and add the following code:
from django.urls import reverse
class Post(models.Model):
    # ...
    def get_absolute_url(self):
        return reverse('blog:post_detail',
                       args=[self.publish.year,
                             self.publish.month,
                             self.publish.day, self.slug])
You will use the get_absolute_url() method in your templates to link to specific posts.
Creating templates for your views
You have created views and URL patterns for the blog application. URL patterns map URLs to views, and views decide which data gets returned to the user. Templates define how the data is displayed; they are usually written in HTML in combination with the Django template language. You can find more information about the Django template language at https://docs.djangoproject.com/en/3.0/ref/templates/language/.
Let's add templates to your application to display posts in a user-friendly manner.
Create the following directories and files inside your blog application directory:
templates/
    blog/
        base.html
        post/
            list.html
            detail.html
The preceding structure will be the file structure for your templates. The base.html file will include the main HTML structure of the website and divide the content into the main content area and a sidebar. The list.html and detail.html files will inherit from the base.html file to render the blog post list and detail views, respectively.
Django has a powerful template language that allows you to specify how data is displayed. It is based on template tags, template variables, and template filters:
- Template tags control the rendering of the template and look like
{% tag %} - Template variables get replaced with values when the template is rendered and look like
{{ variable }} - Template filters allow you to modify variables for display and look like
{{ variable|filter}}.
You can see all built-in template tags and filters at https://docs.djangoproject.com/en/3.0/ref/templates/builtins/.
Edit the base.html file and add the following code:
{% load static %}
<!DOCTYPE html>
<html>
<head>
  <title>{% block title %}{% endblock %}</title>
  <link href="{% static "css/blog.css" %}" rel="stylesheet">
</head>
<body>
  <div id="content">
    {% block content %}
    {% endblock %}
  </div>
  <div id="sidebar">
    <h2>My blog</h2>
    <p>This is my blog.</p>
  </div>
</body>
</html>
{% load static %} tells Django to load the static template tags that are provided by the django.contrib.staticfiles application, which is contained in the INSTALLED_APPS setting. After loading them, you are able to use the {% static %} template tag throughout this template. With this template tag, you can include the static files, such as the blog.css file, which you will find in the code of this example under the static/ directory of the blog application. Copy the static/ directory from the code that comes along with this chapter into the same location as your project to apply the CSS styles to the templates. You can find the directory's contents at https://github.com/PacktPublishing/Django-3-by-Example/tree/master/Chapter01/mysite/blog/static.
You can see that there are two {% block %} tags. These tell Django that you want to define a block in that area. Templates that inherit from this template can fill in the blocks with content. You have defined a block called title and a block called content.
Let's edit the post/list.html file and make it look like the following:
{% extends "blog/base.html" %}
{% block title %}My Blog{% endblock %}
{% block content %}
  <h1>My Blog</h1>
  {% for post in posts %}
    <h2>
      <a href="{{ post.get_absolute_url }}">
        {{ post.title }}
      </a>
    </h2>
    <p class="date">
      Published {{ post.publish }} by {{ post.author }}
    </p>
    {{ post.body|truncatewords:30|linebreaks }}
  {% endfor %}
{% endblock %}
With the {% extends %} template tag, you tell Django to inherit from the blog/base.html template. Then, you fill the title and content blocks of the base template with content. You iterate through the posts and display their title, date, author, and body, including a link in the title to the canonical URL of the post.
In the body of the post, you apply two template filters: truncatewords truncates the value to the number of words specified, and linebreaks converts the output into HTML line breaks. You can concatenate as many template filters as you wish; each one will be applied to the output generated by the preceding one.
Open the shell and execute the python manage.py runserver command to start the development server. Open http://127.0.0.1:8000/blog/ in your browser; you will see everything running. Note that you need to have some posts with the Published status to show them here. You should see something like this:
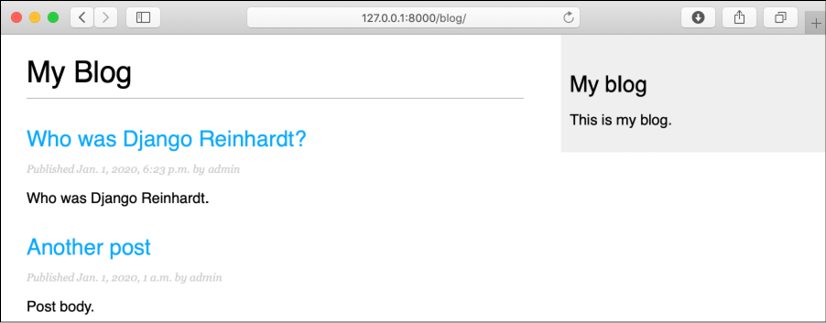
Figure 1.10: The page for the post list view
Next, edit the post/detail.html file:
{% extends "blog/base.html" %}
{% block title %}{{ post.title }}{% endblock %}
{% block content %}
  <h1>{{ post.title }}</h1>
  <p class="date">
    Published {{ post.publish }} by {{ post.author }}
  </p>
  {{ post.body|linebreaks }}
{% endblock %}
Next, you can return to your browser and click on one of the post titles to take a look at the detail view of the post. You should see something like this:
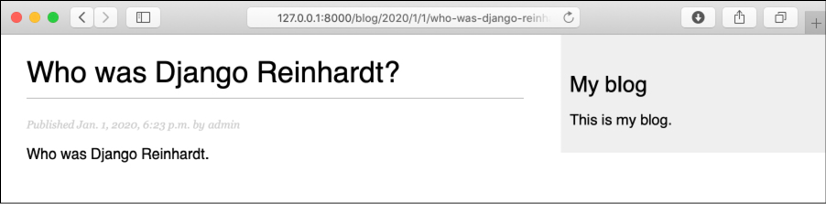
Figure 1.11: The page for the post's detail view
Take a look at the URL—it should be /blog/2020/1/1/who-was-django-reinhardt/. You have designed SEO-friendly URLs for your blog posts.
Adding pagination
When you start adding content to your blog, you might easily reach the point where tens or hundreds of posts are stored in your database. Instead of displaying all the posts on a single page, you may want to split the list of posts across several pages. This can be achieved through pagination. You can define the number of posts you want to be displayed per page and retrieve the posts that correspond to the page requested by the user. Django has a built-in pagination class that allows you to manage paginated data easily.
Edit the views.py file of the blog application to import the Django paginator classes and modify the post_list view, as follows:
from django.core.paginator import Paginator, EmptyPage,\
                                  PageNotAnInteger
def post_list(request):
    object_list = Post.published.all()
    paginator = Paginator(object_list, 3) # 3 posts in each page
    page = request.GET.get('page')
    try:
        posts = paginator.page(page)
    except PageNotAnInteger:
        # If page is not an integer deliver the first page
        posts = paginator.page(1)
    except EmptyPage:
        # If page is out of range deliver last page of results
        posts = paginator.page(paginator.num_pages)
    return render(request,
                  'blog/post/list.html',
                   {'page': page,
                    'posts': posts})
- You instantiate the
Paginatorclass with the number of objects that you want to display on each page. - You get the
page GETparameter, which indicates the current page number. - You obtain the objects for the desired page by calling the
page()method ofPaginator. - If the
pageparameter is not an integer, you retrieve the first page of results. If this parameter is a number higher than the last page of results, you retrieve the last page. - You pass the page number and retrieved objects to the template.
Now you have to create a template to display the paginator so that it can be included in any template that uses pagination. In the templates/ folder of the blog application, create a new file and name it pagination.html. Add the following HTML code to the file:
<div class="pagination">
  <span class="step-links">
    {% if page.has_previous %}
      <a href="?page={{ page.previous_page_number }}">Previous</a>
    {% endif %}
    <span class="current">
      Page {{ page.number }} of {{ page.paginator.num_pages }}.
    </span>
    {% if page.has_next %}
      <a href="?page={{ page.next_page_number }}">Next</a>
    {% endif %}
  </span>
</div>
The pagination template expects a Page object in order to render the previous and next links, and to display the current page and total pages of results. Let's return to the blog/post/list.html template and include the pagination.html template at the bottom of the {% content %} block, as follows:
{% block content %}
  ...
  {% include "pagination.html" with page=posts %}
{% endblock %}
Since the Page object you are passing to the template is called posts, you include the pagination template in the post list template, passing the parameters to render it correctly. You can follow this method to reuse your pagination template in the paginated views of different models.
Now open http://127.0.0.1:8000/blog/ in your browser. You should see the pagination at the bottom of the post list and should be able to navigate through pages:
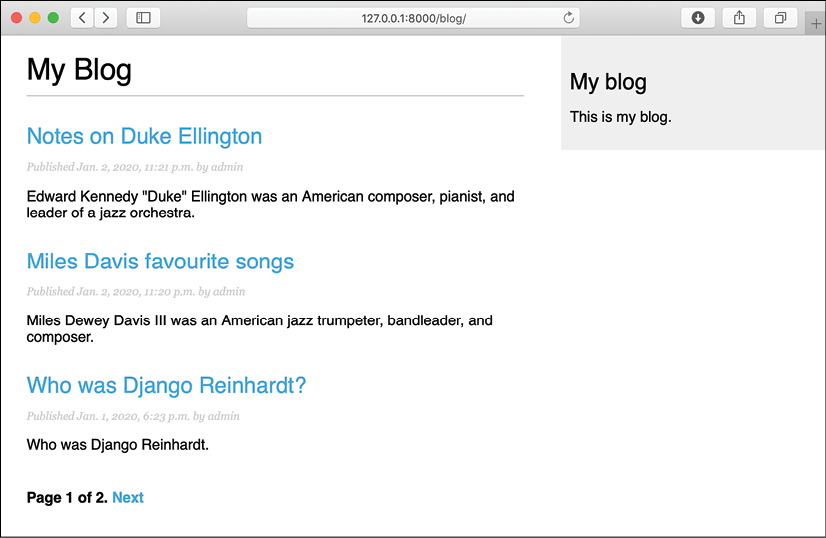
Figure 1.12: The post list page including pagination
Using class-based views
Class-based views are an alternative way to implement views as Python objects instead of functions. Since a view is a callable that takes a web request and returns a web response, you can also define your views as class methods. Django provides base view classes for this. All of them inherit from the View class, which handles HTTP method dispatching and other common functionalities.
Class-based views offer advantages over function-based views for some use cases. They have the following features:
- Organizing code related to HTTP methods, such as
GET,POST, orPUT, in separate methods, instead of using conditional branching - Using multiple inheritance to create reusable view classes (also known as mixins)
You can take a look at an introduction to class-based views at https://docs.djangoproject.com/en/3.0/topics/class-based-views/intro/.
You will change your post_list view into a class-based view to use the generic ListView offered by Django. This base view allows you to list objects of any kind.
Edit the views.py file of your blog application and add the following code:
from django.views.generic import ListView
class PostListView(ListView):
    queryset = Post.published.all()
    context_object_name = 'posts'
    paginate_by = 3
    template_name = 'blog/post/list.html'
This class-based view is analogous to the previous post_list view. In the preceding code, you are telling ListView to do the following things:
- Use a specific QuerySet instead of retrieving all objects. Instead of defining a
querysetattribute, you could have specifiedmodel = Postand Django would have built the genericPost.objects.all()QuerySet for you. - Use the context variable
postsfor the query results. The default variable isobject_listif you don't specify anycontext_object_name. - Paginate the result, displaying three objects per page.
- Use a custom template to render the page. If you don't set a default template,
ListViewwill useblog/post_list.html.
Now open the urls.py file of your blog application, comment the preceding post_list URL pattern, and add a new URL pattern using the PostListView class, as follows:
urlpatterns = [
    # post views
    # path('', views.post_list, name='post_list'),
    path('', views.PostListView.as_view(), name='post_list'),
    path('<int:year>/<int:month>/<int:day>/<slug:post>/',
        views.post_detail,
        name='post_detail'),
]
In order to keep pagination working, you have to use the right page object that is passed to the template. Django's ListView generic view passes the selected page in a variable called page_obj, so you have to edit your post/list.html template accordingly to include the paginator using the right variable, as follows:
{% include "pagination.html" with page=page_obj %}
Open http://127.0.0.1:8000/blog/ in your browser and verify that everything works the same way as with the previous post_list view. This is a simple example of a class-based view that uses a generic class provided by Django. You will learn more about class-based views in Chapter 10, Building an E-Learning Platform, and successive chapters.
Summary
In this chapter, you learned the basics of the Django web framework by creating a simple blog application. You designed the data models and applied migrations to your project. You also created the views, templates, and URLs for your blog, including object pagination.
In the next chapter, you will discover how to enhance your blog application with a comment system and tagging functionality, and how to allow your users to share posts by email.