


Installing and Configuring Kali Linux
This chapter will guide you through the wonderful world of Kali Linux 2018.2, a specialized Linux distribution for the purpose of penetration testing. In this chapter, we will cover the following topics:
- A brief history of Kali
- Several common uses of Kali
- Downloading and installing Kali
- Configuring and updating Kali
Technical requirements
For this chapter and throughout the book, readers will need a laptop or desktop with 6 GB of RAM or greater and also 100 GB hard disk space if installing Kali Linux and test lab environments as virtual machines. If installing Kali on a flash drive or SD/micro-SD card, minimum storage space should be 8 GB (with 16 GB or more recommended). Readers will also be required to download the following:
- VirtualBox (https://www.virtualbox.org/wiki/Downloads)
- Vmware Player (https://my.vmware.com/en/web/vmware/free#desktop_end_user_computing/vmware_workstation_player/14_0)
- Kali Linux (https://www.kali.org/downloads/)
Kali Linux tool categories
As of the writing of this, the latest release of Kali Linux is version 2018.2, released on. As listed on the official website at https://bugs.kali.org/changelog_page.php, this version includes:
- Better support for AMD GPUs
- Fixes for x86 and x64 architecture against Spectre and Meltdown vulnerabilities
- Easier access to Metasploit with metasploit-framework-4.16.34-0Kali2 and newer
- Updates to tools including Bloodhound v1.51, Reaver 1.6.4, PixieWPS 1.42, BurpSuite 1.7.32, Hashcat 4.0, and others
- Improvements to Wpscan, Openvas, Xplico, Responder, and Dradis
Kali Linux contains a number of tools that can be used during the penetration testing process. The penetration testing tools included in Kali Linux can be categorized into the following:
- Information gathering: This category contains several tools that can be used to gather information about DNS, IDS/IPS, network scanning, operating systems, routing, SSL, SMB, VPN, voice over IP, SNMP, email addresses, and VPN.
- Vulnerability assessment: In this category, you can find tools to scan vulnerabilities in general. It also contains tools to assess the Cisco network, and tools to assess vulnerability in several database servers. This category also includes several fuzzing tools.
- Web applications: This category contains tools related to web applications such as the content management system scanner, database exploitation, web application fuzzers, web application proxies, web crawlers, and web vulnerability scanners.
- Database assessment: Tools in this category test the security of a variety of databases. There are a number of tools designed specifically to test SQL databases.
- Password attacks: In this category, you will find several tools that can be used to perform password attacks, online or offline.
- Wireless attacks: Testing wireless security is becoming more and more common. This category includes tools to attack Bluetooth, RFID/NFC, and wireless devices.
- Exploitation tools: This category contains tools that can be used to exploit the vulnerabilities found in the target environment. You can find exploitation tools for the network, web, and databases. There are also tools to perform social engineering attacks and find exploit information.
- Sniffing and spoofing: Tools in this category can be used to sniff the network and web traffic. This category also includes network spoofing tools such as Ettercap and Yersinia.
- Post exploitation: Tools in this category will be able to help you maintain access to the target machine. You might need to get the highest privilege level in the machine before you can install tools in this category. Here, you can find tools for backdooring the operating system and web application. You can also find tools for tunneling.
- Forensics: This category contains tools to perform digital forensic acquisitions, data recovery, incident response, and file carving.
- Reporting tools: In this category, you will find tools that help you document the penetration testing process and results.
- Social engineering tools: This category contains the very powerful Maltego and Social Engineering Toolkit (SET), among others, which are very useful in the reconnaissance and exploitation phases of penetration testing.
- System services: This category contains several services that can be useful during the penetration testing task, such as the Apache service, MySQL service, SSH service, and Metasploit service.
To simplify the life of a penetration tester, Kali Linux has provided us with a category called Top 10 Security Tools. As its name implies, these are the top 10 security tools most commonly used by penetration testers. The tools included in this category are aircrack-ng, burp-suite, hydra, john, maltego, metasploit, nmap, sqlmap, wireshark, and zaproxy.
Besides containing tools that can be used for the penetration testing tasks, Kali Linux also comes with several tools that you can use for the following:
- Reverse engineering: This category contains tools that can be used to debug a program or disassemble an executable file.
- Stress testing: This category contains tools that can be used to help you in stress testing your network, wireless, web, and VOIP environment.
- Hardware hacking: Tools in this category can be used if you want to work with Android and Arduino applications.
- Forensics: Tools in this category can be used for a variety of digital forensic tasks. This includes imaging disks, analyzing memory images, and file carving. One of the best forensic tools that is available with Kali Linux is Volatility. This command-line tool has a number of features for analyzing memory images. There are also several GUI tools available such as Autopsy and Guymager and also Xplico, which has been fixed.
For the purposes of this book, we are focusing only on Kali Linux's penetration testing tools.
Downloading Kali Linux
The first thing to do before installing and using Kali Linux is to download it. You can get Kali Linux from the Kali Linux website (http://www.kali.org/downloads/).
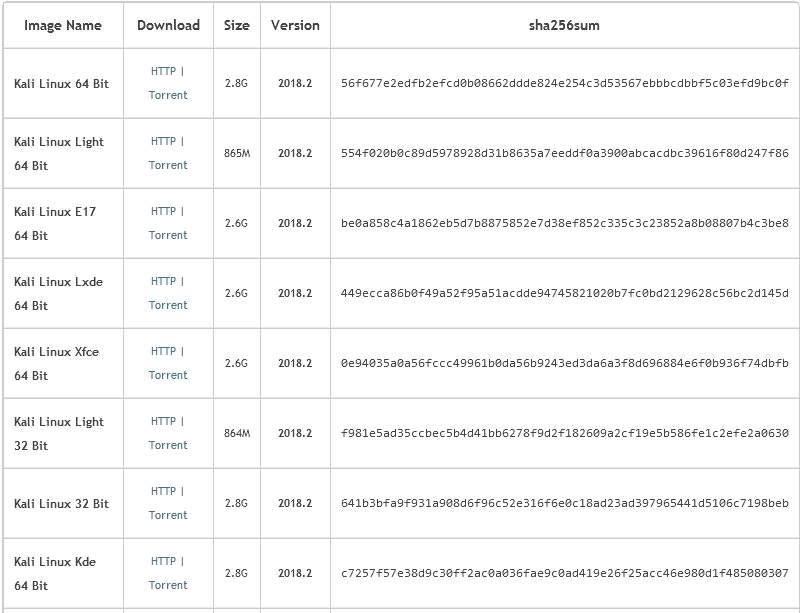
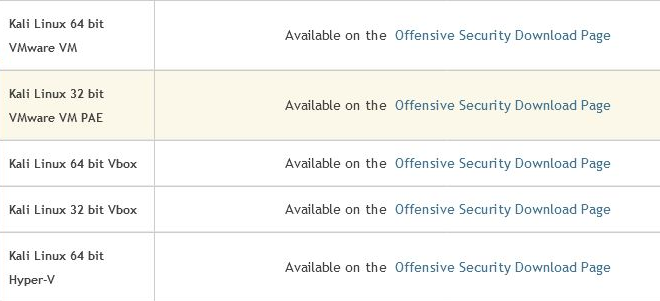
On the Downloads page, you can select the official Kali Linux image based on the following items:
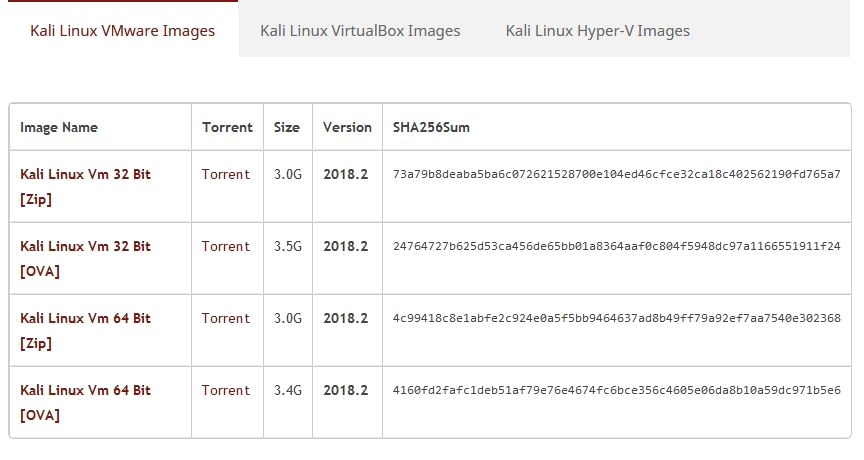
Images for VMware, VirtualBox, and Hyper-V can also be downloaded from the Offensive Security Downloads page at https://www.offensive-security.com/kali-linux-vm-vmware-virtualbox-hyperv-image-download/, as seen in the following screenshot:
Kali Linux Custom ARM downloads can be downloaded from https://www.offensive-security.com/kali-linux-arm-images/. Images can be downloaded for devices such as Chromebooks, Raspberry Pi, and others by clicking on the arrow to the right of the device names.
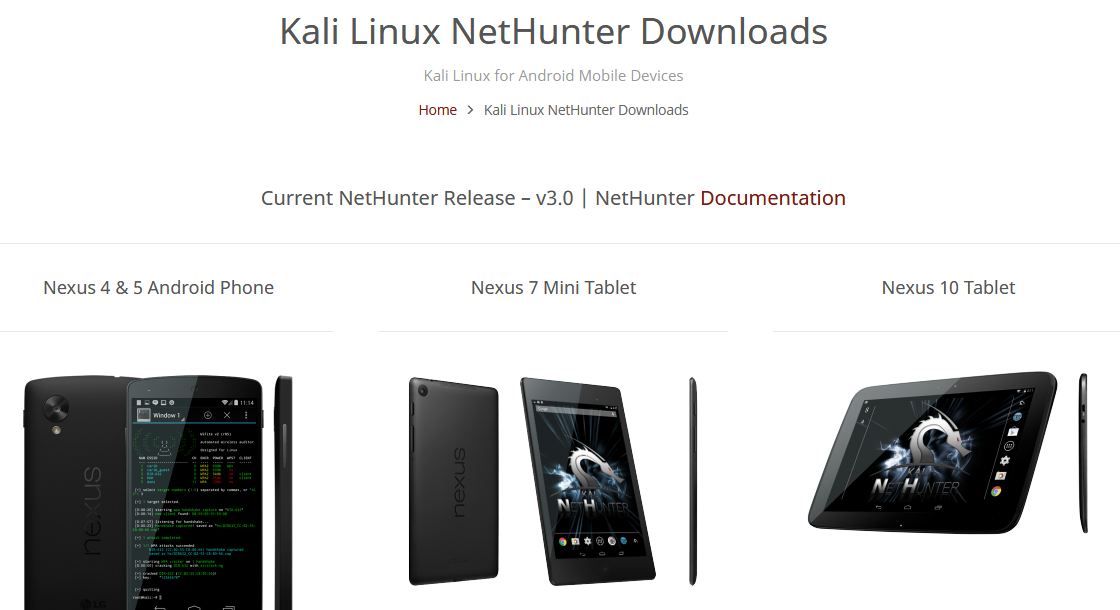
Kali NetHunter v3.o can be downloaded from the Offensive Security website at https://www.offensive-security.com/kali-linux-nethunter-download/.
More on choosing, installing, and using the appropriate version of NetHunter will be discussed in later chapters:
If you want to burn the image to a DVD or install Kali Linux on your machine, you might want to download the ISO image version. However, if you want to use Kali Linux in a virtual environment such as VirtualBox, VMWare, or Hyper-V, you can use the relevant image files to speed up the installation and configuration for a virtual environment, available at https://www.offensive-security.com/kali-linux-vm-vmware-virtualbox-hyperv-image-download/.
After you have downloaded the image file successfully, you need to compare the SHA hash value from the downloaded image with the sha256sum hash value provided on the download page. The purpose of checking the SHA-256 value is to ensure the integrity of the downloaded image is preserved. This prevents the user from either installing a corrupt image or an image file that has been maliciously tampered with.
In the UNIX/Linux/BSD operating system, you can use the sha256sum command to check the SHA-256 hash value of the downloaded image file. Remember that it might take some time to compute the hash value of the Kali Linux image file due to its size. For example, to generate the hash value of the kali-linux-2018.2-amd64.iso file, the following command is used:
sha256sum kali-linux-2018.2-amd64.iso
For Windows users, a small and free tool created by Raymond Lin, called the MD5 & SHA Checksum Utility, can be used. This tool calculates MD5, SHA-1, SHA-256, and even SHA-512 hashes of files and also allows for the comparison and verification of hashes.
The MD5 & SHA Checksum Utility can be downloaded at: https://download.cnet.com/MD5-SHA-Checksum-Utility/3000-2092_4-10911445.html. Once downloaded and run, click on the Browse button and browse to the path of the downloaded file. In this instance, I'll be using my kali-linux-2018.2-amd64.iso file, as seen in this screenshot:
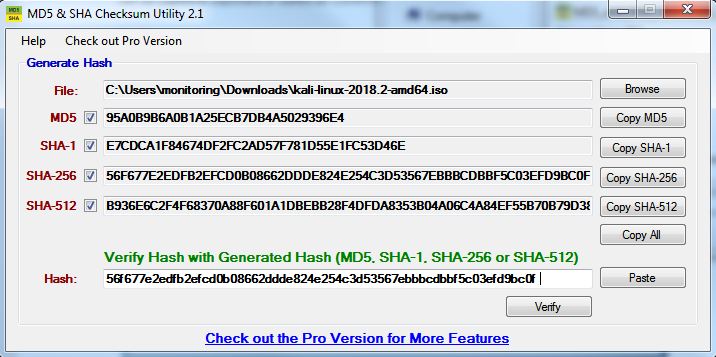
In the preceding screenshot, the hash of the kali-linux-2018.2-amd64.iso file was also copied from the Kali Linux Downloads page and pasted into the Hash field for verification. Click on the Verify button to compare and verify the SHA-256 hashes:
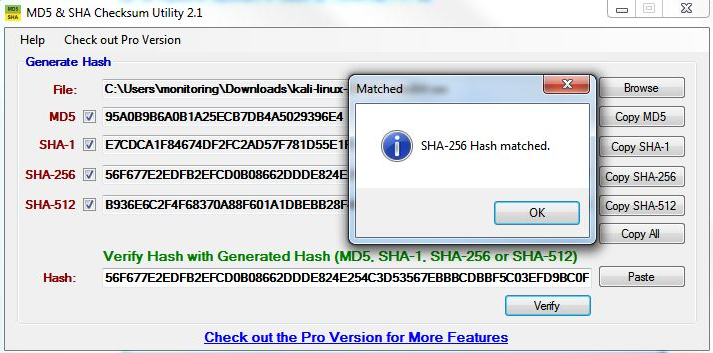
If both the values match, you can go straight to the Using Kali Linux section. However, if they do not match, it means that your image file is broken; you may want to download the file again from an official download mirror. When we run the hash of our downloaded file and compare it to the hash on the website, we see that they match, indicating that the package has been fully downloaded and is complete.
Using Kali Linux
You can use Kali Linux in one of the following ways:
- You can run Kali Linux directly from the Live DVD
- You can install Kali Linux on the hard disk and then run it
- You can install Kali Linux on the USB disk (as a portable Kali Linux)
In the following sections, we will briefly describe each of those methods.
Running Kali using a Live DVD
If you want to use Kali Linux without installing it first, you can do so by burning the ISO image file to a DVD. After the burn process finishes successfully, boot up your machine with that DVD. You need to make sure that you have set the machine to boot from the DVD.
The advantage of using Kali Linux as a Live DVD is that it is very fast to set up and is very easy to use.
Unfortunately, a Live DVD has several drawbacks; for example, any files or configuration changes will not be saved after a reboot. Additionally, running Kali Linux from the DVD is slow compared to running Kali Linux from the hard disk because the DVD's reading speed is slower than the hard disk's reading speed.
This method of running Kali is recommended only if you just want to test Kali. However, if you want to work with Kali Linux extensively, we suggest that you install Kali Linux.
Installing on a hard disk
To install Kali Linux on your hard disk, you can choose one of the following methods:
- Installation on a physical/real machine (regular installation)
- Installation on a virtual machine
You can choose whichever method is suitable for you, but we personally prefer to install Kali Linux on a virtual machine.
Installing Kali on a physical machine
Before you install Kali Linux on a physical/real machine, make sure that you install it on an empty hard drive. If your hard drive already has some data on it, that data will be lost during the installation process because the installer will format the hard drive. For the easiest installation, it is recommended that you use the entire hard disk. For more advanced setups, there is the option of installing Kali Linux on a partition of a single logical drive. To do this, you will have to have a primary partition that boots the operating system and another partition for Kali Linux. Take care when doing this because it is easy for the bootable operating system to become corrupted.
There are several tools that can be used to help you perform disk partitioning. In the open source area, the following Linux Live CDs are available:
- SystemRescueCD (http://www.sysresccd.org/)
- GParted Live (http://gparted.sourceforge.net/livecd.php)
- Kali Linux (http://www.kali.org)
To use the Linux Live CD, you just need to boot it up and you are ready for disk partitioning. Make sure that you back up your data before you use the Linux Live CD disk-partitioning tool. Even though they are safe for use in our experience, there is nothing wrong with being cautious, especially if you have important data on the hard disk.
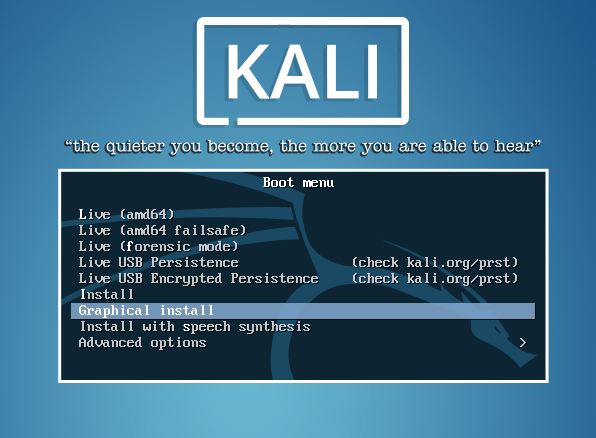
After you are done with the disk partitioning (or you just want to use all the hard disk space), you can boot your machine using the Kali Linux Live DVD and select the Install or Graphical install option when you are prompted with the Kali Linux Live CD menu:
After that, you will see an installation window. You need to set up several things during the installation process:
- Set Language: The default is English.
- Selection Location: Use the drop-down menu to select your country.
- Configure the Keyboard: Select the keyboard that best fits your needs.
- Host Name for the system: The default is Kali. For beginners, you can leave the default in place. Host names are often used in enterprise environments where an accounting of all systems connected to the network is necessary.
- Set the Domain: For beginners, this should be left blank. This would only be used if the installation was to be part of a network domain.
- Set Password: This will be the password for the ROOT account. Choose a strong one, do not share it, and do not forget it.
- Configure the clock: Choose your time zone.
- Partition Disk: The installer will guide you through the disk partitioning process. If you use an empty hard disk, just select the default Guided - use entire disk option for convenience. If you have some other operating system installed on your machine, you might first want to create a separate partition for Kali Linux and then select Manual in this menu. After you have selected a suitable menu, the installer will create the partition.
- The installer will ask you about the partitioning scheme; the default scheme is All files in one partition. Remember that if you want to store files in the home directory, you should select Separate /home partition so that those files won't be deleted if you reinstall the system. The /home partition's size really depends on your needs. If you want to put all your data in that directory, you may want a big partition size (more than 50 GB). For average use, you can go ahead with 10 to 20 GB.
- For beginners, it is recommended that you select the Guided - use entire disk option. Then, select the disk that you want to install Kali Linux to. Select All files in one partition.
- The installer will display an overview of your currently configured partitions, as shown in the following screenshot:
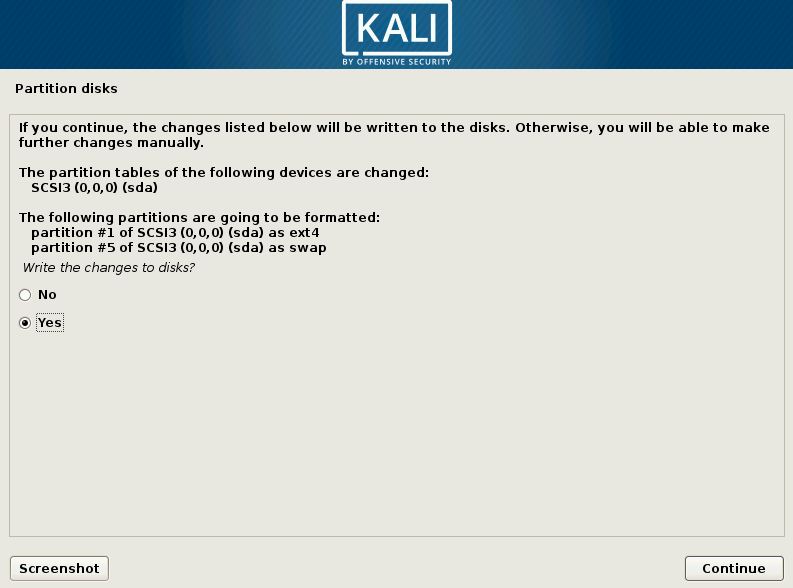
- Make sure Finish partitioning and write changes to disk is selected and then click Continue. Finally, click the Yes radio button and click Continue to write the changes to the disk.
- Network Mirror: For beginners, choose no. We will cover updating Kali Linux.
- Next, the installer will install the Kali Linux system. The installation will be completed in several minutes and you will have Kali Linux installed on your hard disk afterwards. In our test machine, the installation took around 20 minutes.
- After the installation is finished, the installer will ask you to configure the package manager. Next, it will ask you to install GRUB to the Master Boot Record (MBR). You can just choose the default values for these two questions. Beware: if you have some other operating system on the same machine, you should not choose to install GRUB to the MBR.
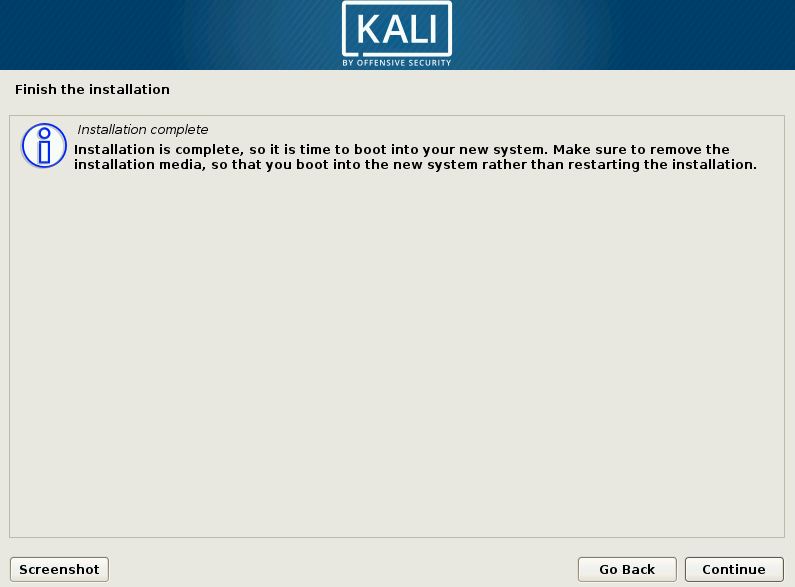
- If you see the following message, it means that your Kali installation is complete:
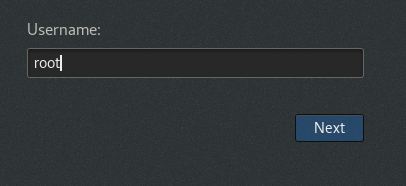
- You can restart the machine to test your new Kali installation by selecting the Continue button. After restarting, you will see the following Kali login screen. You can log in using the credentials that you configured in the installation process. The default username is root:
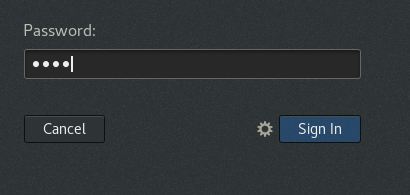
The default password is toor:
Installing Kali on a virtual machine
You can also install Kali Linux on a virtual machine environment as a guest operating system. The advantages of this type of installation are that you do not need to prepare a separate physical hard disk partition for the Kali Linux image and can use your existing operating system as is.
Unfortunately, there is also the disadvantage of running Kali Linux on a virtual machine; it is slower than running Kali Linux on a physical machine.
There are two options that can be utilized for installing Kali Linux on a virtual machine. The first option is to install the Kali Linux ISO image into a virtual machine. This option will take more time compared to VMware image installation. The advantage of this method is that you can customize your Kali installation.
Installing Kali on a virtual machine from the ISO image
To install a Kali Linux ISO image on a virtual machine, these steps can be followed:
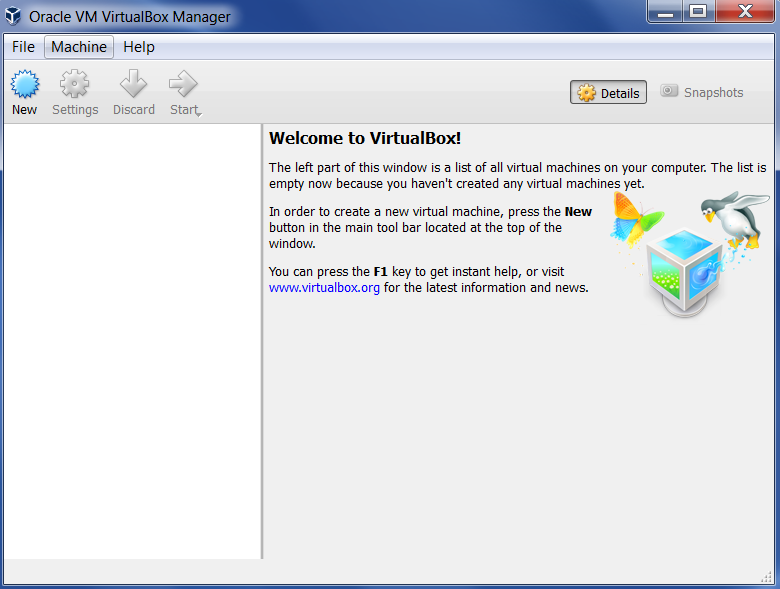
- Create a new virtual machine by selecting New from the VirtualBox toolbar menu:
- After that, you need to define the virtual machine's name and the operating system's type. Here, we set the VM's name to Kali Linux and we choose Linux for the OS type and Debian for the version.
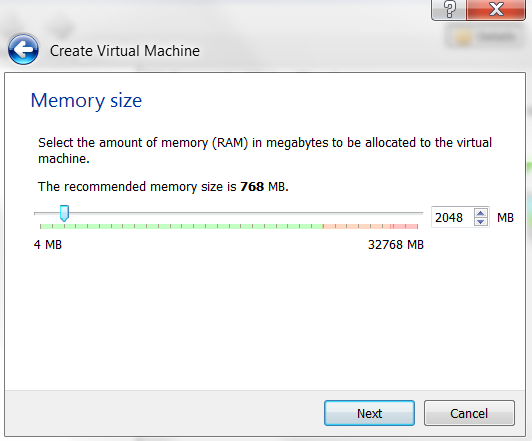
- Then, you need to define the VM's base memory size. The more memory you provide, the better the virtual machine will be. Here, we allocated 2,048 MB of memory to the Kali Linux virtual machine. Remember that you can't give all of your physical memory to the VM because you still need the memory to run your host operating system:
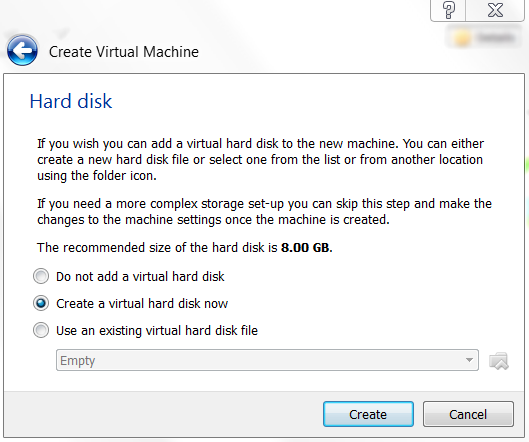
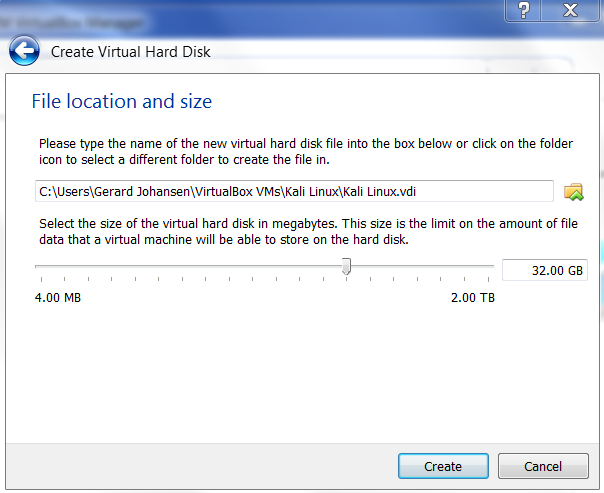
- Next, you will be asked to create a virtual hard disk. You can just select VDI as the hard disk type along with a dynamically allocated virtual disk file. We suggest creating at least a 32 GB virtual hard disk. If you want to install some software packages later on, you may want to create a larger virtual hard disk. Choose Create a virtual hard disk now and click Create:
- Now select a file location and size. Click Create:
- Read the dialog box and click Continue.
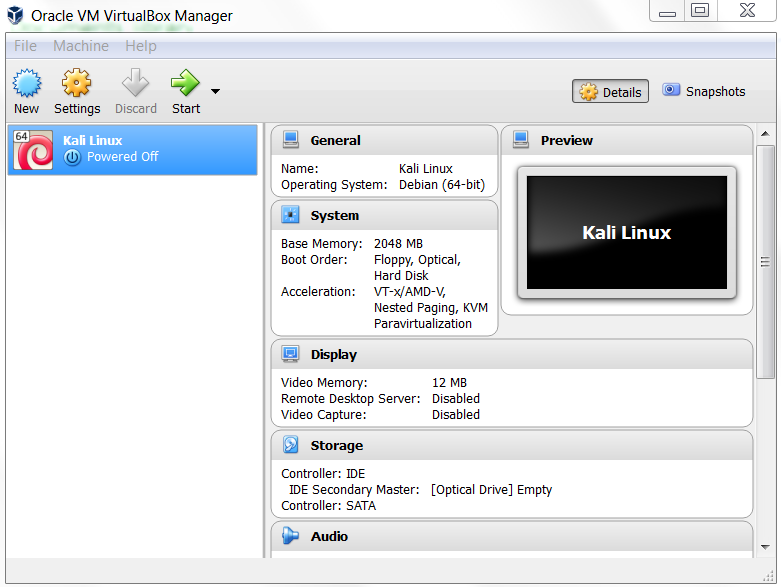
- After this, your newly created VM will be listed in the VirtualBox menu:
- Double-click on the new Kali Linux VM:
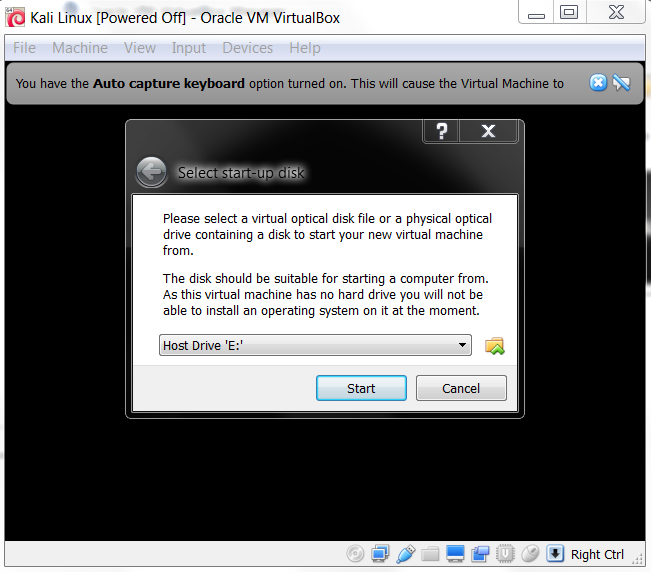
- Using the file icon, navigate to where you have the Kali Linux 2018.2 ISO of your choice. Once selected, click Start.
- Once the installation starts, follow the directions as they were defined in the previous section on installing Kali Linux 2.0.
Installing Kali Linux on a virtual machine using the Kali Linux VM image provided
The second option is using the VMware image provided by Kali Linux.
With this option, you can install Kali Linux on a virtual machine with ease; it is located on the Kali Linux Downloads page at https://www.offensive-security.com/kali-linux-vm-vmware-virtualbox-image-download/:
After clicking Kali Virtual Images, we are brought to another page listing the packages and their associated sha256sum values on the Offensive Security page:

After downloading the Kali Linux VMware image (kali-linux-2018.2-vm-amd64.zip), you need to verify the SHA256 hash of the downloaded file with the hash value provided on the download page. If the hash value is the same, you can extract the image file to the appropriate folder.
As the VMware image is compressed in the ZIP format, you can use any software that can extract a .gz file such as gzip, or 7-Zip if you use a Windows operating system. If you have extracted it successfully, you will find 13 files in the directory:
- To create the new virtual machine using this VM image file, select New from the VirtualBox icon toolbar.
- We will use Kali Linux from VM as the VM name and choose Linux as the operating system and Debian as the version.
- We configure the Kali Linux virtual machine to use 2,048 MB as its memory size.
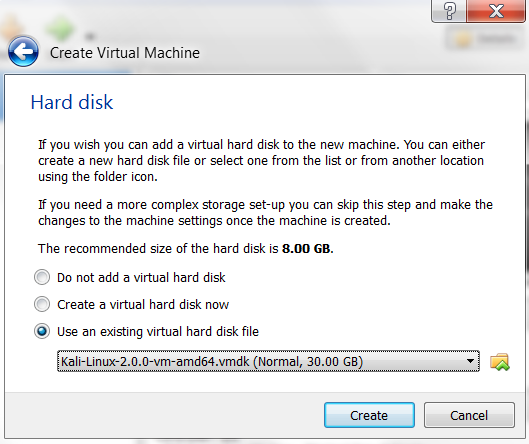
- Next, we define the virtual hard disk to Use an existing virtual hard drive file. Then, we select the kali-linux-2018.2-vm-amd64.vmdk file for the hard disk. After that, we choose Create to create the virtual machine, as shown in the following screenshot:
The following is the default configuration of the Kali Linux VMware image:
- Hard disk size: 30 GB
- Network type: NAT
- Username: root
- Password: toor
If successful, you will see the new virtual machine in the virtual manager list in Virtual Box.
To run the Kali Linux virtual machine, click on the start icon at the top of the VirtualBox menu bar. After the boot process, Kali Linux will display its login prompt.
If there are any error messages, install the VirtualBox Extension Pack. You can get it from http://www.virtualbox.org/wiki/Downloads.
Clicking OK will bring you to the following dialog:
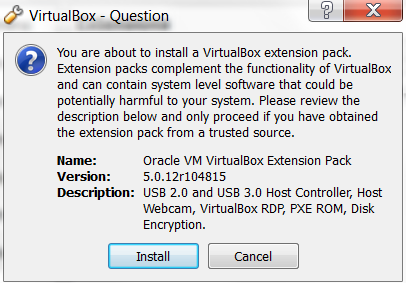
Go ahead and click on Install and then click on OK.
Saving or moving the virtual machine
There are two other advantages to using Kali Linux as a virtual machine. The first is the ease with which the virtual machine can be paused. Pausing the virtual machine allows you to suspend your activity without losing any of your work. For example, if you have to shut down the host system and the virtual machine is still processing an action, suspending it will allow you to pick up right where you left off. To pause the virtual machine, click on the Pause button located at the upper-left-hand corner of the virtual machine window.
Another feature of the virtual machine is the ability to move it from one host to another. This is very handy if you need to change host systems, for example, running on a laptop and then moving it to a newer, more powerful laptop. This ensures that any configurations or modifications you have made remain, so that you do not have to go through the whole process again.
To export a virtual machine, go to File and click on Export Appliance. You will then be guided through exporting the Kali Linux virtual machine. Select a location to export to and leave the application settings the same. Finally, click Export and the virtual machine will be exported to the location. This may take some time, depending on how large the virtual machine is.
Once the export has concluded, you can use whatever storage device you would like and transfer the virtual machine to another host system. Keep in mind that if you use Oracle VirtualBox to create the virtual machine, use the same version on the new host computer. Once it has transferred, you can import the virtual machine by going to File, Import Appliance, and following the instructions.
Installing Kali on a USB disk
The third option to use Kali Linux is by installing it on a USB flash disk; we call this method Portable Kali Linux. According to the official Kali documentation, this is Kali developers' favorite and fastest method of booting and installing Kali. Compared to the hard disk installation, you can run Kali Linux using any computer that supports booting from the USB flash disk with this method.
There are several tools available to create portable Kali Linux. One of them is Rufus (http://rufus.akeo.ie/). This tool can be run only from a Windows operating system.
You can use other tools to create a bootable disk from the ISO image, such as these:
- Win32DiskImager (https://launchpad.net/win32-image-writer)
- Universal USB Installer (http://www.pendrivelinux.com/universal-usb-installer-easy-as-1-2-3/)
- LinuxLive USB Creator (http://www.linuxliveusb.com)
Before creating portable Kali Linux, you need to prepare a couple of things:
- Kali Linux ISO image: Even though you can use the portable creator tool to download the image directly while making Kali Linux portable, we think it's much better to download the ISO first and then configure Rufus to use the image file.
- USB flash disk: You need an empty USB flash disk with enough space on it. We suggest using a USB flash disk with a minimum size of 16 GB.
After downloading Rufus, you can run it on your Windows computer by double-clicking on the rufus.exe file. You will then see the Rufus window.
If you use a UNIX-based operating system, you can create the image using the dd command. The following is an example of imaging:
dd if=kali-linux-2.0-i386.iso of=/dev/sdb bs=512k
To create a bootable Kali USB flash disk, we need to fill in the following options:
- For Device, we choose the location of the USB flash disk. In my case, it is the E drive in my Windows system.
- For Partition scheme and target system type, set it to MBR partition scheme for BIOS or UEFI computers.
- In the Create a bootable disk using option, set the value to ISO image and select the ISO image using the disk icon:
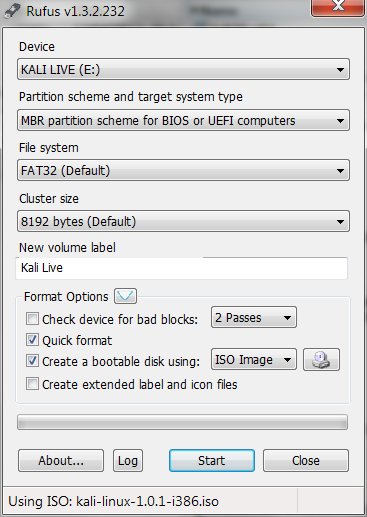
- Click on Start to create the bootable image.
After the process is complete, save all your work first and then reboot your system if you want to try the USB flash disk right away. You may want to configure your Basic Input Output System (BIOS) to boot it from the USB disk. If there is no error, you can boot up Kali Linux from the USB flash disk.
Configuring the virtual machine
Once installed, there are several configuration steps necessary for the Kali Linux virtual machine. These steps allow for greater functionality and usability.
VirtualBox guest additions
It is recommended that after you have successfully created the Kali Linux virtual machine using VirtualBox, you install VirtualBox guest additions. This add-on will provide you with the following additional features:
- It will enable the virtual machine to be viewed in full screen
- It will make the mouse move faster in the virtual machine
- It will enable you to copy and paste the text between the host and guest machine
- It will enable the guest and host machines to share folders
To install the guest additions, perform the following steps:
- From the VirtualBox menu, navigate to Devices | Install Guest Additions. You will then see that the VirtualBox guest addition file is mounted as a disk.
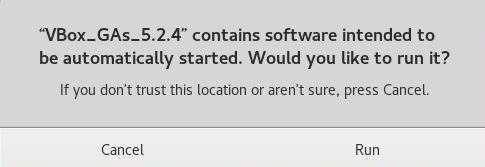
- The VirtualBox will then display the following message. Click on Cancel to close the window:
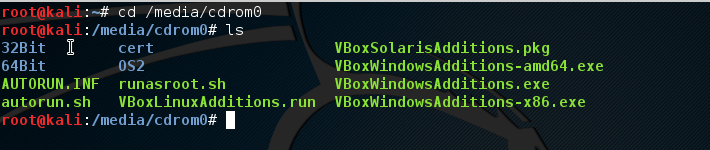
- Open the Terminal console and change the VirtualBox guest additions CD ROM mount point (/media/cdrom0):
- Execute VBoxLinuxAdditions.run to run the VirtualBox guest additions installer by typing sh ./VBoxLinuxAdditions.run, as seen here:
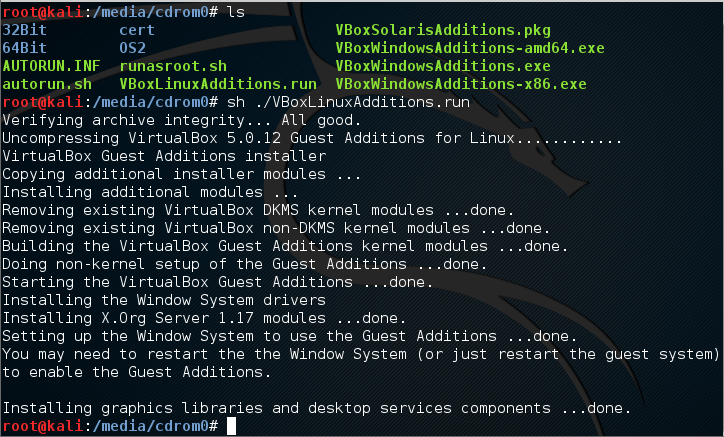
You may need to wait for several minutes until all of the required modules are successfully built and installed. Follow these steps to switch the VM to full-screen mode:
- Change to the root home directory.
- Eject the VBoxAdditions CD image by right-clicking on the icon and selecting Eject from the menu. If successful, the VBoxAdditions icon will disappear from the desktop.
- Reboot the virtual machine by typing the reboot command in the terminal console.
- After the reboot, you can switch to full screen (View | Switch to fullscreen) from the VirtualBox menu.
Setting up networking
In the following section, we will discuss how to set up networking in Kali Linux for a wired and wireless network.
Setting up a wired connection
In the default Kali Linux VMware image or ISO configuration, Kali Linux uses Network Address Translation (NAT) as the network's connection type. In this connection mode, the Kali Linux machine will be able to connect to the outside world through the host operating system, whereas the outside world, including the host operating system, will not be able to connect to the Kali Linux virtual machine.
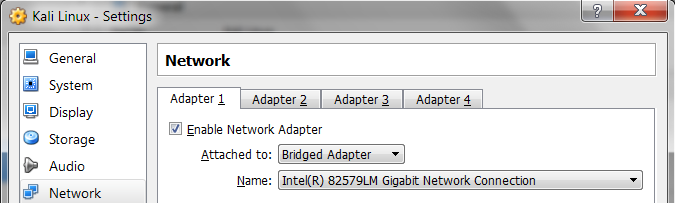
For the penetration testing task, you might need to change this networking method to Bridged Adapter. The following are the steps to change it:
- First, make sure you have already powered off the virtual machine.
- Then, open up the VirtualBox Manager, select the appropriate virtual machine—in this case we are using the Kali Linux virtual machine—and then click on the Network icon on the right-hand side and change the Attached to drop-down box from NAT to Bridged Adapter in Adapter 1. In the Name field, you can select the network interface that is connected to the network you want to test, as shown in the following screenshot:
To be able to use the bridge network connection, the host machine needs to connect to a network device that can give you an IP address via DHCP, such as a router or a switch.
As you may be aware, a DHCP IP address is not a permanent IP address; it's just a lease IP address. After several times (as defined in the DHCP lease time), the Kali Linux virtual machine will need to get a lease IP address again. This IP address might be the same as the previous one or might be a different one.
If you want to make the IP address permanent, you can do so by saving the IP address in the /etc/network/interfaces file.
The following is the default content of this file in Kali Linux:
- auto lo
- iface lo inet loopback
In the default configuration, all of the network cards are set to use DHCP to get the IP address. To make a network card bind to an IP address permanently, we have to edit that file and change the content to the following:
- auto eth0
- iface eth0 inet static
- address 10.0.2.15
- netmask 255.255.255.0
- network 10.0.2.0
- broadcast 10.0.2.255
- gateway 10.0.2.2
Here, we set the first network card (eth0) to bind to the IP address of 10.0.2.15. You may need to adjust this configuration according to the network environment you want to test.
Setting up a wireless connection
By running Kali Linux as a virtual machine, you cannot use the wireless card that is embedded in your host OS. Fortunately, you can use an external USB-based wireless card.
For this demonstration, we are using the USB Ralink wireless card/external antenna (there will be an in-depth discussion of wireless antenna selection later on in the section concerning wireless penetration testing):
- To activate your USB-based wireless card in the Kali virtual machine, plug in the wireless card to a USB port, navigate to Devices | USB Devices, and select your wireless card from the VirtualBox menu:
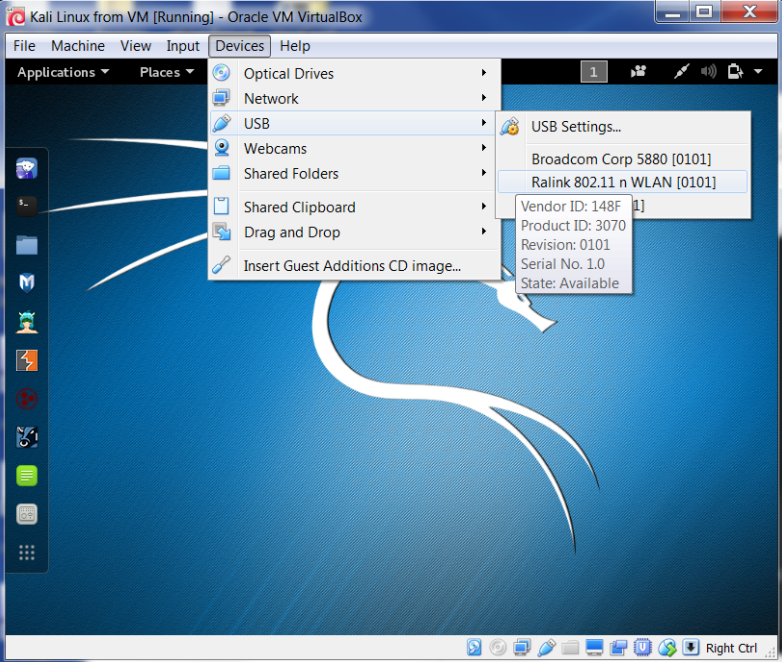
In this screenshot, we can see the USB device listed.
- If your USB wireless card has been successfully recognized by Kali, you can use the dmesg program to see the wireless card's information. Another option to determine whether your wireless device is properly connected is to open a Terminal and run this command:
ifconfig
If the wireless connection is properly configured, you should see a listing under the output with WLAN0 or WLAN1 listed:
- The output should include a listing for a WLAN. This is the wireless network connection.
- In the top-right section of the Kali menu, you will see the Network Connections icon. You can click on it to display your network information.
- You will see several networks' names, wired or wireless, available for your machine:
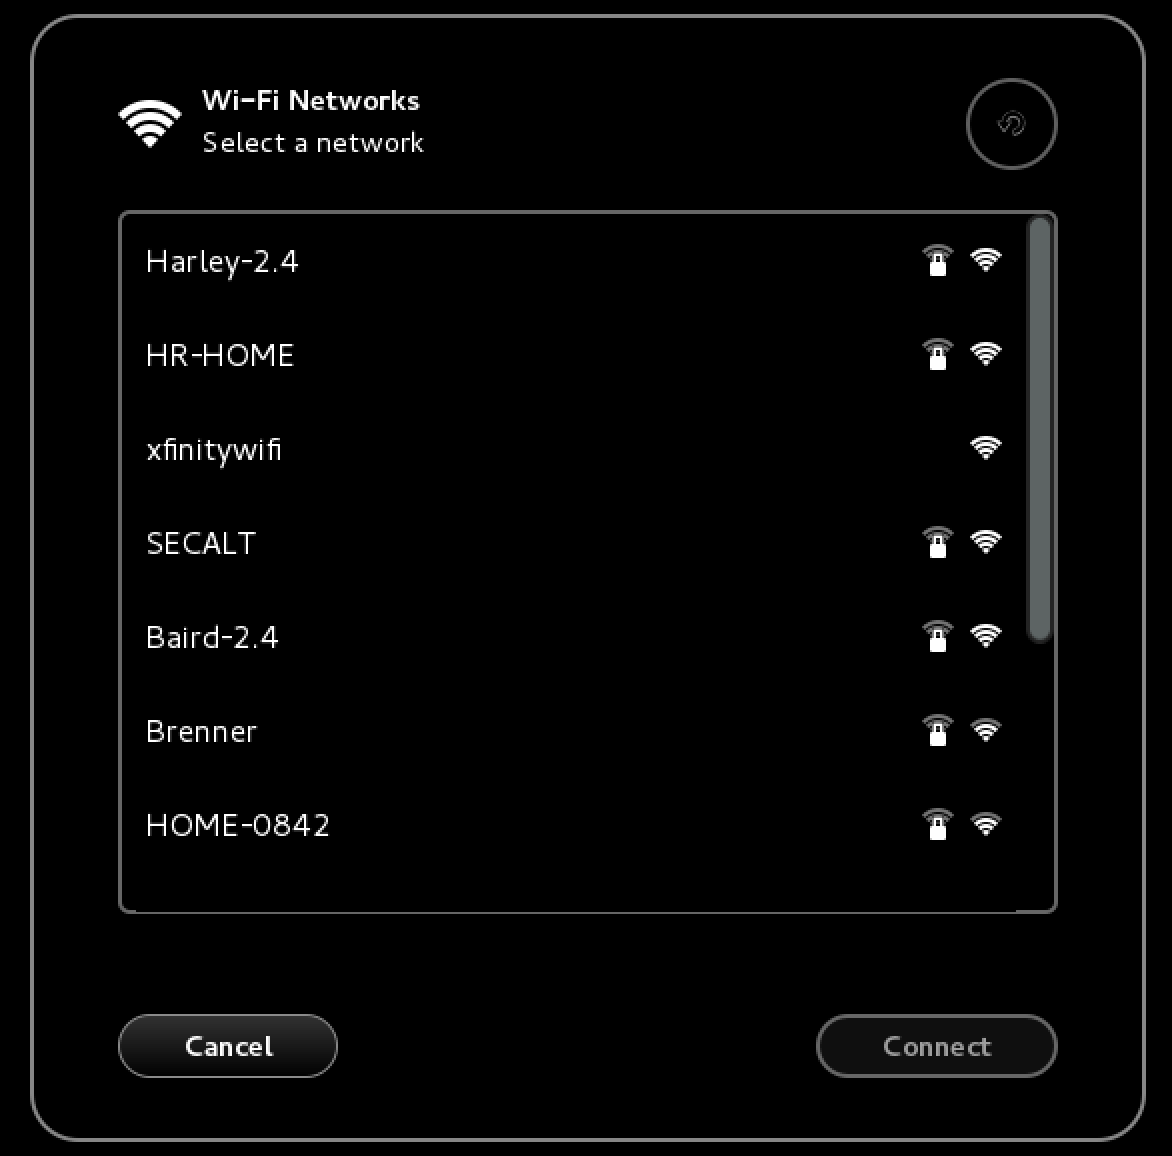
- To connect to the wireless network, just select the particular SSID you want by double-clicking on its name. If the wireless network requires authentication, you will be prompted to enter the password. Only after you give the correct password will you be allowed to connect to that wireless network.
Updating Kali Linux
Kali Linux consists of hundreds of pieces of application software and an operating system kernel. You may need to update the software if you want to get the latest features. We suggest that you only update the software and kernel from the Kali Linux software package repository.
The first thing to do after you have successfully installed and configured Kali Linux is to update it. As Kali is based on Debian, you can use the Debian command (apt-get) for the updating process.
The apt-get command will consult the /etc/apt/sources.list file to get the update servers. You need to make sure that you have put the correct servers in that file.
To update the sources.list file, open a Terminal and type the following command:
leafpad /etc/apt/sources.list
Copy the repository from the official website at https://docs.kali.org/general-use/kali-linux-sources-list-repositories, paste it into leafpad, and save it:
 deb http://http.kali.org/kali kali-rolling main contrib non-free
 # For source package access, uncomment the following line
 # deb-src http://http.kali.org/kali kali-rolling main contrib non-free
You need to synchronize the package's index files from the repository specified in the /etc/apt/sources.list file before you can perform the update process. The following is the command for this synchronization:
apt-get update
Make sure that you always run an apt-get update before performing a software update or installation in Kali. After the package index has been synchronized, you can perform software updates.
Two command options are available to perform an upgrade:
- apt-get upgrade: This command will upgrade all of the packages that are currently installed on the machine to the latest version. If there is a problem in upgrading a package, that package will be left intact in the current version.
- apt-get dist-upgrade: This command will upgrade the entire Kali Linux distribution; for example, if you want to upgrade from Kali Linux 1.0.2 to Kali Linux 2.0, you can use this command. This command will upgrade all of the packages that are currently installed and will also handle any conflicts during the upgrade process; however, some specific action may be required to perform the upgrade.
After you choose the appropriate command option to update Kali Linux, the apt-get program will list all of the packages that will be installed, upgraded, or removed. The apt-get command will then wait for your confirmation.
If you give confirmation, the upgrade process will start. Beware: the upgrade process might take a long time to finish depending on your internet connection speed.
Setting up Kali Linux AMI on Amazon AWS Cloud
Kali Linux can also be set up in the cloud as an Amazon Machine Image (AMI) in the Amazon Web Services platform, as a cloud computing service. Although listed with a cost of $0.046 per hour, it can be used for free if specifically configured as a basic service with the user not exceeding certain set limits. Although a credit card is required for sign-up and configuration, you will be notified before you are charged, should said limits be crossed.
Before we begin setting up Kali Linux in the cloud, you can first visit the Amazon Marketplace to view the details of the AMI at this link: https://aws.amazon.com/marketplace/pp/B01M26MMTT. Notice that it is listed as Free Tier.
To begin our setup and to configure Kali Linux in the cloud, we must perform the following steps:
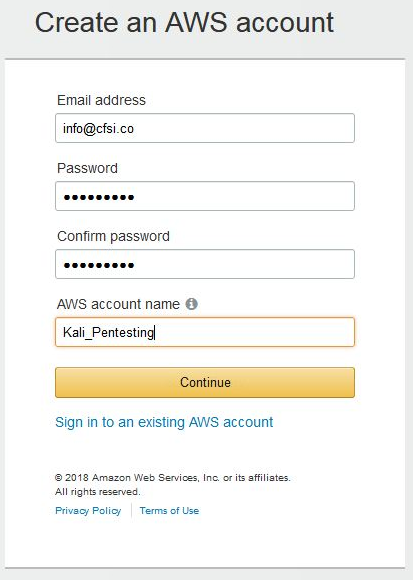
- First, create an account at Amazon's AWS portal. Visit https://aws.amazon.com/ and click on Create a new account. Be sure to remember the credentials used as well as the AWA Name you created, as seen in the screenshot:
- After clicking on Continue, complete the additional required details. When entering your credit card details, you may be prompted to have Amazon call you and have you enter a code for verification and security purposes. Once completed, you will be greeted with the AWS Console.
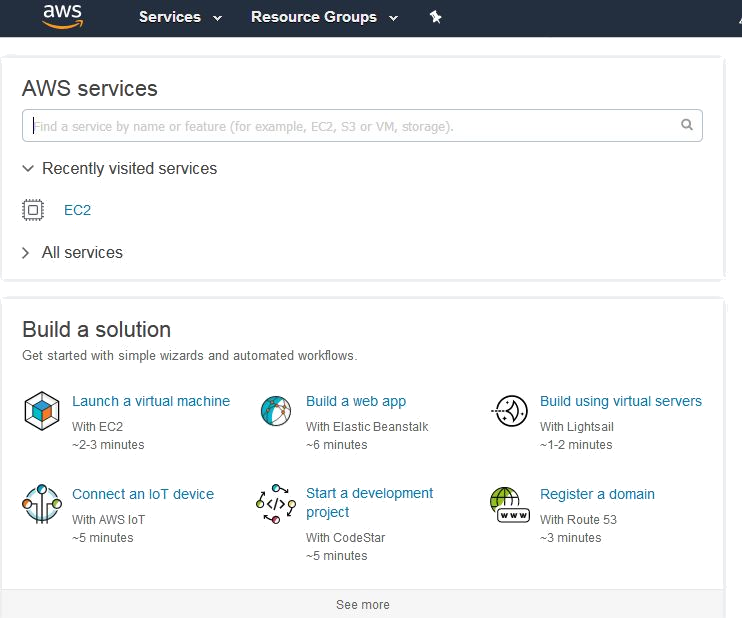
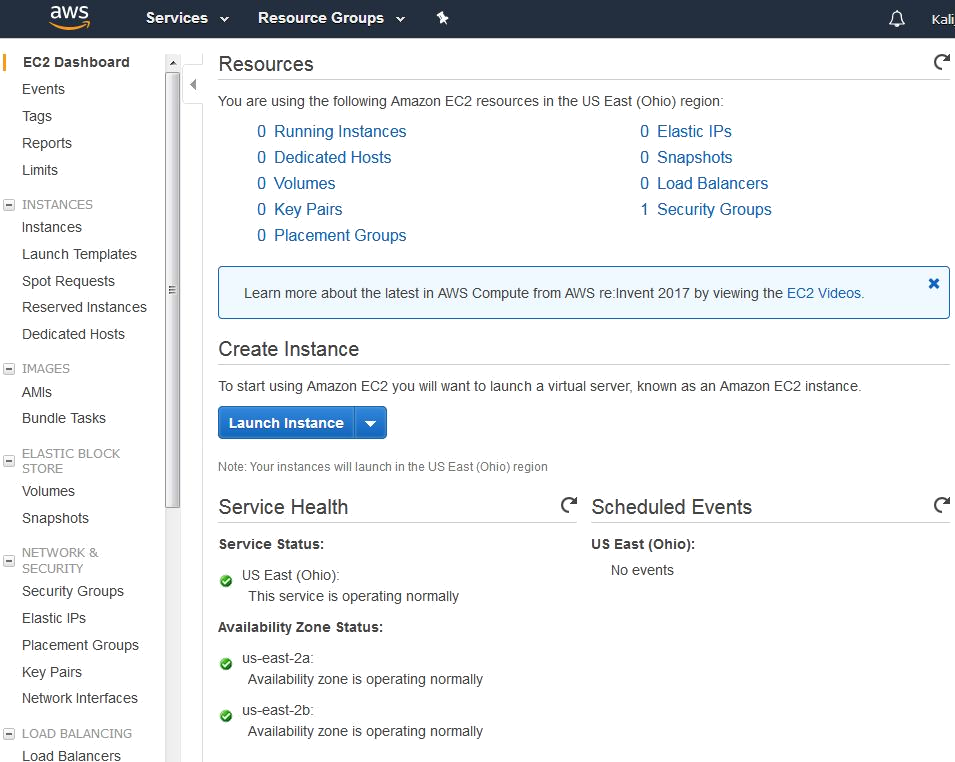
- You should also receive an email notification informing you that your account has been successfully created. You may now log in to the AWS console where you will be able to complete your configuration. Under the Build a solution section, click on Launch a virtual machine:
- Within the EC2 Dashboard of the AWS Console, on the left pane, click on Key pairs under the Network & Security category:
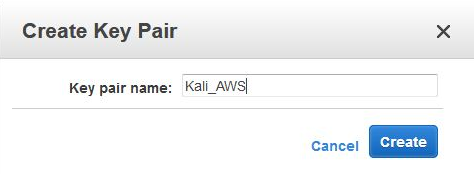
Next, click on Create Key Pair.
When prompted, type a name for your key pair. It is recommended that you choose a name and location that are easy to remember as you will need this Key Pair for authentication and verification:
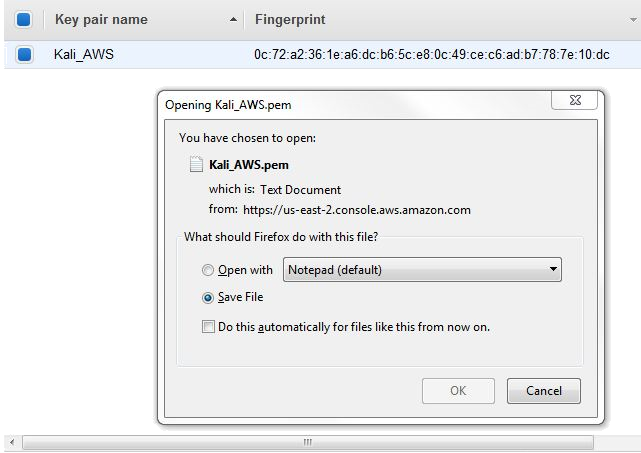
Save your Key Pair to a destination of your choice. Note that the key pair extension is listed as .pem and it also has a digital fingerprint in hexadecimal format, as seen here:
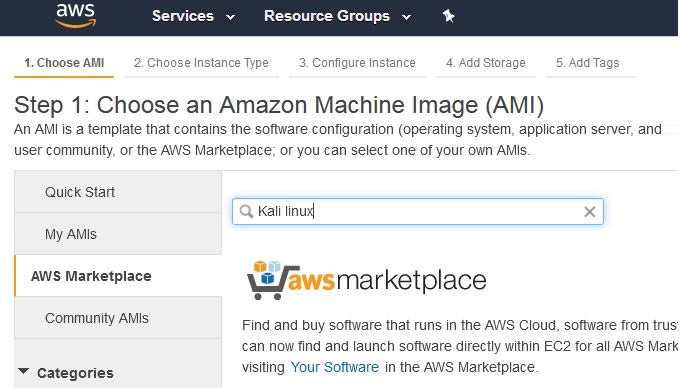
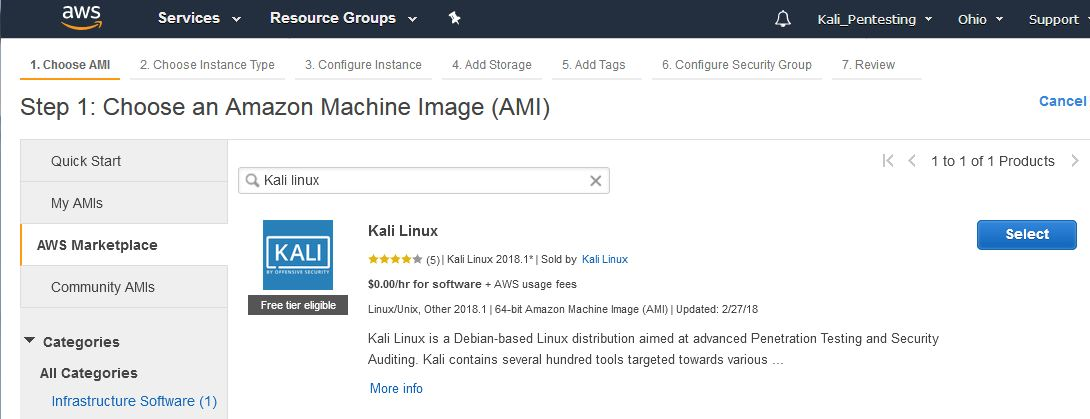
Once your key pair has been saved, return to the AWS console and click on Resource Groups at the top of the console and then choose Launch a Virtual Machine. In the menu at the left of the console, click on AWS Marketplace and enter Kali Linux in the search bar as seen here:
There is currently only once instance of a Kali Linux AMI in the marketplace. Notice that it is listed as Free tier eligible under the Kali logo. Click on Select to use this AMI:
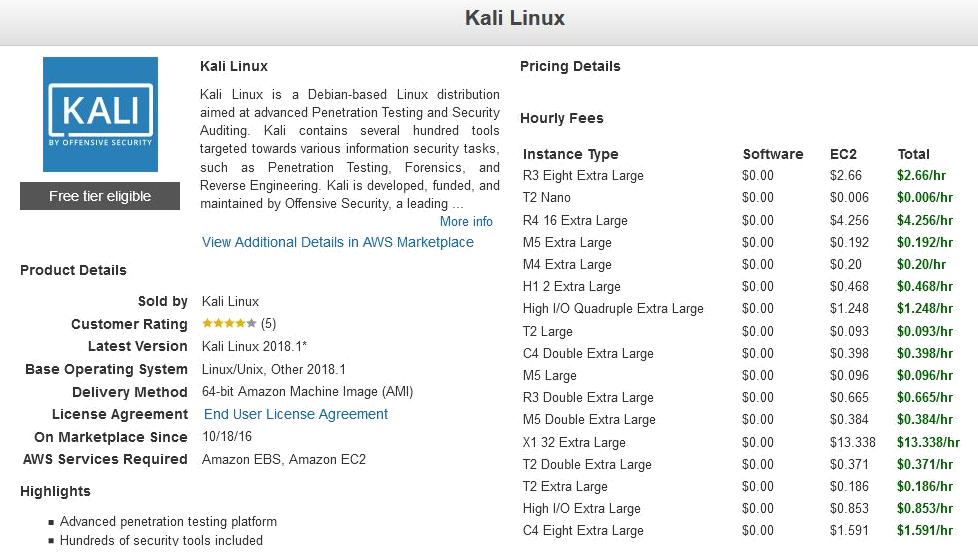
This brings us to the pricing details of the various Instance Types for AMIs, which package the specifications such as memory and processor usage available to the AMI, with T2 Nano having the lowest hourly rate of $0.006/hr. Once finished viewing the Instance Types, scroll to the bottom of the page and click on Continue:
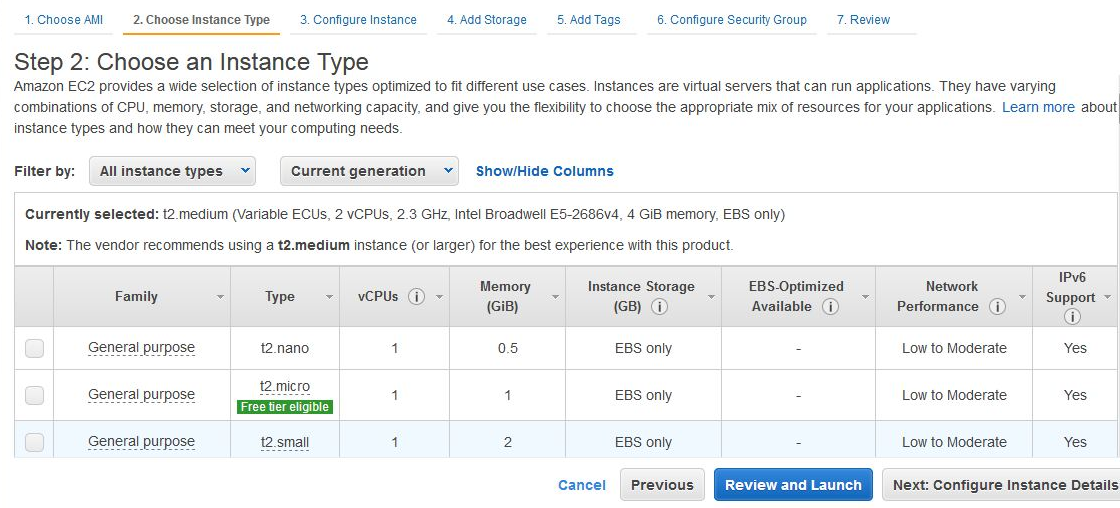
For the free version, select the t2 micro type as this is for general purpose use and is eligible for the Free Tier:
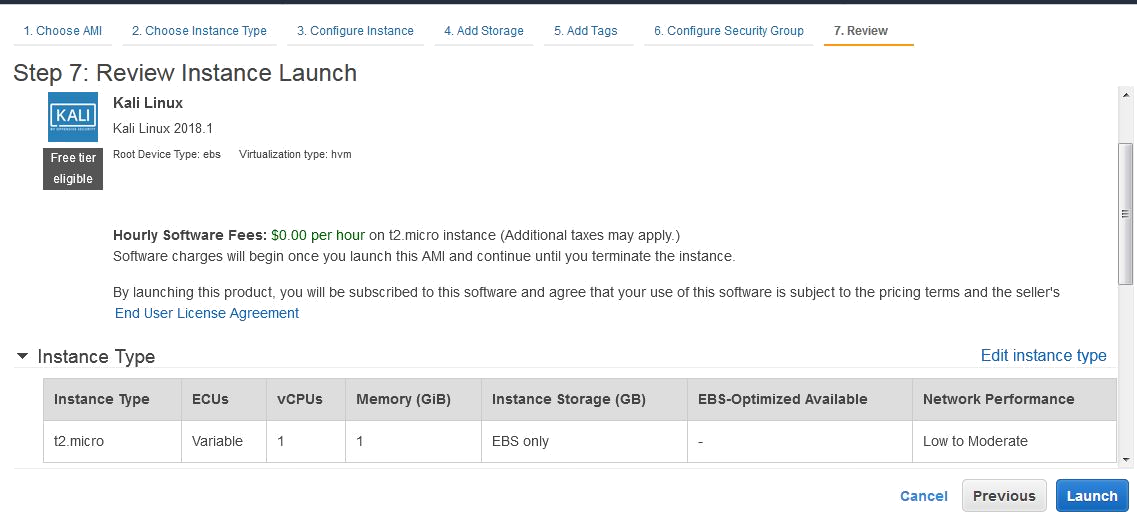
Click on the Review and Launch button. Confirm that the Instance Type chosen is t2.micro and click on Launch:
You should now be prompted to use your previously saved key pair. In the first drop-menu, select Choose and existing key pair. In the Select a key pair menu, browse to the location of your saved key pair. Click on the checkbox to acknowledge the terms and then lastly click on Launch Instances.
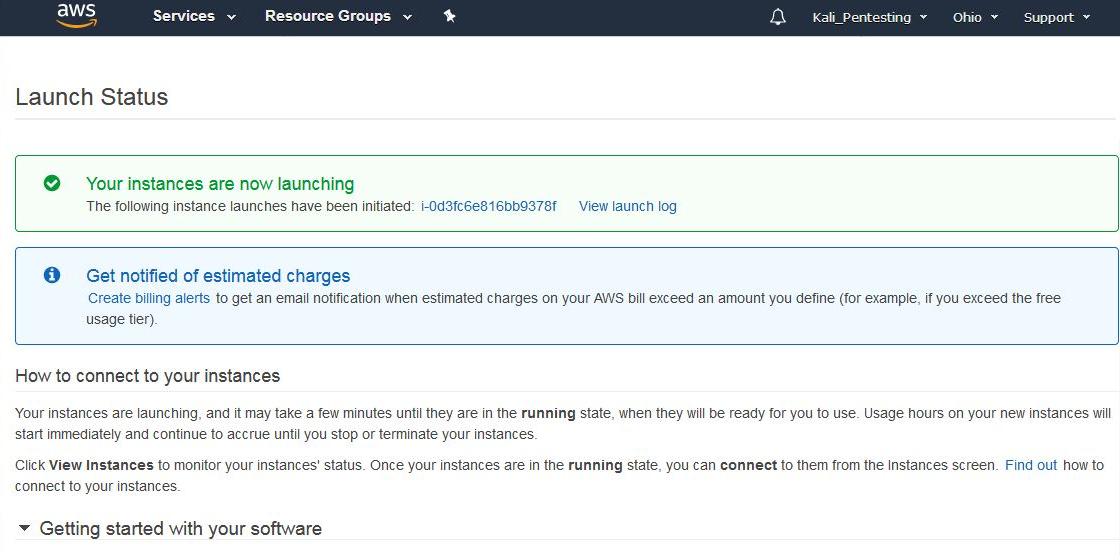
You should now be notified of the Launch Status of the Kali Linux AMI. You can also create billing alerts in the event that you exceed AWS's Free Tier usage:
Scroll down and click on View Usage Instructions:

Return to the Launch Status page and click on Open Your Software on AWS Marketplace. In the Software Subscriptions and AMI tab, click on View Instances.
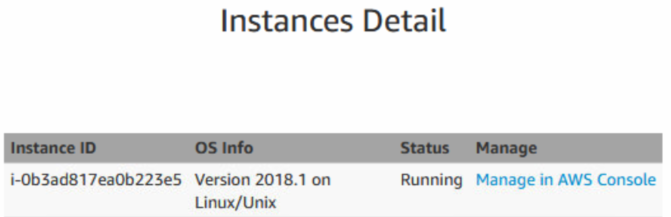
This presents a pop-up box displaying the details of the instance including the ID, OS Info, and Status. Click on Manage in the AWS Console:
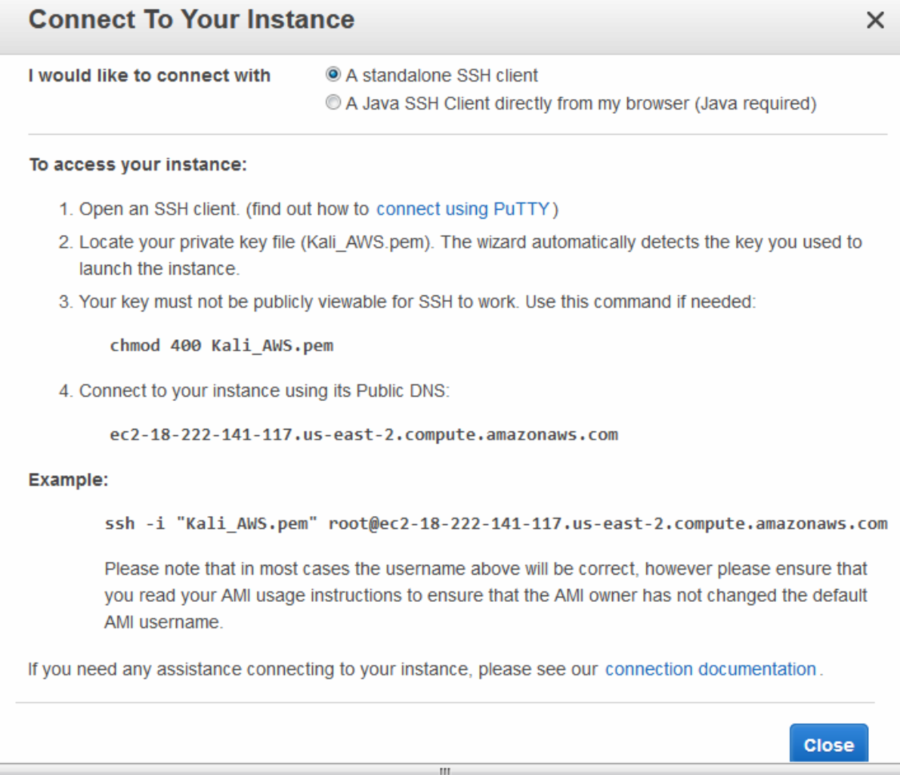
Click on the Connect button:

We are then presented with the options available to connect to our Instance, as well as instructions on how to do so using an SSH client such as PuTTY. Note that in the example listed, the name of the key pair is Kali_AWS.pem. When connecting via an SSH client, be sure to use the key pair name you chose in the previous steps:
Now we need a standalone Secure Shell (SSH) client to be able to connect to our Kali Linux instance in the cloud. We'll be using Putty as our standalone client and we will also require Puttygen to be able to authenticate with our cloud instance using our previously downloaded key pair. Both Putty and Puttygen come in 32-bit and 64-bit versions and can be downloaded from the following link: https://www.chiark.greenend.org.uk/~sgtatham/putty/latest.html?.
Be sure to download both putty.exe and puttygen.exe which are Windows executables. The machine I am using is of 64-bit architecture, therefore I'll be using the 64-bit versions.
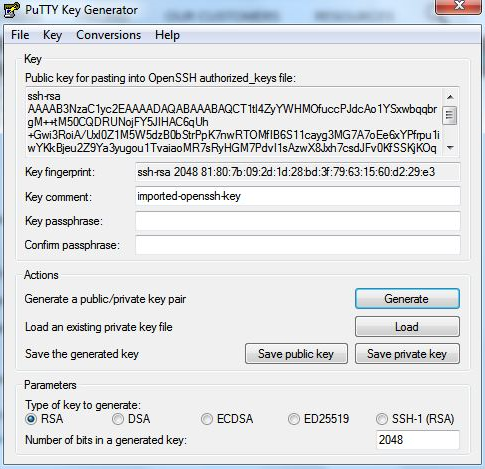
Once they are downloaded, run puttygen.exe first. Click on File and then click on Load Private Key. Now, browse to the key pair file you downloaded earlier. You may have to change the file type from PFF to All Files as the key file is in the older .pem format.
Once selected, you should be prompted to Save private key to be able to save it in Putty's format.
Once the Key has been located, click on the Save private key button:
Now, we can run and configure Putty.exe with the necessary settings to connect to our Kali instance in the AWS cloud.
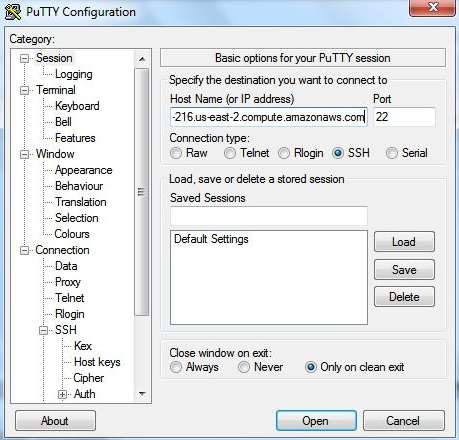
In the Session category in the left pane of Putty, enter the Public DNS URL shown in the Instances category in the dashboard. It should look like the URL in this screenshot:

Enter the Public DNS address into the Host Name area in Putty, as seen in the screenshot:
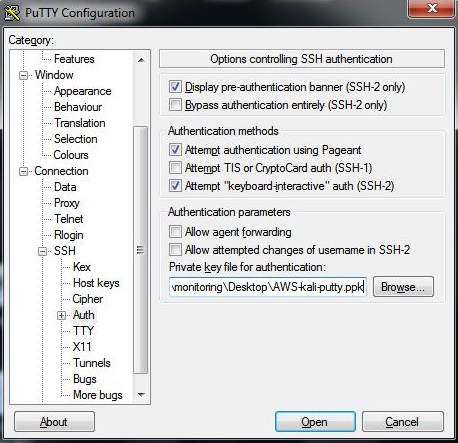
Next, scroll down to the SSH category in the left pane and click on the Auth sub-category. Click on the Browse button on the right pane to browse to the saved .ppk private key.
For the username, we will be using Ec2-user:
Click on the Open button and you should now be able to log in to your Kali instance in the cloud. Once connected, remember to update Kali.
Summary
When looking at the vast array of tools in the latest version of Kali Linux, we can see that there is functionality for a wide variety of security tasks. These include digital forensics, wireless security assessments, reverse engineering software, hacking hardware, and penetration testing.
There was also a discussion on the variety of ways that Kali Linux can be deployed. There is the ability to deploy Kali Linux using a live DVD or USB or SD card, installing it as a virtual machine, and also using it as the primary operating system on a standalone system or even in the cloud.
As with any other software, Kali Linux also needs to be updated, whether we only update the software applications or the Linux kernel included in the distribution.
In the next chapter, we will look at setting up our pentesting lab.
Questions
- What is the name of the mobile version of Kali Linux?
- What Windows tool can be used to verify the integrity of the downloaded Kali Linux image file?
- What is the Linux command to verify the integrity of the downloaded Kali Linux image file?
- What is the name of the tool that can be used to install Kali Linux and other Linux distributions on a flash drive or SD/micro-SD card?
- What are the various live modes for using Kali Linux?
- What command is used to update Kali Linux?
- When installing Kali Linux in the cloud using Amazon, which general purpose instance is eligible for Free Tier use?
Further reading
Additional information on Kali Linux installations can be found here: https://docs.kali.org/category/installation.
Additional information on dual-booting Kali Linux with Windows can be found here: https://docs.kali.org/installation/dual-boot-kali-with-windows.

